
You know that feeling? Thanksgiving is just around the corner, and you want your dessert spread to be absolutely show-stopping, like something you’d find in a swanky restaurant. We’re talking about achieving that *Restaurant-Style Thanksgiving Desserts at Home* magic! I remember a few years back, I desperately wanted to make a gluten-free pumpkin tart that looked like it belonged on a fancy menu. My first try? Total disaster – soggy bottom, sunken filling. Ugh! But that failure lit a fire in me. I realized the real secret wasn’t just more sugar or butter; it was all about technique. Once I started using my foundation flour blend system, everything clicked. The crust got perfectly crisp, the filling held its shape like a dream, and my guests still couldn’t believe it was gluten-free! That’s the pure joy of creating restaurant-level treats in your own kitchen. It’s where passion meets precision, and the results just taste like pure celebration. You can absolutely achieve this, even with dietary restrictions!
I’m Maria Rodriguez, and as a Certified Gluten-Free Culinary Master, I’ve turned those kitchen challenges into an art. This article is for you – the home baker who wants to wow your family and friends with desserts that are as beautiful as they are delicious, no matter what dietary needs you’re catering to. Get ready to impress!
The Secret to Restaurant-Style Thanksgiving Desserts at Home
So, what’s the magic trick to making your home Thanksgiving desserts taste like they came straight from a fancy restaurant? It’s really not about having secret ingredients, trust me! It comes down to a few core principles: focusing on **technique**, choosing **high-quality ingredients**, and paying attention to **presentation**. When you get these things right, even simple desserts can feel incredibly elevated. It’s all about that precision your favorite eateries use, making even a classic gluten-free roux or a flaky pie crust sing. That’s how we achieve those impressive results for your Restaurant-Style Thanksgiving Desserts at Home!
Mastering Classic Thanksgiving Pies with a Restaurant Touch
Okay, let’s talk pies! They’re the heart and soul of so many Thanksgiving tables, right? To really nail those Restaurant-Style Thanksgiving Desserts at Home, we need to give our classic pies a little bit of that restaurant polish. It’s all about taking what we know and just elevating it a notch. Think a crust that’s impossibly flaky, fillings that are perfectly balanced, and a look that says, “Wow, you made this?!” We’ll get that perfect golden hue and flavors that just sing.
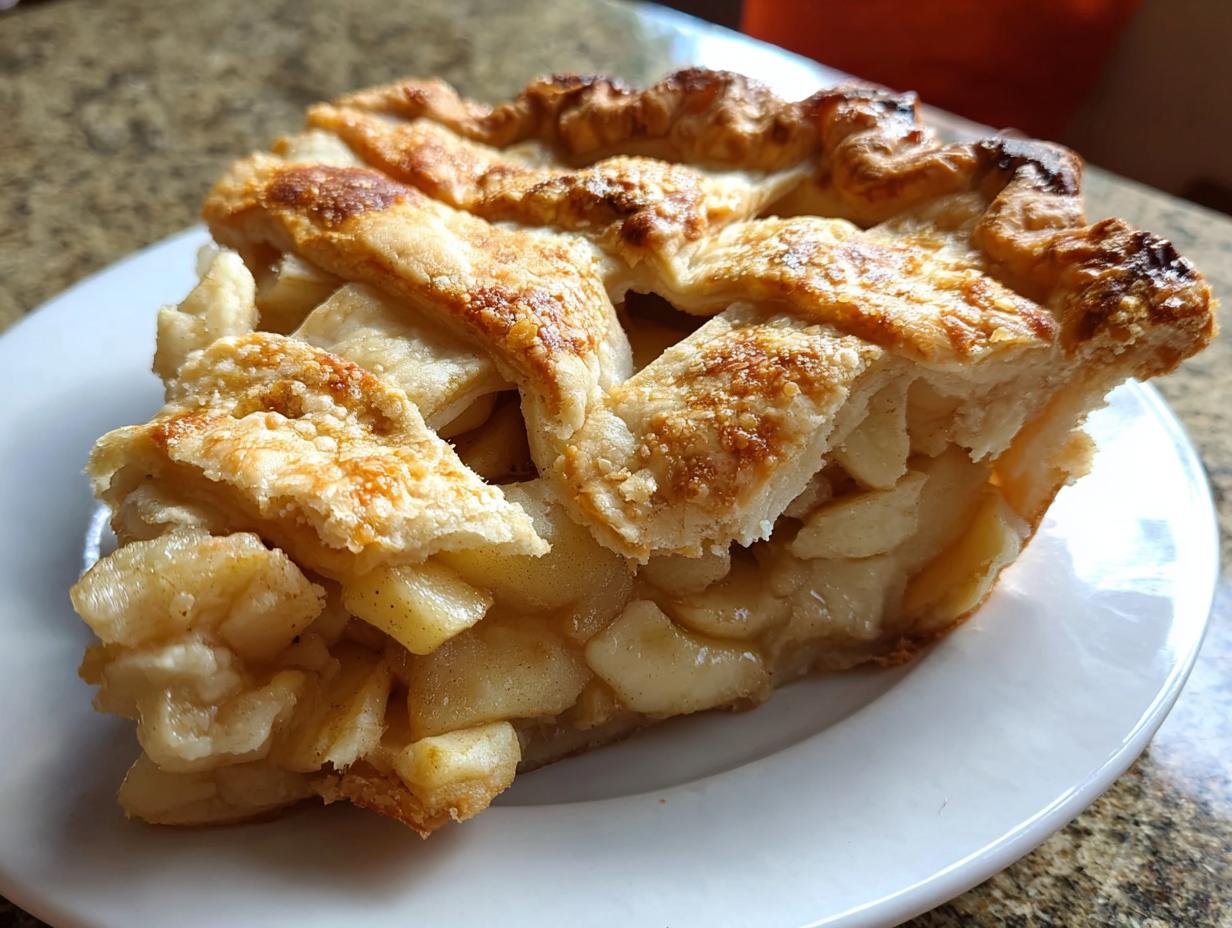
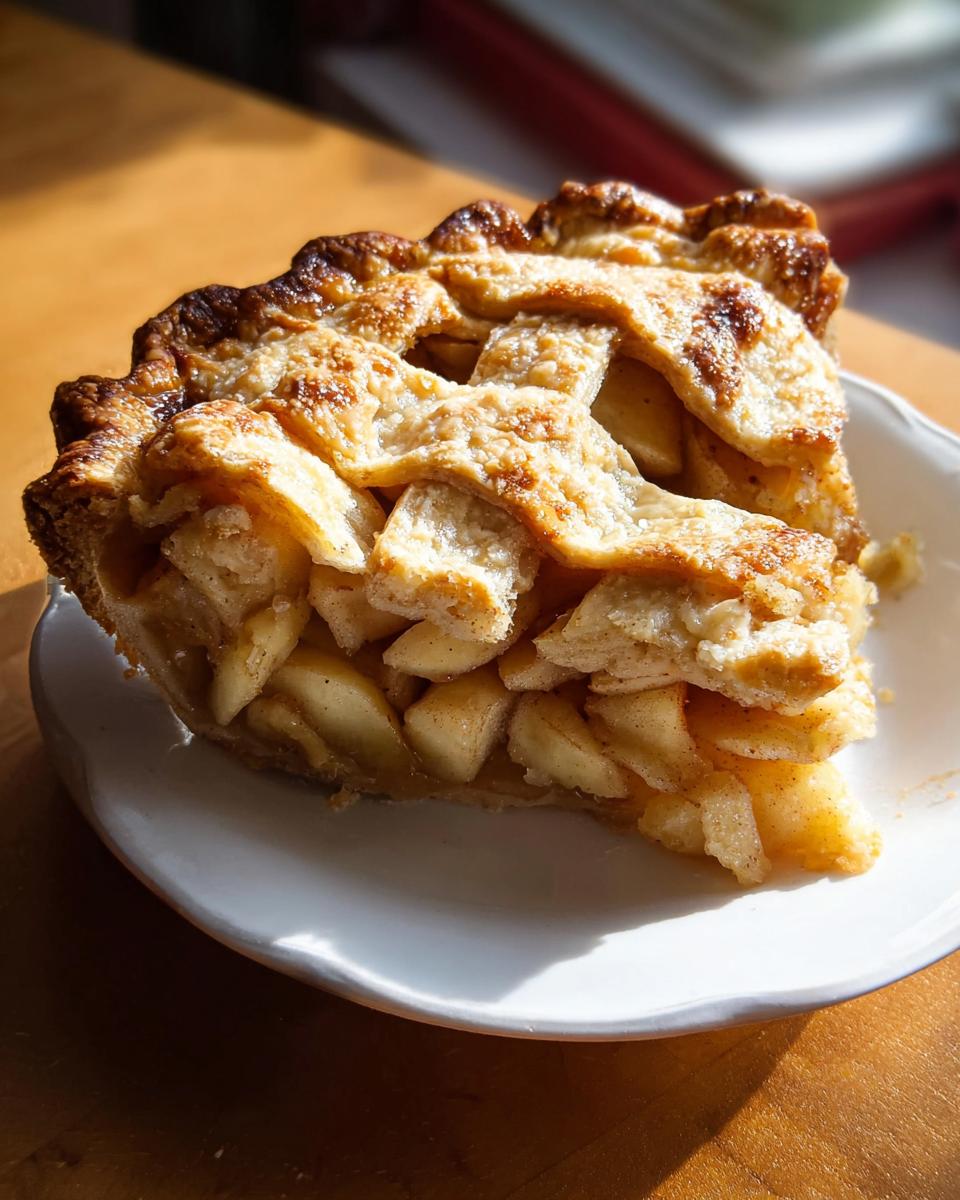
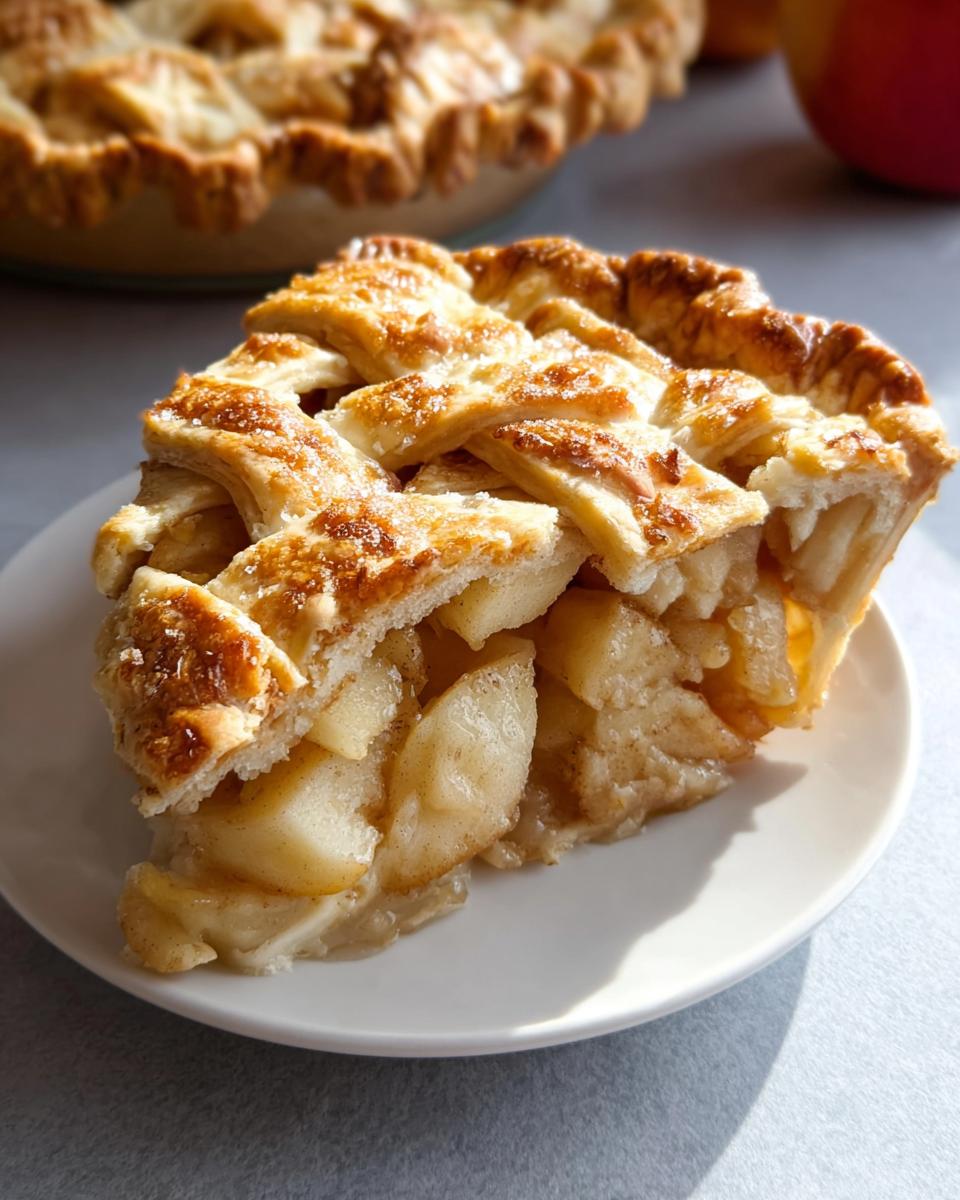
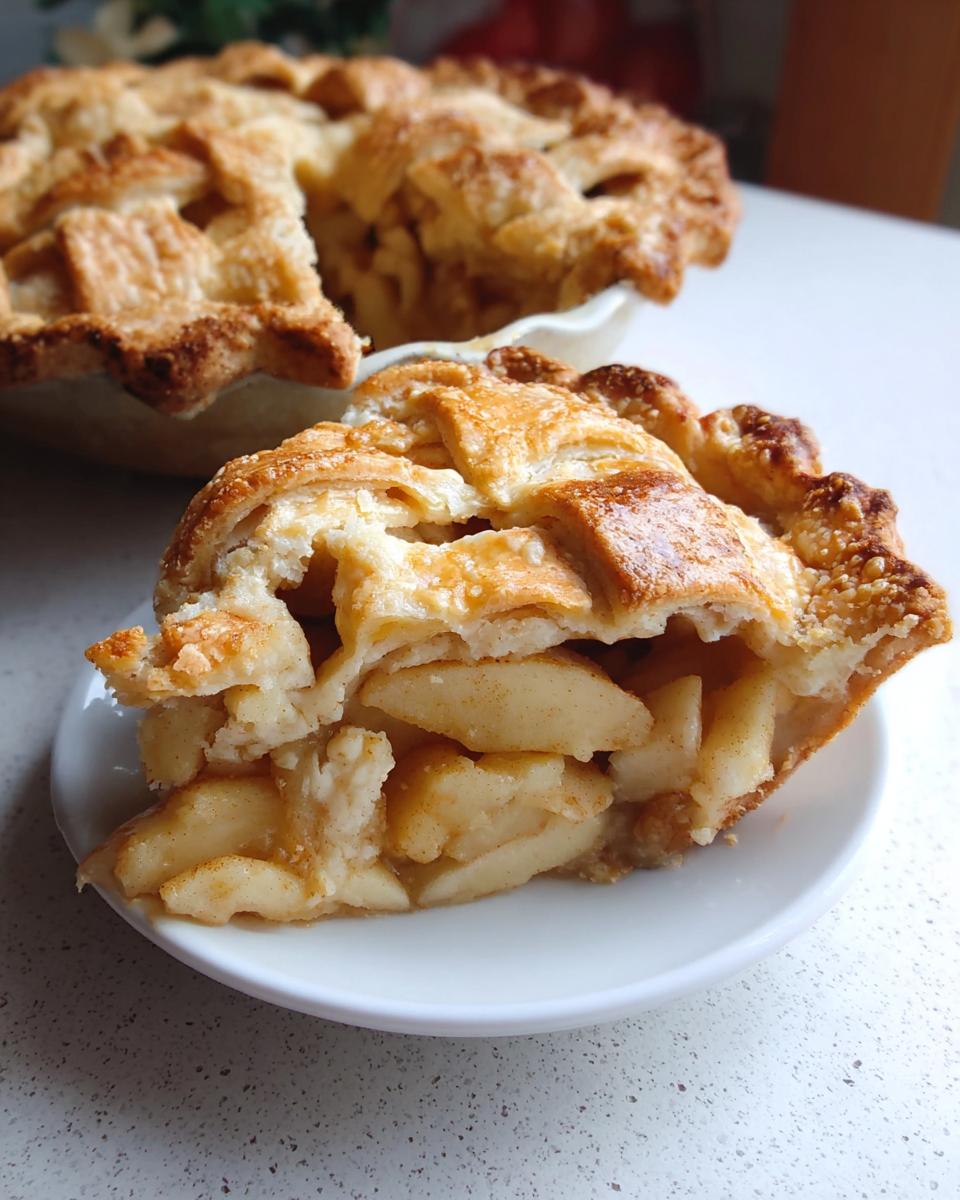
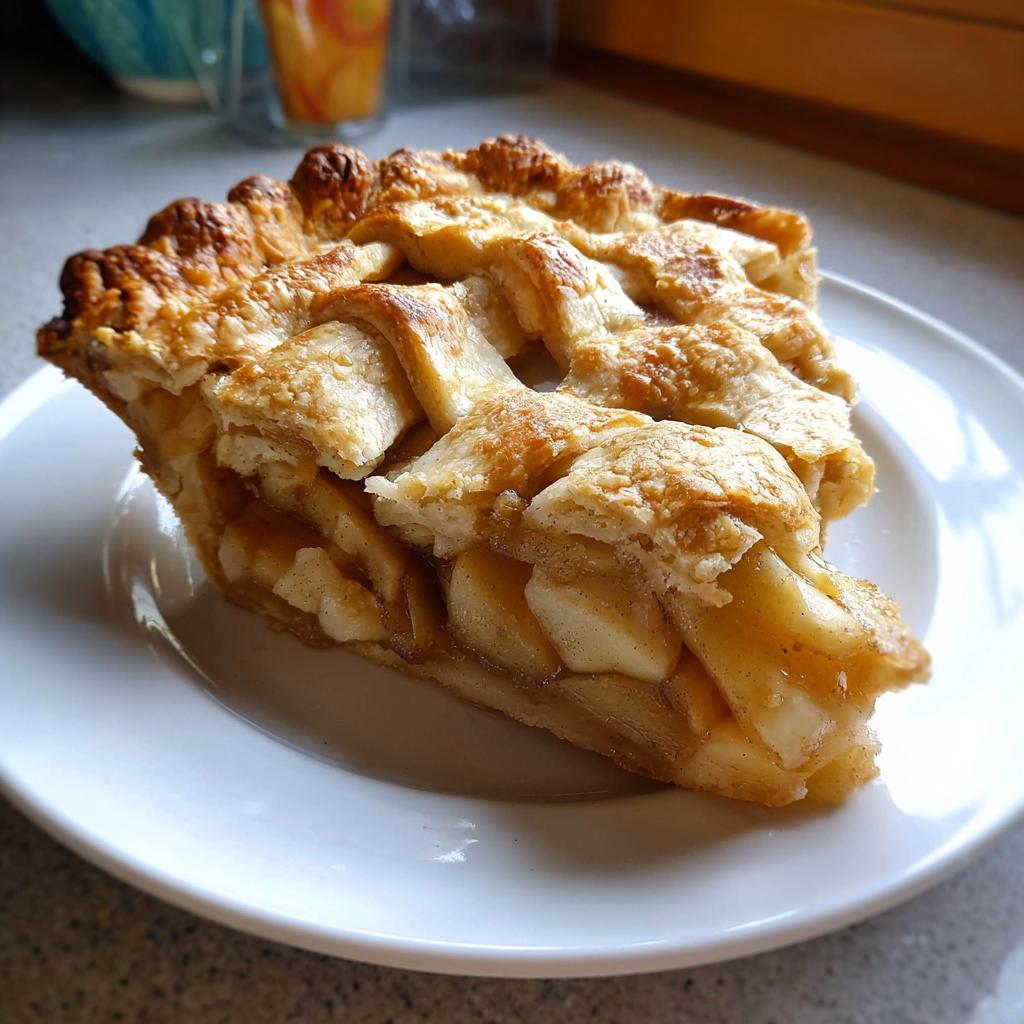
Perfecting Your Apple Pie Crust
The crust is *everything*! For that flaky, golden perfection that restaurants are known for, you’ve gotta use super cold butter and water. Seriously, ice cold! Mix the dough just until it comes together – don’t overwork it, or you’ll get a tough crust instead of a tender, flaky one. If you’re feeling fancy, a beautiful lattice top, like in this classic apple pie recipe, really ups the ante. Just slicing those strips and weaving them takes your pie from everyday to extraordinary.
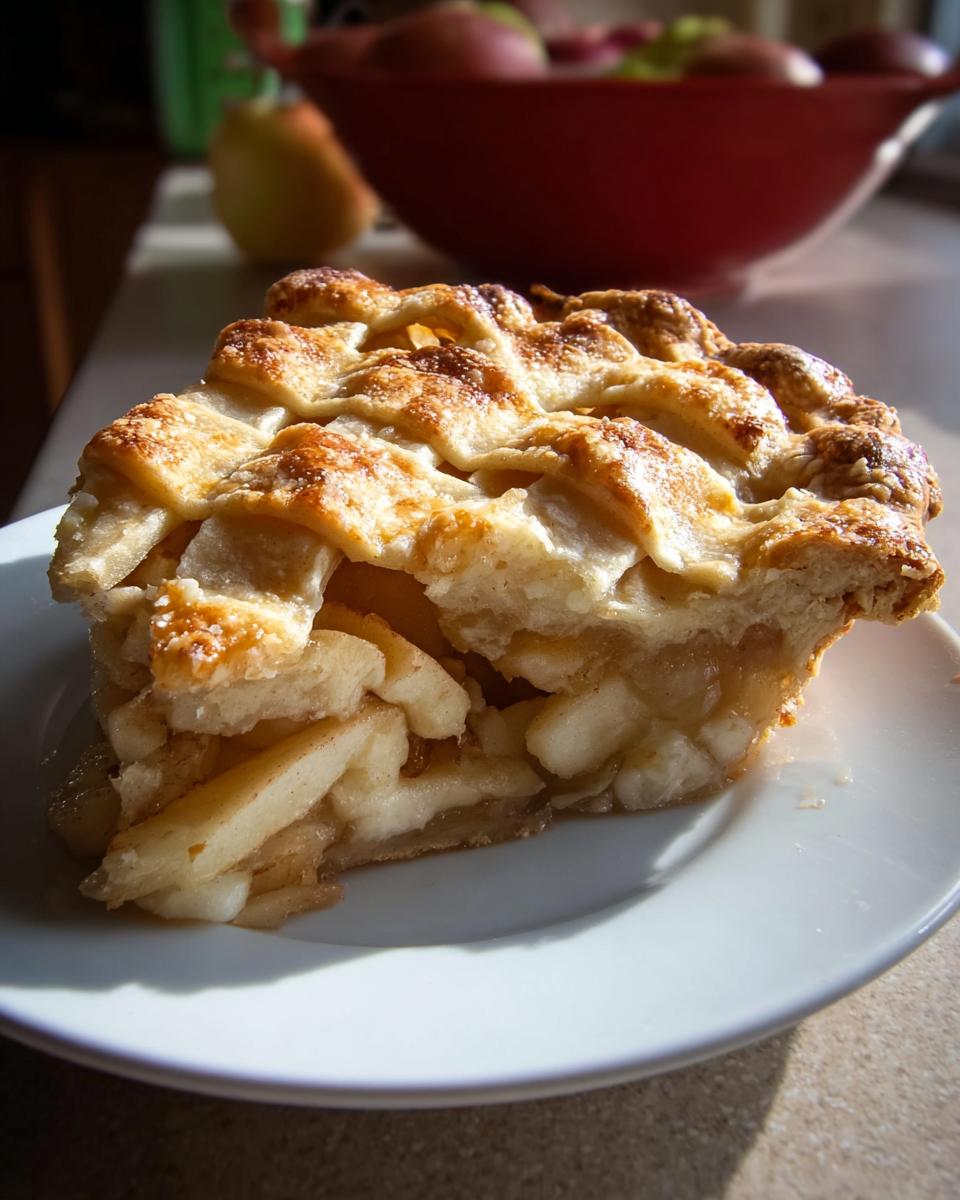
Achieving the Ideal Apple Pie Filling
Now for the apples! Pick a mix of tart and sweet apples, like Granny Smith for tartness and Honeycrisp for sweetness; it gives the filling so much more depth. Don’t be shy with the spices – cinnamon, nutmeg, a little allspice – they make it smell like heaven. To avoid that dreaded soggy bottom, make sure your filling is nice and thick. A little cornstarch or flour helps, and letting the filling cool a bit before you put it into the pie crust can work wonders too. You want tender apples, but not mushy, with a filling that’s luscious, not runny.
Beyond Pie: Other Restaurant-Style Thanksgiving Desserts at Home
Okay, let’s talk pies! They’re the heart and soul of so many Thanksgiving tables, right? For truly standout Restaurant-Style Thanksgiving Desserts at Home, we’ve got to venture beyond just apple pie. Think about those other holiday stars and how we can give them that extra sparkle, that restaurant-level flair! It’s amazing what a few little tweaks can do. Whether it’s a silky smooth pumpkin pie, a perfectly gooey pecan pie, or even a no-bake stunner, we can make these classics shine brighter than ever. Check out some ideas over on our recipes page for inspiration!
Elevating Pumpkin Pie
For pumpkin pie that wows, use real pumpkin puree, never pie filling! A good mix of spices – cinnamon, ginger, nutmeg, and a pinch of cloves – makes all the difference. And for that super smooth texture? Try adding a splash of heavy cream or even some full-fat coconut milk. And please, don’t overbake it! You want a filling that’s just set, not rubbery. A beautiful, flaky crust is a must, whether it’s traditional or gluten-free.
Decadent Pecan Pie
A classic pecan pie can be *so* sweet and gooey, right? To make it restaurant-worthy, focus on quality pecans – toasted, they have so much more flavor! And instead of just a super sugary syrup, try using a mix of brown sugar and a touch of maple syrup for more complex sweetness. For a filling that sets beautifully without being overly sticky, watch your baking time carefully. It should jiggle just a little in the center when it’s done.
Impressive No-Bake Desserts
Don’t underestimate the power of a no-bake dessert! Think elegant chocolate tarts with a press-in crust (hello, gluten-free!), layered parfaits with fresh berries and whipped cream, or even a no-bake cheesecake. The key is presentation. Use beautiful serving dishes, add a garnish like chocolate shavings or a sprig of mint, and make sure the layers are distinct. These look so sophisticated, and guests will be amazed you whipped them up with no oven time!
Make-Ahead Strategies for Stress-Free Holiday Baking
Honestly, trying to do *all* the baking on Thanksgiving Day? It’s a recipe for chaos, right? To truly achieve those amazing Restaurant-Style Thanksgiving Desserts at Home without losing your mind, making a game plan is everything. The best part is, so many of these delicious treats can be prepped ahead of time! Think of it as giving yourself a little gift so you can actually relax and enjoy the holiday. We can get a head start on so many things that will make your day so much smoother. Want some inspiration on other make-ahead dishes? Check out our low-carb Thanksgiving sides!
Pie crusts are total champions for make-ahead meals. You can mix up the dough, wrap it up tight, and keep it in the fridge for a couple of days, or even freeze it for longer. The filling components for things like apple or pumpkin pie can often be prepped too. Chop your apples and toss them with lemon juice and spices, then store them in the fridge. Make your pumpkin pie filling the day before and just pour it into your pre-baked or prepped crusts on Thanksgiving morning. Custardy pies like pecan pie are also great candidates for making the day before. Just store them covered in the fridge and let them come to room temperature for a bit before serving.
Dietary Considerations: Gluten-Free and Low-Carb Options
Okay, here’s where we really get to shine with those Restaurant-Style Thanksgiving Desserts at Home! A lot of folks worry that going gluten-free or low-carb means sacrificing all the richness and indulgence of holiday baking. But honestly, that’s just not true anymore! With the right techniques and ingredients, you can make desserts that are absolutely spectacular, no matter the dietary need. It’s not about making compromises; it’s about smart substitutions and making sure every bite is pure joy. You’ll find tons of amazing ideas that fit the bill over at our low-carb and gluten-free recipes!
Remember my “foundation flour blend system” I mentioned? That’s your secret weapon! It’s not just one flour but a smart mix that mimics the texture and structure of traditional flour, keeping things from being crumbly or weirdly dense. For pies, a crust made with almond flour and a little coconut flour can be just as flaky and delicious. Sweeteners like erythritol or stevia work wonders in low-carb versions, giving you that sweetness without the sugar spikes. And for gluten-free? Blends using rice flour, starch, and sometimes a bit of xanthan gum are game-changers. It’s all about finding that perfect balance so your dessert is a true showstopper for everyone at the table!
Frequently Asked Questions about Restaurant-Style Thanksgiving Desserts
Got questions about whipping up those fancy holiday treats at home? I get it! It totally makes sense to want all the “wow” factor without the kitchen stress. Let’s clear up some common worries and get you feeling super confident!
Can I really make a pie crust that doesn’t taste gluten-free?
Absolutely! The trick is using a good blend of gluten-free flours, like almond and coconut flour, maybe with a touch of tapioca starch for tenderness. Using cold fat – butter or shortening – and not overworking the dough is key, just like with regular pie crusts. My foundation flour system really helps mimic that perfect, flaky texture. You’ll be amazed how delicious it is!
What are the best sweeteners for low-carb pies?
For low-carb baking, my go-to sweeteners are erythritol and monk fruit blends. They offer a great sweetness without the carb count and usually don’t have that weird aftertaste. Sometimes I’ll mix in a little stevia for extra sweetness intensity. Just make sure to follow the recommended substitution ratios on the packaging, as they can vary!
How do I prevent my meringue from weeping?
Ah, weeping meringue! It happens when the sugar hasn’t fully dissolved or when there’s too much moisture. Make sure your egg whites are at room temperature and super clean (no yolk!). Beat the sugar in gradually once the whites are foamy. Using a bit of cream of tartar helps stabilize them, too. Baking the meringue at a lower temperature for a longer time also helps it dry out properly and prevents that sad weeping.
What’s the secret to a glossy ganache?
A smooth, glossy ganache is all about the ratio and the quality of your chocolate! Generally, a 1:1 ratio of chopped chocolate to hot heavy cream works beautifully. Pour the hot cream over the finely chopped chocolate and let it sit for a few minutes before gently whisking from the center outwards until it’s super smooth and shiny. Using good quality chocolate makes a huge difference!
Still have more questions? Don’t hesitate to reach out on our contact page!
Essential Equipment for Elevated Holiday Baking
Alright, to really get those restaurant-level vibes going for your Thanksgiving Desserts at Home, having the right tools makes a world of difference! You don’t need a million gadgets, but a few key players will seriously step up your baking game. Think of them as your trusty sidekicks in creating something truly special.
First off, a good **9-inch pie pan** is crucial. Whether it’s glass, ceramic, or metal, a sturdy pan helps ensure even baking and a beautiful presentation. A reliable **rolling pin** is essential for getting those pie crusts and pastry doughs just right – you want one that feels comfortable in your hand. And don’t skimp on **precise measuring cups and spoons**! Baking is a science, so getting those ingredient amounts spot-on is key for texture and flavor. If you plan on doing a lot of holiday baking, a **stand mixer** can be an absolute lifesaver, especially for whipping up meringues or creaming butter and sugar.
Serving and Presentation Tips
Okay, so you’ve baked the most amazing dessert, but how do you make it *look* like it came from a five-star restaurant? This is where the magic happens, tying it all together for that perfect Restaurant-Style Thanksgiving touch! It’s all about the final flourish.
Think about your plate! Simple white or neutral plates let your creation be the star. For pies, a delicate drizzle of extra caramel sauce or a dusting of powdered sugar can look so elegant. A dollop of homemade whipped cream or vanilla bean ice cream is always a winner. For cakes, fresh berries, a mint sprig, or even a sprinkle of edible gold leaf can really elevate things. And don’t forget those sides! If you’re serving something rich like a pecan pie, maybe a slightly tart cranberry compote on the side can balance the sweetness wonderfully, just like they do with some of our easy low-carb sides. It’s these little details that say, “This is special!”
Your Thoughts on Creating Holiday Magic
I’ve gushed enough about how amazing Restaurant-Style Thanksgiving Desserts at Home can be, right?! Now, I want to hear from YOU! What are your absolute go-to Thanksgiving dessert recipes? Do you have any holiday baking stories, triumphs or hilarious fails, you’d love to share? Or maybe you’ve got some lingering questions after reading all this? Drop them in the comments below – let’s create some holiday magic together!
You can always learn more about me and my journey!
Apple Pie
Ingredients
Equipment
Method
- Preheat your oven to 425 degrees F (220 degrees C). Peel and core the apples, then slice them thinly. Set aside.
- Melt the butter in a saucepan over medium heat. Add the flour and stir to create a paste. Cook for about 1 to 2 minutes until fragrant. Stir in both sugars and the water. Bring to a boil, then reduce heat to low and simmer for 3 to 5 minutes. Remove from heat.
- Press one pastry into the bottom and up the sides of a 9-inch pie pan. Roll out the remaining pastry so it overhangs the pie by about 1/2 inch. Cut the pastry into eight 1-inch strips.
- Place the sliced apples into the bottom crust, forming a slight mound. Lay four pastry strips vertically and evenly spaced over the apples. Use longer strips in the center and shorter strips at the edges.
- To make a lattice crust, fold the first and third strips back. Lay one of the unused strips perpendicularly over the second and fourth strips. Unfold the first and third strips back into place.
- Fold the second and fourth vertical strips back. Lay one of the remaining unused strips perpendicularly over top. Unfold the second and fourth strips back into place. Repeat this process with the last two strips of pastry to weave the lattice.
- Fold and trim any excess dough at the edges as needed, and pinch to secure.
- Slowly and gently pour the sugar-butter mixture over the lattice crust, ensuring it seeps over the apples. Brush some onto the lattice, but avoid letting it run off the sides.
- Bake in the preheated oven for 15 minutes. Reduce the oven temperature to 350 degrees F (175 degrees C) and continue baking for 35 to 45 minutes, or until the apples are soft.
- Serve and enjoy!
Nutrition
Notes
Tried this recipe?
Let us know how it was!
Dual-Restriction Recipe Engineer & Cross-Contamination Specialist
Everything changed when my teenage son got hit with celiac disease and Type 1 diabetes diagnoses within six months of each other. Suddenly, pizza and pasta were off the table, and most “diabetic-friendly” foods contained gluten. I went from regular mom cooking to navigating what I call “compound restriction cooking”—and I had a kid’s appetite and taste buds to satisfy.
Lucky for us, my background in pharmaceutical quality control gave me the systematic mindset this level of precision requires. My kitchen now operates under pharmaceutical-grade protocols adapted for home use: dedicated prep surfaces, separate storage systems, and testing procedures that verify both carb counts and gluten absence before any recipe gets published.
I’ve developed over 220 recipes that clear multiple dietary hurdles simultaneously—finding gluten-free thickeners that don’t spike blood sugar, creating bread alternatives that meet both keto ratios and celiac safety, and developing desserts that actually taste good to a teenager despite impossible restrictions.
Through my “Safe Kitchen Certification” program, I teach other parents that managing multiple dietary restrictions isn’t about multiplying limitations—it’s about systematic thinking that reveals unexpected possibilities. When you engineer solutions instead of making compromises, restriction becomes innovation rather than deprivation.