
Oh, honestly, doesn’t everyone just love making something that looks like it belongs in a fancy bakery window? Getting those show-stopping desserts on your own table doesn’t have to be complicated, trust me! I remember the first time I tried something truly decorative—I was hosting a friend, wanted to impress, and decided on this spectacular Gold-Dusted Bundt Cake. As the rich devil’s food batter filled that ornate pan, I felt that familiar bubbling excitement. When it came out gleaming, I knew I’d nailed it. It’s not just cake; it’s crafting joy! This recipe, paired with a delicate champagne buttercream, is proof that elegance is achievable for us home cooks.
Why You Will Love This Gold-Dusted Bundt Cake
This cake is what dreams are made of! It perfectly blends deep, rich chocolate flavor with the slight celebratory fizz of champagne buttercream. It’s seriously the best recipe when you need something that looks way more complicated than it actually is. This is my go-to Holiday Dessert because it just screams celebration when you present it. You get that truly Easy Elegant look without spending all day stressing over fiddly layers.
- The contrast between the dark devil’s food and the silky buttercream is heaven.
- It offers a show-stopping presentation perfect for any gathering.
- The technique is approachable, meaning you get bakery results easily!
Essential Components for Your Gold-Dusted Bundt Cake
When you’re aiming for something this elegant, you can’t just throw ingredients together, right? This Gold-Dusted Bundt Cake is absolutely built in three amazing layers—the dark, moist cake, the bubbly, light frosting, and the glamorous finishing touches. For this recipe to shine, especially with all the butter in that buttercream, ingredient quality really matters. Pay attention to those little notes, because they are my secrets to making sure nothing goes wrong!
Ingredients for the Devil’s Food Cake Base
We need a cake that is dark, rich, and holds up beautifully in that ornate pan. For the base, you start by mixing the dry stuff—sugar, flour, and make sure you sift that Dutch-processed cocoa powder! Seriously, the sifting step prevents lumps that can ruin the texture. The secret weapon here is the hot coffee. Adding hot liquid actually blooms the cocoa powder, making the chocolate flavor incredibly deep. It sounds odd, but trust me, that hot coffee (plus that splash of rum or brandy!) is essential for that intense devil’s food rich flavor. Don’t forget the buttermilk for the perfect tenderness.
- Sugar and all-purpose flour go in first.
- Sift that Dutch-processed cocoa powder well.
- Buttermilk keeps the crumb soft.
- Hot coffee is non-negotiable for blooming the chocolate!
Making the Champagne Buttercream
Okay, this frosting is the star alongside the cake itself. We’re making a stabilized meringue buttercream, which is totally worth the effort! You whip the egg whites and sugar over heat until it’s smooth, then whip it until it’s cool and glossy. If you don’t let it cool, adding the enormous amount of butter will just melt it right into soup, and we definitely don’t want that runny mess. The flavor comes from pure vanilla extract and what I love most—just a few drops of champagne extract. That hint of bubbly flavor pairs shockingly well with the dark chocolate cake.
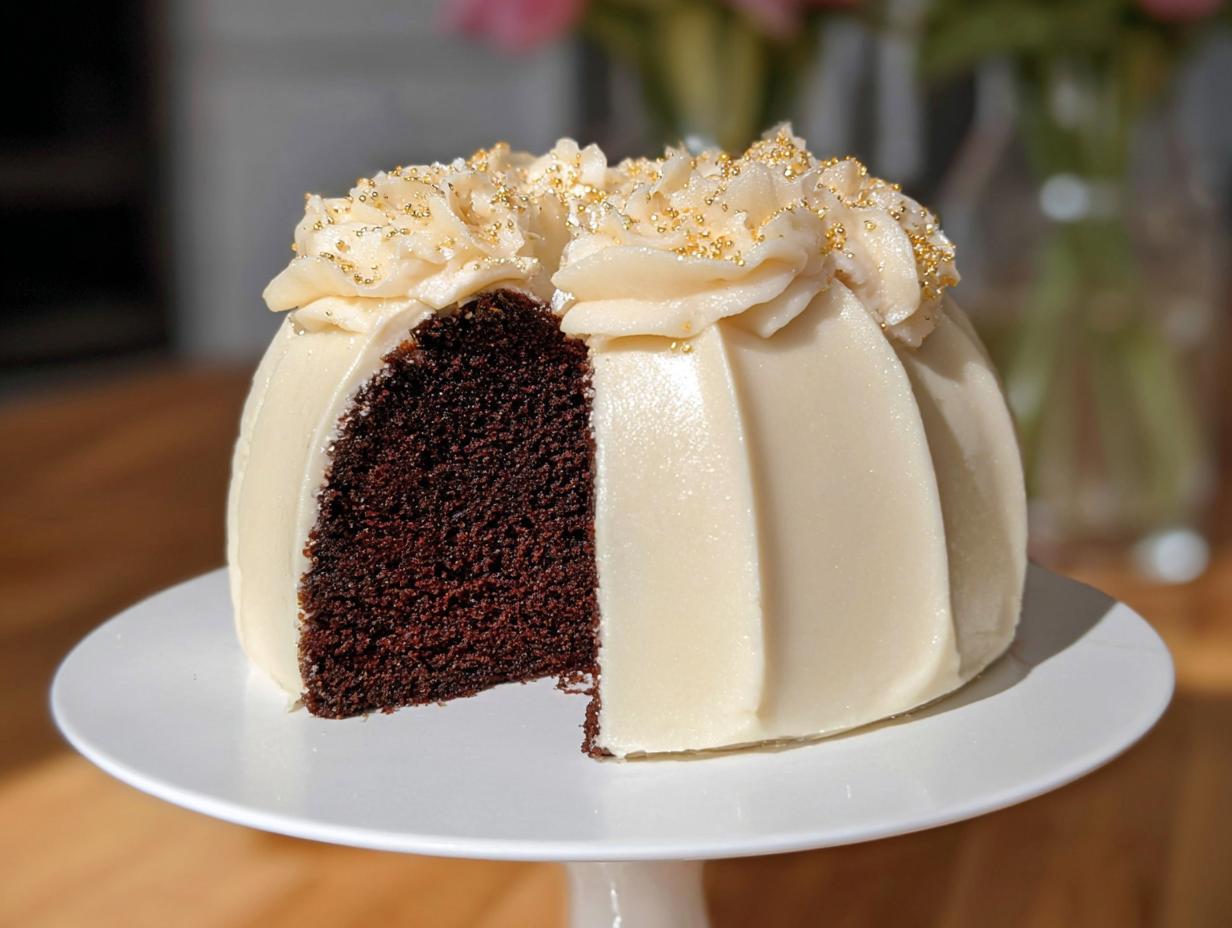
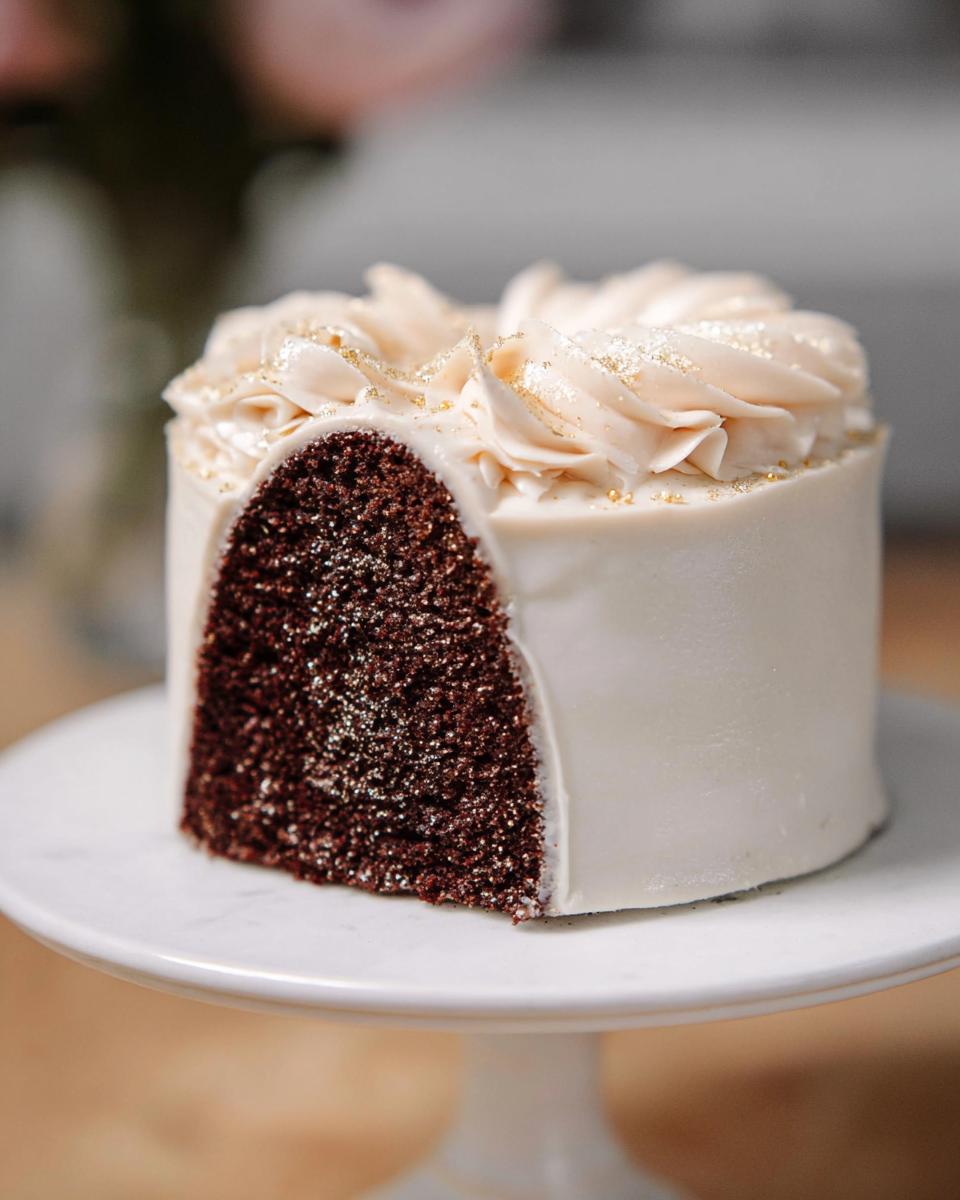
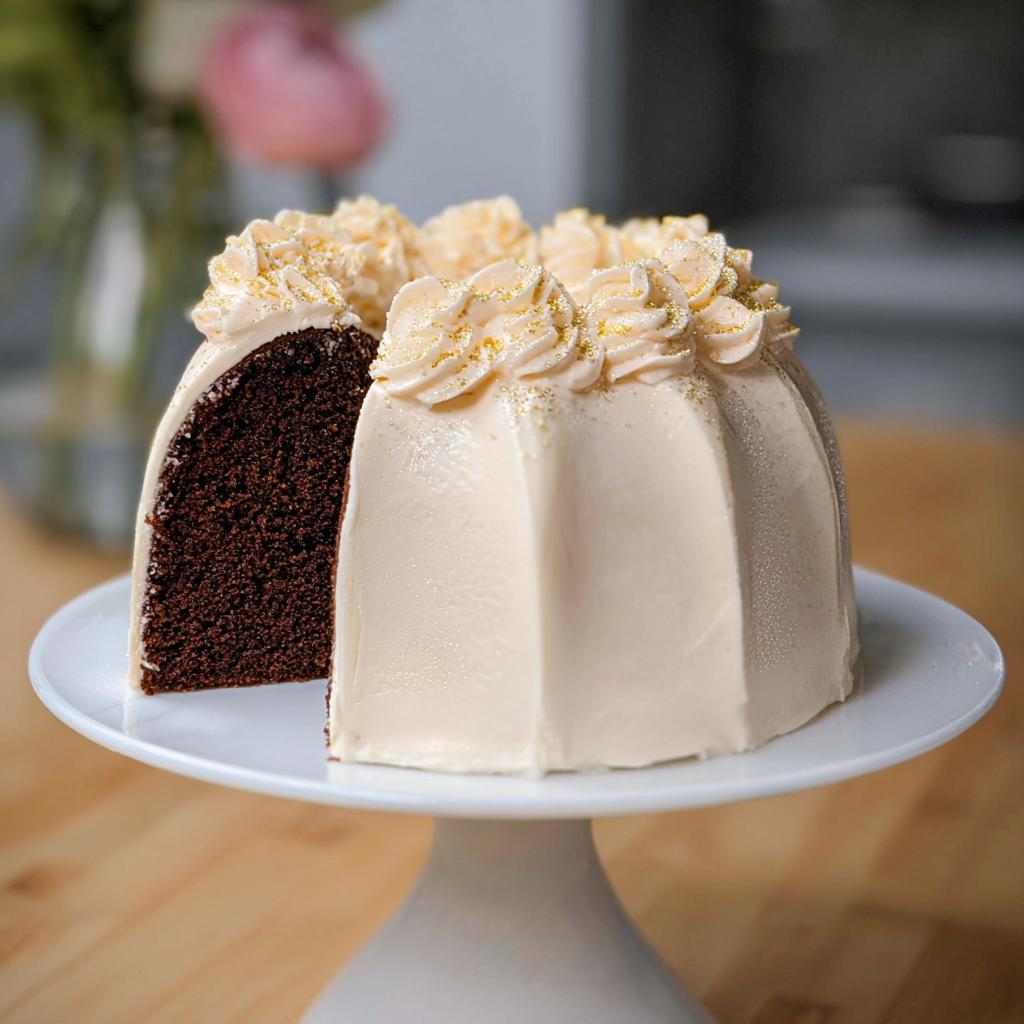
Filling and Decorating: Achieving the Edible Gold Look
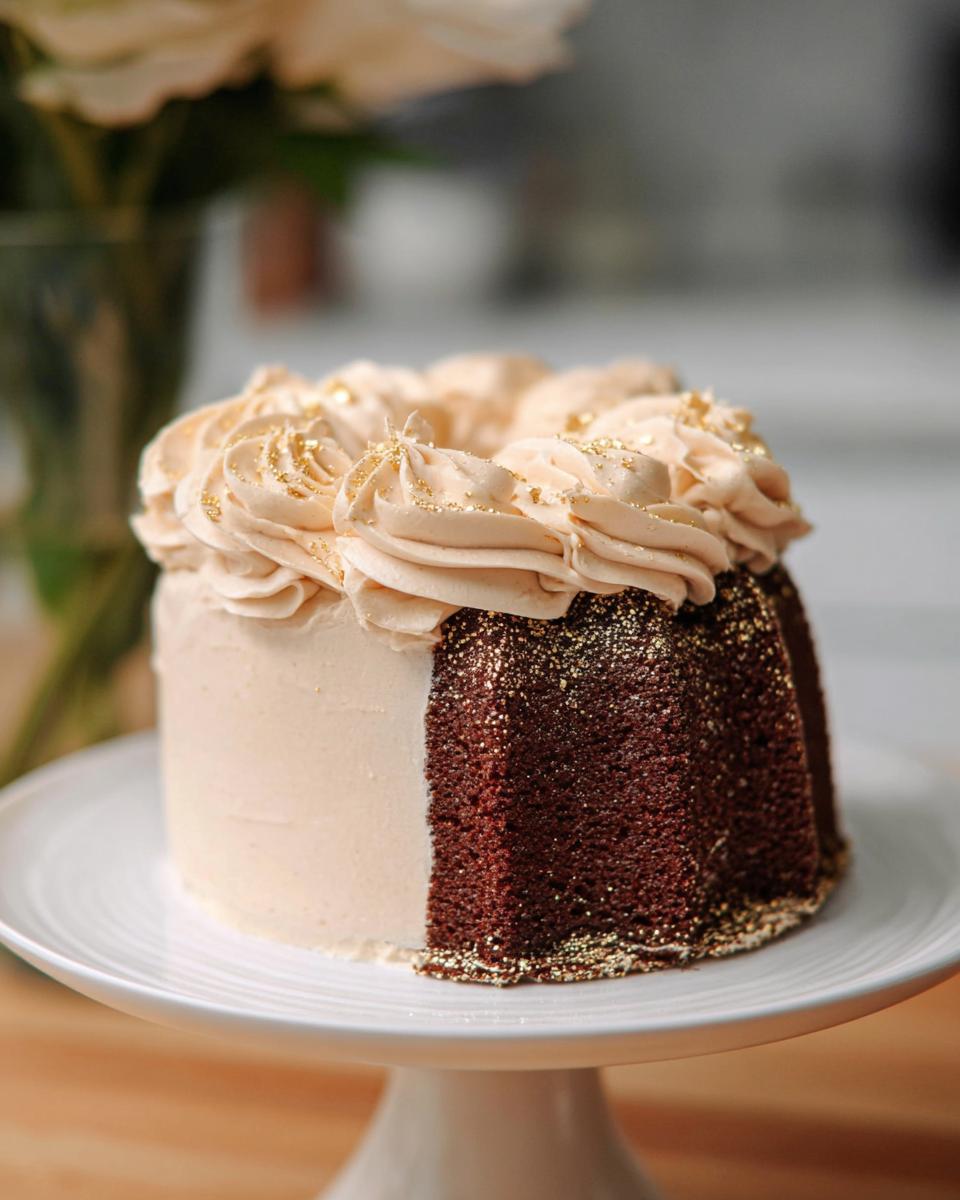
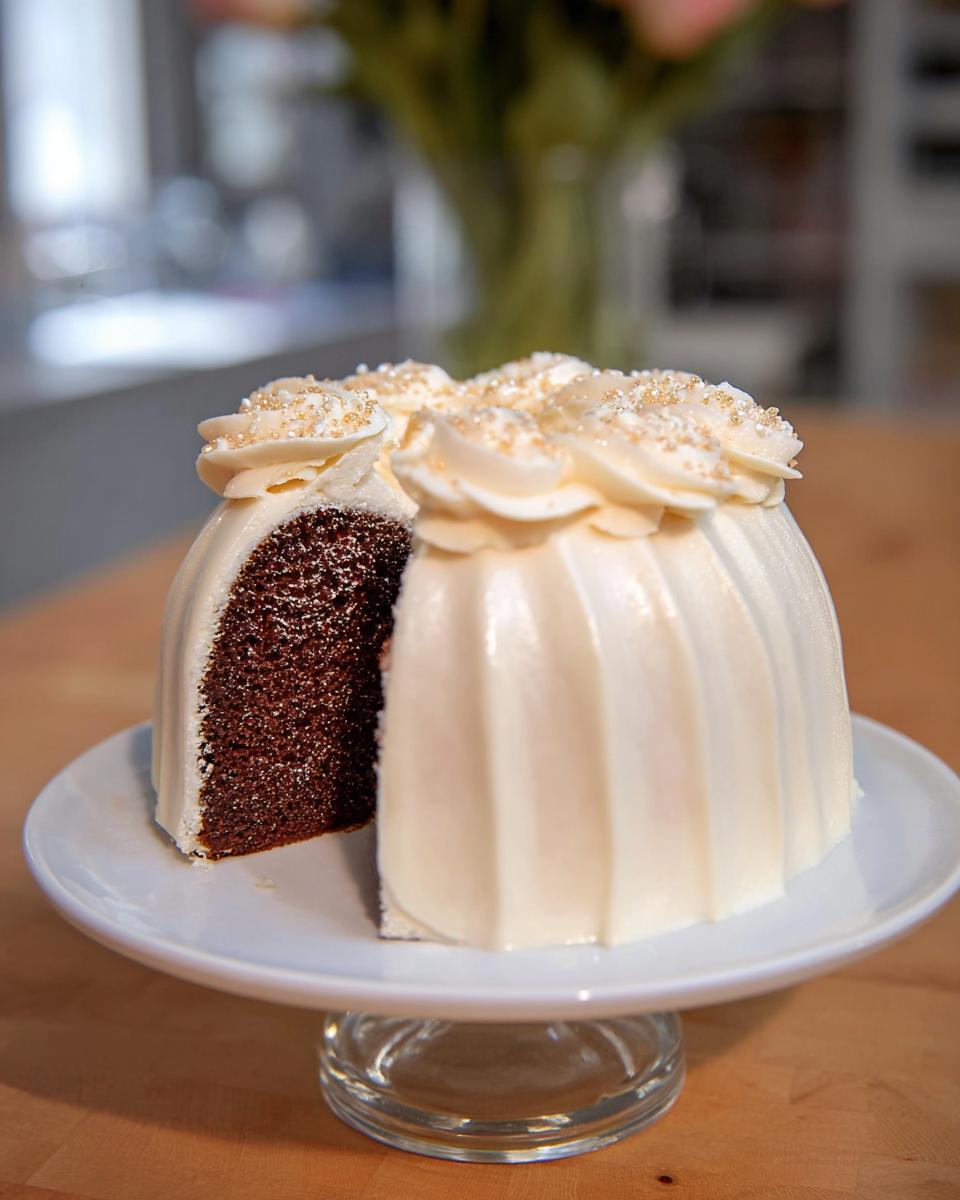
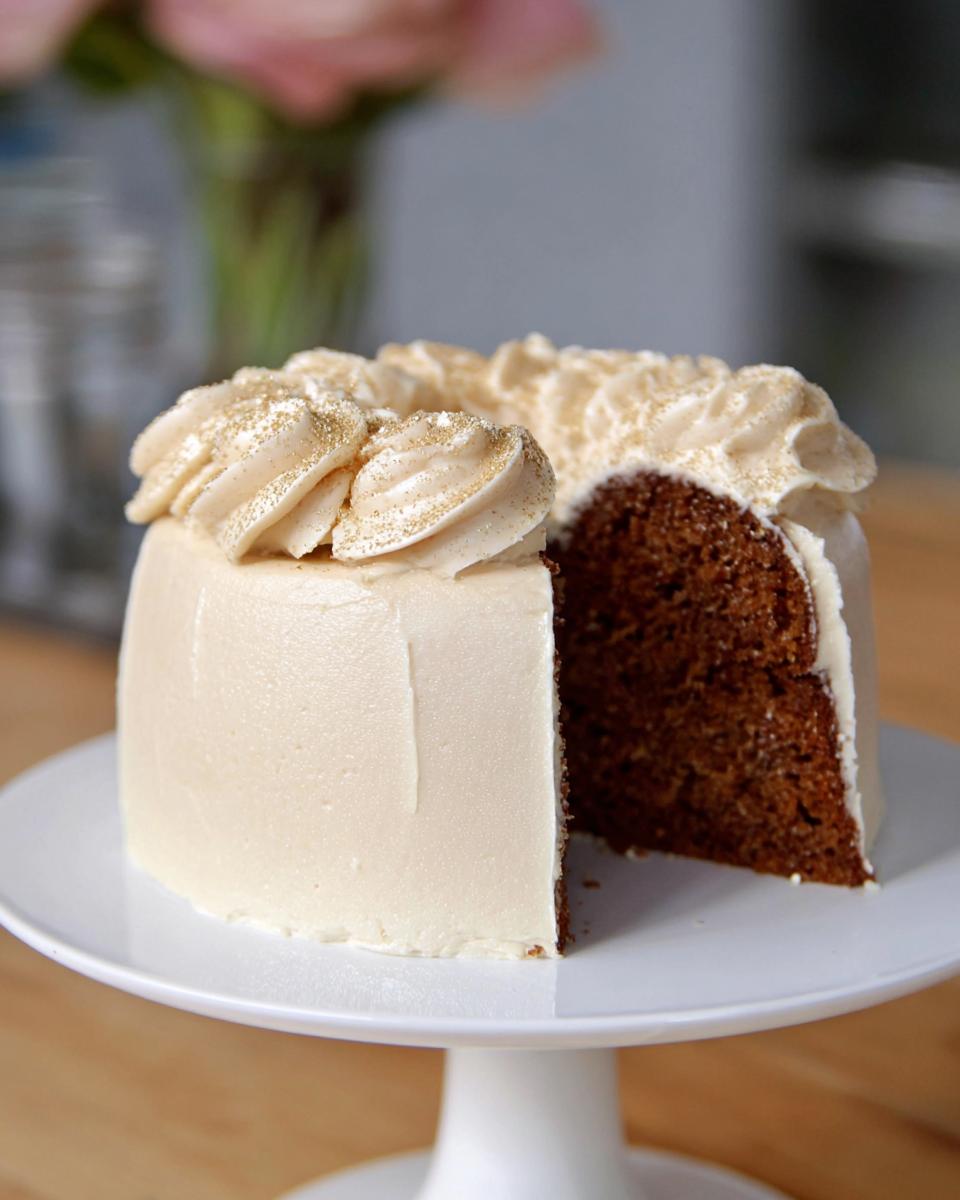
Once the vanilla buttercream is perfect, we split it off. I take about two cups of the white frosting and mix it with cherry preserves—this creates a lovely hidden layer of fruit flavor inside the cake. For the wow-factor on the outside, you need that Edible Gold dust. A tiny bit of luster dust mixed with clear alcohol becomes your paint. You can also grab some optional decorating pearls for extra texture around the bottom edge. That simple little dusting makes the whole Gold-Dusted Bundt Cake feel incredibly luxurious!
Step-by-Step Guide to Baking the Gold-Dusted Bundt Cake
Alright, let’s get down to business, because this Gold-Dusted Bundt Cake needs a little method to look spectacular. Baking is just a series of small, manageable steps, even when the end result looks super fancy! We start hot, move to mixing, and then ensure everything cools down properly before we even think about frosting. I’ve linked the original technique here for a detailed look at the source, but I’m going to walk you through my tricks for getting this Devil’s food base perfect. Trust me, following the steps for the buttercream is where we show our expertise, just like learning how to make a perfect roux—it takes focus!
Baking Techniques for the Perfect Bundt Cake Layers
First things first: pan prep is everything! You just cannot let this rich cake stick. Use softened butter to grease every nook and cranny of your Bundt pan, and then dust it generously with cocoa powder—this works way better than flour for dark cakes. Remember, we are actually baking three separate 6-inch layers for this design, not the whole cake at once in the big Bundt pan, so make sure you’ve got three pans ready to go. The batter is quite thin, almost like a thick soup, so don’t panic when you pour it in! Bake them until that tester comes out clean, usually around 35 minutes at 350°F. Patience is key here; let them cool completely in the pan before you try flipping them out.
Mastering the Champagne Buttercream
This is where we turn things up from ‘great cake’ to ‘showstopper’! Making the buttercream involves the Swiss meringue method. Combine your sugar and egg whites in a heatproof bowl that sits over a saucepan of simmering water—that’s your makeshift double boiler. You have to keep stirring until that sugar completely dissolves. You’ll know it’s ready when it feels smooth between your fingers, not gritty at all. Then, you whip it until it’s fluffy, glossy, and cool to the touch before you even go near the butter. When you finally start adding that giant amount of room-temperature butter, the mixture might look suspicious—like it completely broke and curdled? That is okay! Just keep mixing on medium speed, and suddenly, around the two-minute mark, it magically smooths out into the creamiest, dreamiest frosting you’ve ever seen. For more insight on this step, check out the original recipe notes at this source!
Assembly and Crumb Coating for the Gold-Dusted Bundt Cake
Once your layers are cool and your frosting is dreamy, we assemble the interior. Take your cherry preserves—that tiny bit of tartness cuts through the richness so nicely—and mix them into about two cups of that white vanilla buttercream. Place your first cake layer down, spread that cherry filling on, and top with the next layer. Once everything is stacked, it needs a proper crumb coat. Grab a small amount of the plain vanilla buttercream and spread a super thin layer over the entire cake. This traps all those pesky crumbs. Throw the whole thing in the freezer for about 20 minutes to let that coat set up rock solid before applying the final, thick layer of frosting.
Decoration Ideas for Your Gold-Dusted Bundt Cake
This is the fun part, isn’t it? This is where we stop just baking and start creating art! Since we used our vanilla buttercream for the exterior coat, we are going to divide two small amounts for the final touches. First, take a tiny bit of frosting and color it pink with gel dye. Put that pink frosting into a pastry bag fitted with a rose tip. Remember, if your buttercream is too cold for piping, it will crack when you try to shape it, so let it sit on the counter for about 10 minutes until it’s soft enough to flow beautifully.
I love making those little buttercream roses right on the tip of a rose nail—it takes practice, but once you get the hang of twisting the nail while piping the petals, they look incredibly sophisticated. Transfer those roses gently to the top center of your finished cake. Then comes the magic for our Gold-Dusted Bundt Cake look: mix a tiny amount of Edible Gold luster dust with just a drop or two of clear vanilla extract or vodka. Use a clean, fine paintbrush to lightly flick or dust this gold mixture over the top border and the ridges of the cake. A final ring of sugar pearls around the base adds that perfect, polished sparkle. It’s all glamour, darling!
Tips for Success When Making This Gold-Dusted Bundt Cake
You’ve got the gorgeous cake layers and that luxurious frosting, but we need to make sure the final reveal is perfect! The biggest fear with any Bundt cake, especially one this rich, is having it stick to the pan. Seriously, take extra care greasing and dusting those crevices. Even though we only baked layers for this specific design, I always recommend a quick preventative measure if you ever make a full one: use a commercial pan release spray—it’s a game-changer for Bundt cakes. That rich cake batter needs a little help to let go gracefully.
Also, remember what I said about the buttercream potentially breaking? If it looks soupy, don’t panic! Just keep mixing; it resolves itself. If you are struggling with getting those sharp edges during the final coat, try chill time. After the crumb coat, freezing the cake for 20 minutes makes applying the final layer much simpler. Knowing how to recover like this means you’ll always get a smooth finish on your Gold-Dusted Bundt Cake.
Serving Suggestions for Your Elegant Bundt Cake
Isn’t half the fun deciding how to present this beauty? Because this Gold-Dusted Bundt Cake is so rich with that deep chocolate and the fancy champagne flavor, it doesn’t really need much else. If you are serving it as a centerpiece Holiday Dessert, a simple dusting of powdered sugar on the plate edges works wonders. Or, try a small spoonful of fresh raspberries or orange segments right next to the slice; the tartness is divine against the dark cake.
Temperature matters, too! I actually prefer this cake the next day, slightly chilled, as the champagne buttercream firms up just a bit, giving it a lovely texture. But honestly, letting it sit out for 30 minutes before serving so it’s just barely room temperature is perfect—that lets those chocolate flavors really sing.
Storage and Reheating Instructions for the Gold-Dusted Bundt Cake
Now that you’ve made this gorgeous cake, you need to keep it looking perfect! Since we used that beautiful champagne buttercream, storage can be a little delicate. If you’re keeping it just for a day or two, room temperature is fine, but you must keep it covered gently. A cake dome is wonderful, but if you don’t have one, just tent some foil loosely over the top so you don’t crush those stunning roses or smudge the gold dust.
If you need to keep it longer, pop the whole Gold-Dusted Bundt Cake into the fridge. When you pull it out because you’re ready to serve that amazing Holiday Dessert, let it sit on the counter for at least two hours. That lets the butter in the frosting soften up; cold buttercream can taste waxy, and we want creamy deliciousness all the way through!
Frequently Asked Questions About This Gold-Dusted Bundt Cake
It’s so normal to have questions when you’re making a cake this fancy! I’ve gathered the things people ask me most often when they tackle their first Gold-Dusted Bundt Cake. Don’t worry about asking—we’ve all been there!
Can I skip the champagne extract in the buttercream?
Oh, I totally get it if you can’t find that extract! You can certainly skip it, but you’ll be missing that little celebratory *pop* of flavor that makes this frosting special. If you skip it, just add another half teaspoon of vanilla extract to boost the flavor. It will still be delicious, but it won’t be quite the same signature taste for this elegant dessert.
How do I ensure my cake releases cleanly from the Bundt pan?
This is the million-dollar question for any fancy Bundt Cake! Since we are only using 6-inch pans for the layers in this version, buttering and dusting with cocoa powder does the trick. But, if you decide to bake the whole thing in one large Bundt pan, I highly recommend buying a tub of commercial pan release spray. It saves so much heartache and guarantees a clean release every single time. It’s worth the small investment!
Is this recipe truly easy, or is it only for experienced bakers?
I promise, we designed this to be as Easy Elegant as possible! The chocolate cake batter is super simple—just mix wet and dry ingredients. The only part that requires focus is the meringue buttercream; it takes attention because you have to heat the egg whites correctly. But once you nail the butter incorporation, the rest is just piping and dusting. You absolutely can do this!
Share Your Stunning Gold-Dusted Bundt Cake Creations
Now that you’ve got the recipe and the sparkle, I can’t wait to see what you create! Seriously, seeing your takes on this Gold-Dusted Bundt Cake fills my heart with so much joy. Whether you went all-out with the pink roses or kept it simple with just that shimmering gold dust, I want to know how it went. Baking is so much better when we share the successes!
Don’t be shy! Please leave a star rating right here on the recipe card if you enjoyed this decadent Devil’s Food Cake. Did you try adding more champagne extract? Did you pipe a different style of border? Drop all your decorating triumphs, tips, or even any minor mishaps in the comments below. I read every single one!
If you shared your finished masterpiece on social media, please tag me! It helps me see your amazing work, and honestly, it inspires me to keep tinkering and creating more gorgeous, Easy Elegant recipes just like this one. You can send me a direct message or reach out through my contact page anytime—I love connecting with fellow bakers!
Gold-Dusted Bundt Cake
Ingredients
Equipment
Method
- Preheat your oven to 350°F (175°C). Butter three 6-inch round cake pans and line each with a parchment paper round.
- In a large bowl, combine the sugar, flour, cocoa powder, baking soda, and salt. Whisk together until combined. Set aside.
- In a separate bowl, whisk together the egg, buttermilk, oil, and vanilla until well combined. Add this egg mixture to the dry ingredients and mix until smooth. Slowly add the hot coffee and rum to the batter and whisk until totally blended and smooth, about 2 minutes. The batter will be quite thin.
- Dust the prepared pans with cocoa powder. Divide the batter evenly into the prepared pans. Bake until a tester comes out clean, about 35 minutes. Allow to cool completely in the pan. Keep covered until ready to fill and frost.
- Remove the cakes from the pans and invert onto 6-inch cardboard cake rounds.
- In the bowl of a stand mixer, combine the granulated sugar and egg whites. It will be very thick and grainy.
- Place the mixer bowl over a double boiler and stir with a rubber spatula until the sugar is completely melted. Brush down the sides of the bowl with the spatula to ensure all sugar is melted. Feel the egg mixture between your fingers to check for graininess. Once it is completely smooth, place the bowl on the mixer and beat with the whisk attachment on medium-high speed until it is light, fluffy, and glossy, and the bowl feels just about room temperature. If the egg whites are not cooled sufficiently, they will melt the butter when you add it.
- Once the egg whites are whipped and cooled, add the butter, 2 tablespoons at a time, beating on medium speed to combine. The mixture may look curdled and runny after about half the butter is added; this is normal. Continue adding the butter. Once all butter is added and mixed on medium speed for about a minute, the buttercream will be creamy and glossy.
- Add the vanilla extract, champagne extract, and salt.
- Place about 2 cups of the buttercream in a mixing bowl. Stir in the cherry preserves. Reserve the remaining buttercream for the exterior coat.
- Place one cake layer in the center of a cake turntable. Cover the first layer with a 1/4-inch-thick layer of the cherry buttercream. Repeat this with the other layers of cake and buttercream, stacking them on the first layer and ending with cake.
- For the crumb coat, spread a thin layer of vanilla buttercream over the top and sides of the cake. Freeze the cake for about 20 minutes.
- Place the cake back on the turntable. Ice the cake with a thick layer of buttercream. Using a metal spatula or cake comb, smooth out the sides and top of the cake.
- Using a pastry bag fitted with a star tip, create a border around the top of the cake.
- To decorate the center of the cake with buttercream roses: Place about 2 tablespoons of buttercream in a small bowl and add a few drops of pink food coloring, if using. Fit a pastry bag with a rose tip. Use a fine paintbrush to paint a line of the colored buttercream down the seam inside the bag (for pink details on the roses). Fill the pastry bag with plain white buttercream. Form each buttercream rose on a rose nail, then use kitchen shears to transfer it to the top of the cake. Repeat, creating as many roses as you like.
- If using, finish the cake with a little luster dust and a ring of edible sugar pearls around the base.
Notes
Tried this recipe?
Let us know how it was!
Mindfulness & Emotional Wellness Specialist
I never thought I’d leave my career as a corporate litigation attorney, but a panic attack in a courthouse bathroom changed everything. After struggling with emotional eating for over a decade—starting in college and getting worse through the stress of law school—I realized that no diet could fix what was really going on inside me.
My breakthrough came through mindfulness meditation training. Working with Jon Kabat-Zinn’s protocols, I discovered that my relationship with food reflected deeper patterns of anxiety and perfectionism that I’d been avoiding for years. That’s when I understood that sustainable eating changes require internal transformation, not just external rules.
Now I treat meal preparation as meditation practice. My “Mindful Kitchen” workshops help people transform ordinary cooking into opportunities for self-awareness and emotional healing. I’ve developed over 180 recipes designed for slow, mindful preparation—complex enough to keep you present, simple enough not to overwhelm your nervous system.
I believe food becomes medicine when we approach it with presence rather than reactivity. The kitchen can be our monastery if we choose to enter it with reverence.