
If you’ve ever scrolled through beautiful cake inspiration and thought, “There is no way *I* could ever make something that stunning,” then pull up a chair! Because I’m Leonardo, and I live to prove that statement wrong. I truly believe that baking should be an incredible adventure where your kitchen becomes your personal design studio. Forget complicated techniques taught only in elite pastry schools; we are making magic happen right here at home.
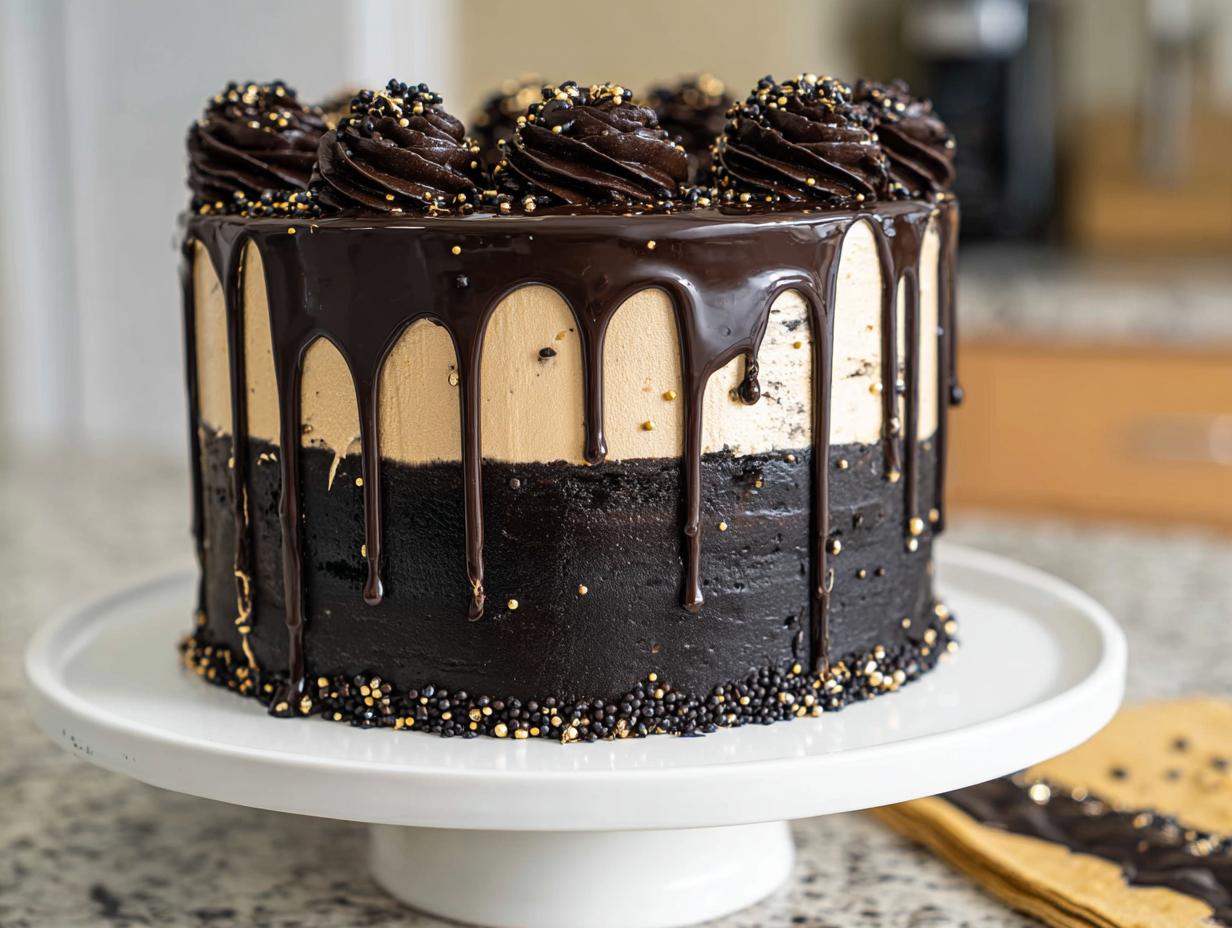
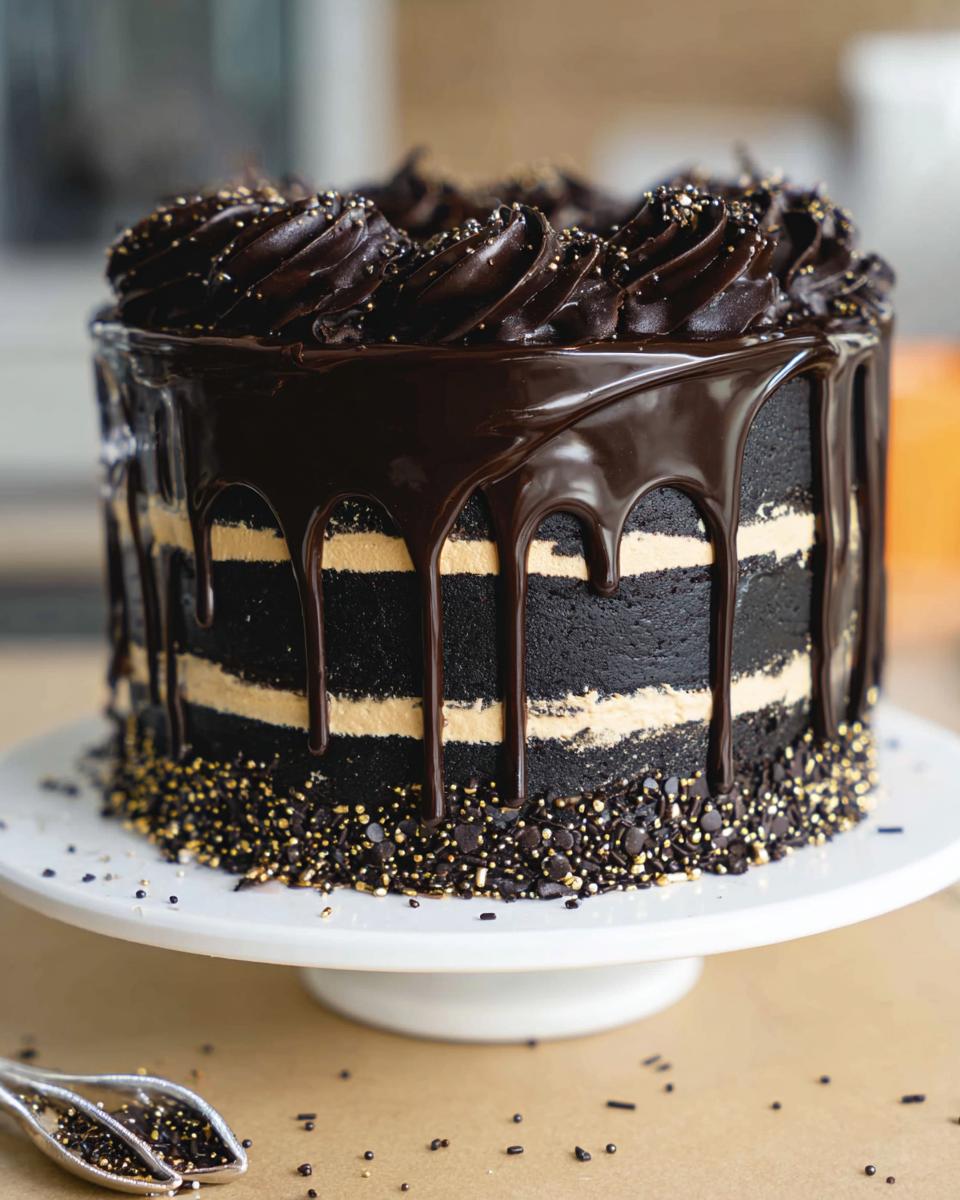
My specialty is creating desserts that stop conversations, and nothing achieves that quite like a bold, dramatic centerpiece. That’s why this recipe for the Black and Gold Drip Cake is one of my absolute favorites to share. It’s pure drama on a plate!
I still remember the first time I attempted a drip cake for a friend’s birthday. It was a modest kitchen adventure, fueled by a YouTube tutorial and a vision of grandeur. As I drizzled the chocolate ganache over the edges of my cake, I was filled with anticipation and a hint of trepidation. The dark chocolate contrasted beautifully against the golden accents I had carefully planned for. When I finally presented the “Black and Gold Drip Cake,” my friends’ eyes lit up—seeing their delight made the effort worthwhile. That moment ignited my passion for creating cakes that not only taste amazing but also look like edible masterpieces.
We aren’t just making a dessert here; we are setting the tone for your entire party theme. You’re going to learn every trick to get that silky, flawless black crumb and that perfect, controlled drip. Trust me, once you master this, you’ll be planning celebrations just so you can bake it again!
Why This Black and Gold Drip Cake Recipe Works (E-E-A-T)
Okay, so you’re looking at this masterpiece and wondering what makes my approach worth your time. I get it! There are a million recipes out there, but this one is built to deliver show-stopping results without the massive headache. This isn’t just a pretty face; it’s a deeply flavored cake engineered for success.
We focus on technique and quality ingredients, which really helps set the tone for your entire Party Theme. When you see the final result, you’ll know exactly why I trust this method completely.
Key Features of Our Black and Gold Drip Cake
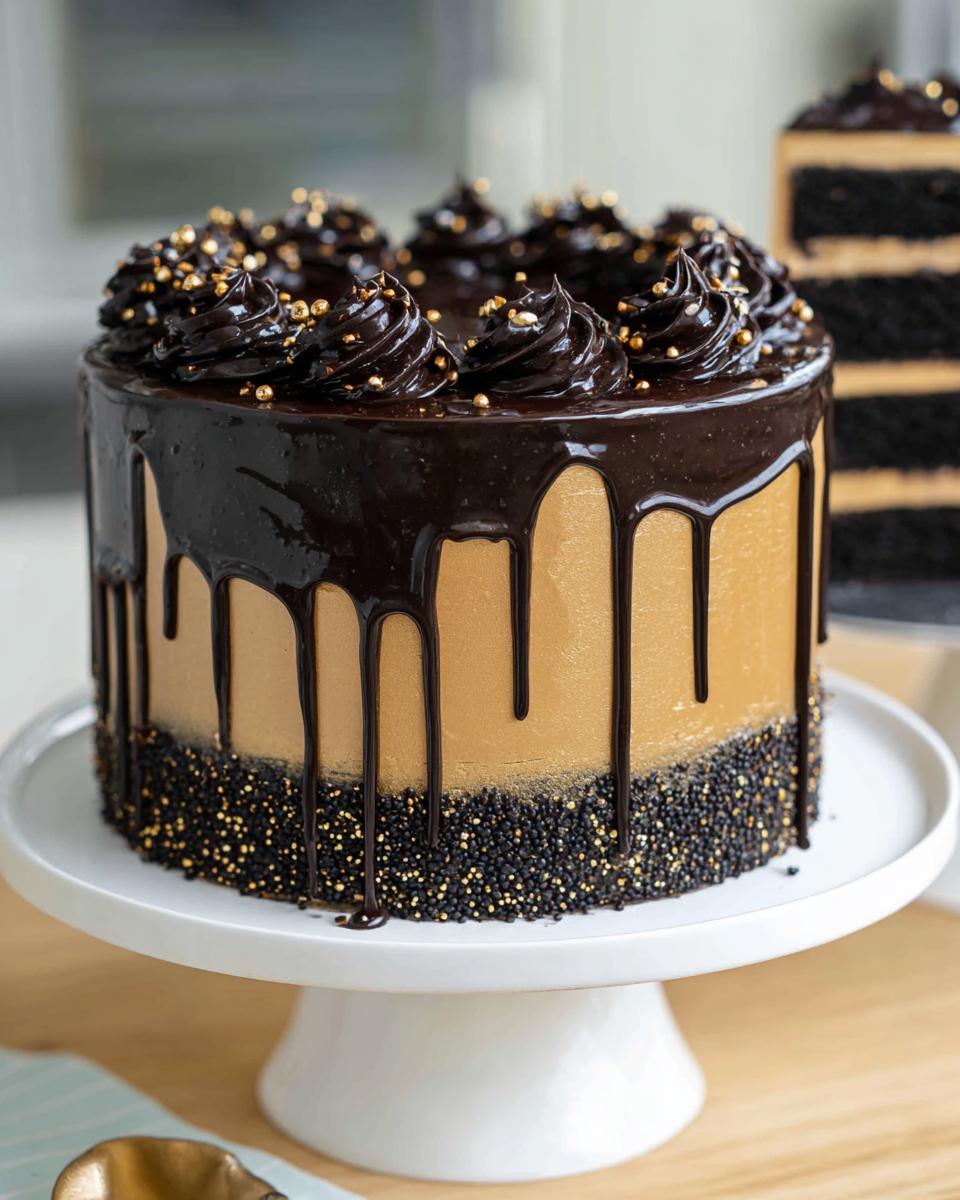
- The black cocoa powder gives us that gorgeous, dramatic hue we want without tasting bitter—it’s intense chocolate flavor, pure and simple.
- We test the chocolate ganache mixture religiously so you get those controlled, stunning drips, not pools of melted mess at the bottom.
- The dark chocolate buttercream is sturdy enough to handle the decorations but still melts beautifully in your mouth with every bite.
- Every step, from the cake batter consistency to the final chill time, is designed to be trustworthy and repeatable, even if you’re new to drip cakes!
Gathering Supplies for Your Black and Gold Drip Cake
Before we dive into the mixing bowls and start creating that incredible color, let’s get our tools ready. Having everything lined up just makes this whole operation smoother, believe me. You want to focus on the artistry, not hunting down a spatula mid-frosting!
For a stunning final presentation, especially when we’re achieving those sharp edges and that perfect Drip Cake look, the right equipment is non-negotiable. Think of these as your painter’s brushes for your edible canvas.
Essential Equipment for Cake Assembly
Don’t let this list scare you! Most of these are basics every serious baker should have. If you’re looking for general tips on stocking your baking arsenal, you can always check out my favorite resources, like this helpful list of general baking notes I keep handy.
- You’ll need your set of 8-inch cake pans—we are aiming for high, even layers here.
- A spinning cake stand is your best friend for getting an even crumb coat and applying that drip without touching the sides.
- Don’t forget a sturdy 10-inch greaseproof cake board to build and present your final cake on.
- Grab a large offset spatula and a good bench scraper. Seriously, the smoother you get that final coat, the better the drip will look!
- An electric hand mixer or a stand mixer makes whipping up that dark chocolate buttercream so much easier.
- For the final decorative flourishes, have a small piping bag ready with an open star frosting tip.
Ingredients for the Black and Gold Drip Cake Components
Right, let’s talk about what you need to gather. This is the moment where we set ourselves up for success, so please, read those notes next to the measurements! If you’re going to nail that deep, moody color and still have a cake that tastes incredible, precision matters here. We’ve broken everything down by what part of the cake it belongs to, so you can organize your mise en place beautifully.
Getting the butter to room temperature for the frosting, or making sure your chocolate chips are thoroughly cooled before mixing them in, aren’t just suggestions—they are secrets to a trustworthy outcome. We want creamy, not greasy, and solid, not soupy!
For the Black Cocoa Cake Layers
These layers are all about moisture and that signature depth of color. That black cocoa powder is non-negotiable; it provides the darkness without the bitterness you sometimes get from regular cocoa.
- Two cups of all-purpose flour (that’s 260g)
- Two cups of granulated sugar (400g)
- Three-quarters of a cup of black cocoa powder (75g) – this is the star!
- Two teaspoons of baking powder (8g)
- One and a half teaspoons of baking soda (9g)
- One teaspoon of fine salt (6g)
- One cup of warm water (240g)
- One cup of buttermilk, make sure it’s room temperature (240g)
- Half a cup of vegetable or canola oil (110g)
- Two large eggs, which absolutely *must* be room temperature (112g)
- Two teaspoons of vanilla extract or vanilla bean paste (8g)
For the Black Dark Chocolate Buttercream Frosting
This frosting needs to be smooth and pipeable, so paying attention to the temperature of your butter and the cooling process for the melted chocolate is key. Don’t rush the cooling!
- Two cups of unsalted butter, room temperature, please! (454g)
- One cup of black cocoa powder (100g)
- One teaspoon of vanilla extract or vanilla bean paste (4g)
- Half a teaspoon of fine salt (3g)
- Four cups of powdered sugar (500g), and you should definitely sift this!
- Half a cup of heavy whipping cream, room temperature (120g)
- One cup of semi-sweet chocolate chips, melted and completely cooled (180g)
- You’ll also need black gel food coloring if you want that extra deep, nighttime black hue.
For the Black Chocolate Drip
The drip is where we get extra dramatic. It needs to flow just right, which means knowing the right ratio of cream to chocolate chips. The black gel coloring here just boosts that intense shade.
- Half a cup of semi-sweet chocolate chips (95g)
- One-third of a cup of heavy whipping cream, room temperature (80g)
- One squirt of black gel food coloring – this is what makes it pop!
Step-by-Step Instructions to Bake the Black and Gold Drip Cake Layers
Now for the fun part—getting these incredibly dark layers baked! Remember, the secret to a show-stopping cake, especially one as dramatic as our Black and Gold Drip Cake, is getting the foundation perfect. Don’t rush the preheating; we need that oven steady!
If you’re making this for a big event, I highly recommend checking out how to organize other recipes you love on my general recipe index page, just to keep things tidy!
Mixing and Baking the Cake Batter
First things first: Get that oven set to 350 F/ 175 C. Time to prep those 8-inch pans—line and grease them well. In a super big bowl, we whisk together all the dry stuff: flour, sugar, that gorgeous black cocoa, baking powder, soda, and salt. Get them really incorporated.
In a separate spot, mix up your wet ingredients—warm water, buttermilk, oil, your room-temperature eggs, and vanilla. Pour those wet ingredients right into the dry mix. You’re just mixing until they come together! Seriously, the batter will look thin, almost watery. That’s exactly what we want for deep moisture!
Use a kitchen scale—this is my little tip for perfect layers! Weigh your pans as you pour the batter to split it evenly between them. Bake these beauties for about 24 to 27 minutes.
Cooling and Preparing Layers for Frosting
Once they come out looking glorious, let them rest in the pans for just 10 minutes. Don’t wait longer! Then, gently flip them out onto tall wire racks to cool completely. This step is crucial; if there’s any heat left when you frost, you are asking for a melted disaster.
When they are totally cool, grab a serrated knife and level those tops off until they are perfectly flat. If you’re doing this assembly later, go ahead and wrap those layers tightly and pop them in the freezer. Cold layers are so much easier to handle when you’re ready to start stacking!
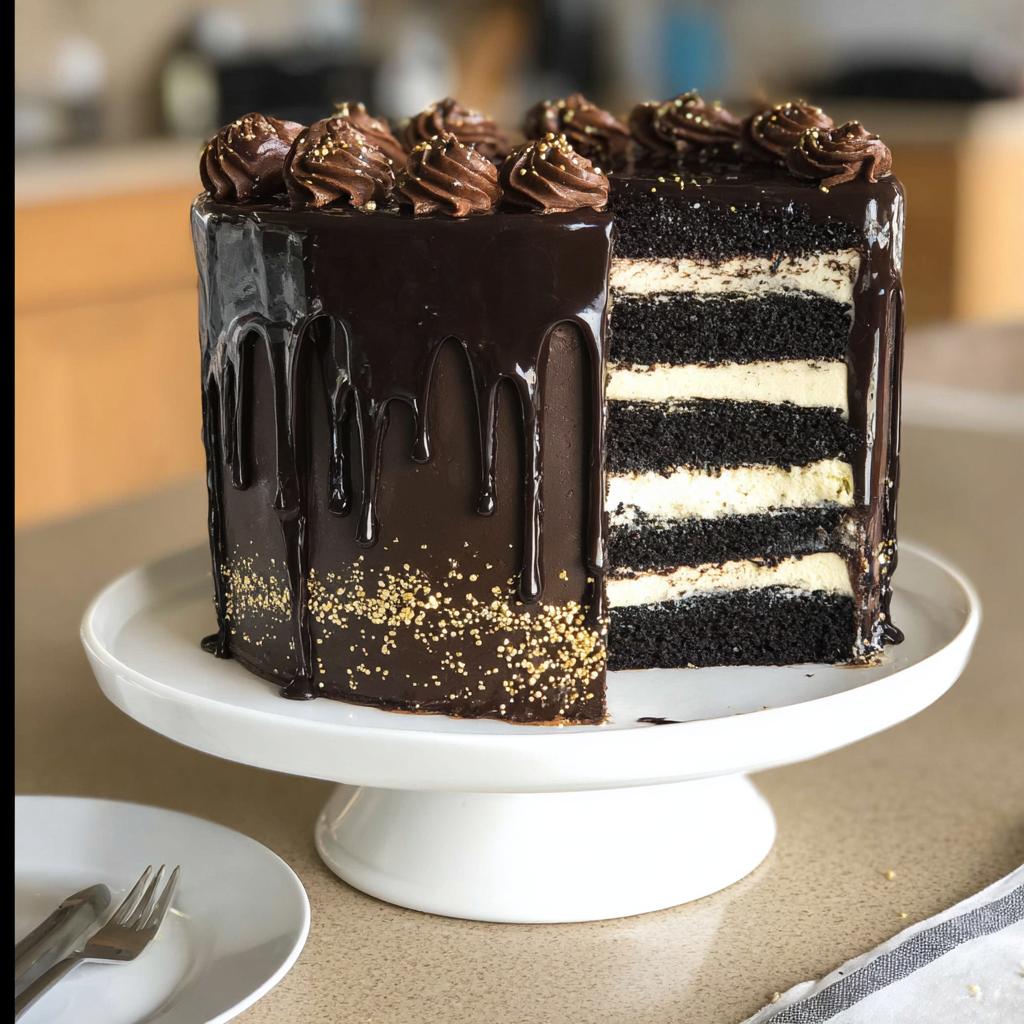
Assembling and Crumb Coating Your Black and Gold Drip Cake
Time to build! You’ve got your perfectly flat, cool layers, and your dark chocolate buttercream is ready to go. This is where we transform those cakes into the structure that will support our dramatic look. Remember, we are aiming for that sharp, professional finish we need before we even think about the drip.
Stack your first layer onto the cake board—use a tiny dab of frosting underneath so it won’t slide around. Start layering it up, adding a nice, even layer of that rich Buttercream Drip between each tier. Then comes the crucial crumb coat. Spread a thin, whisper-thin layer of frosting over the entire cake. Don’t worry about crumbs; that’s why we do this first coat!
Making the Dark Chocolate Buttercream
When you mix up that buttercream, make sure those two cups of butter were legit room temperature—soft, but not greasy. Beat the butter until smooth, then incorporate the sifted black cocoa, vanilla, and salt. Slowly add that powdered sugar along with the cream. Finally, gently fold in your cooled, melted semi-sweet chocolate. If it seems too stiff, add a tiny splash more cream, but be careful not to over-thin it!
Achieving Sharp Edges with Chilling
This next part is non-negotiable if you want those clean lines. After the crumb coat, pop the whole thing into the fridge for a solid 30 minutes, or even 10 if you are impatient like me and use the freezer! That chill firms up the crumbs so they don’t mix into your final coat.
Once firm, take it out and apply your second, thicker layer of frosting. Smooth it perfectly with your bench scraper. Then, chill it *again* for another 20 minutes. This double-chill technique locks in those sharp corners, making the final drip application so much easier and cleaner. If you want more visual inspiration on the assembly process, take a peek at how other bakers handle their drip cake styles!
Mastering the Drip Technique for the Black and Gold Drip Cake
We’ve got a smooth, chilled canvas—now it’s time for the moment everyone waits for! This chocolate drip is what takes your beautiful cake into statement territory. This style is absolutely perfect for those glamorous celebrations, maybe even your next big milestone or as a stunning choice for New Year Cake Ideas. You need the drip to look rich and glossy, not thin and runny, so pay attention to this part!
Preparing the Perfect Chocolate Drip Consistency
First, we need that ganache. We heat the heavy cream until it’s steaming hot and pour it right over those semi-sweet chocolate chips. Let it sit for a minute—don’t touch it! Then, stir slowly until you have a smooth, combined mix. Add your black gel coloring now to get that deep shade. Let this mixture cool for about 10 minutes. You want it warm to the touch, but definitely not hot. If it’s too warm, it will slide right down the sides!
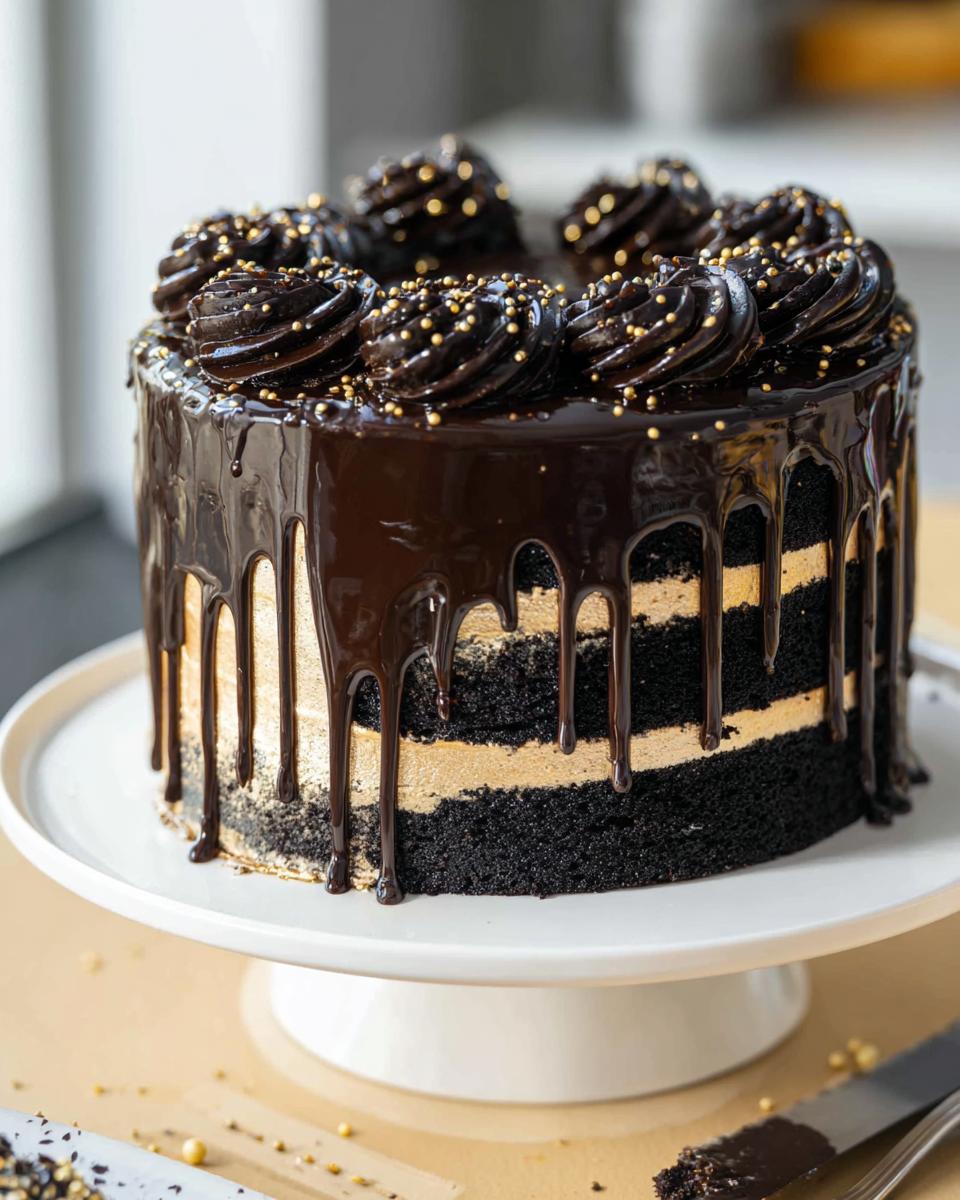
Applying the Drip for a Professional Look
The cake *must* be cold right before you start this. Grab a spoon or, even better, a small squirt bottle for control. Start at the edge of the cake, gently spooning or squeezing a little bit of the warm black drip mixture right over the edge. If you want long, dramatic drips, use a bit more; if you want short ones, use less. Let gravity do the work! Once the drips are done, you can add that edible gold paint or those sprinkles right on top before the drip sets completely.
Final Touches: Decorating Your Black and Gold Drip Cake
The structure is perfect, the drip is set—now we finally get to play with the sparkle! This is the part where we really lean into that luxurious vibe. If you’ve got gold luster dust, edible gold paint, or even some nice gold-flecked sprinkles, now is the time to bring them out. This is what transforms a great chocolate cake into a true showstopper, the perfect Black and Gold Drip Cake!
I recommend working quickly but carefully here since the cake is chilled and your buttercream is firm. If you chilled the cake too long, though, let it sit on the counter for just five minutes so the frosting softens slightly—that keeps things from cracking.
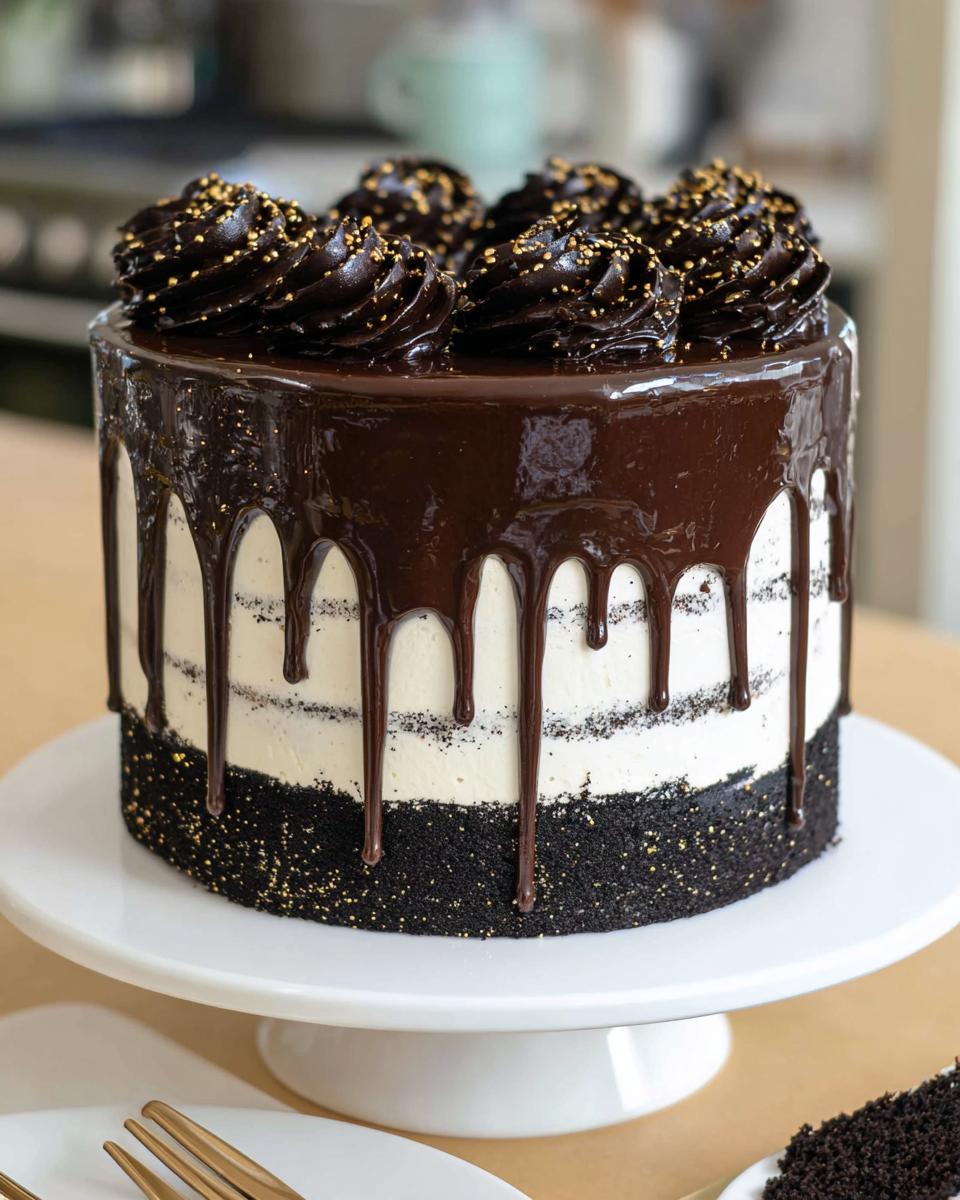
First, tackle the top edge. Remember those swirls we planned? Load up that piping bag with the remaining dark chocolate buttercream and that open star tip. Pipe little dollops right along the top edge of the cake, spacing them evenly. These swirls give you something beautiful to anchor your gold elements to.
Now for the gold! I always use a small, clean paintbrush reserved *only* for food projects. Dip it lightly into edible gold paint (you can thin it with a drop of clear extract if it’s too thick) and gently flick or brush the shine onto the raised edges of the buttercream swirls. A light touch goes a long way here; we want shimmer, not heavy coating.
If you have leftover sprinkles that match your theme—maybe black ones, tiny gold nonpareils, or even some small edible pearls—tuck a few right into the center of those piped swirls. It adds texture and catches the light beautifully. Honestly, stepping back and looking at the finished Black and Gold Drip Cake after these final touches is the most rewarding part of the entire baking process. You made this!
Tips for Success and Troubleshooting Common Issues
Baking a cake this spectacular is rewarding, but sometimes things don’t go exactly to plan, right? Don’t you panic! Even the steadiest hands sometimes end up with a little kitchen drama. I’ve been there—trust me. The key to being a great baker isn’t avoiding mistakes; it’s knowing exactly how to fix them without starting over. We want this Black and Gold Drip Cake to be perfect, so here are the few little fixes I rely on.
If you ever need a quick check on general baking wisdom or running into problems that aren’t cake-related, I always refer back to my favorite troubleshooting spots, like this guide on how to make things foolproof. It reminds you that persistence pays off!
Fixing a Runny Drip or Crumbly Frosting
Let’s tackle the two big worries first: the drip and the frosting. If your beautiful black drip is running too far down the sides, it was just too warm or too thin when you applied it. Don’t try to fix it by scraping it off; that will just ruin your beautiful final coat of buttercream underneath. The solution is simple chilling! Pop that cake straight back into the fridge for 15 to 20 minutes. The cold temperature will slow the flow and allow the chocolate to set up before it reaches the bottom board.
Now, what if your lovely dark chocolate buttercream is looking patchy instead of smooth? That usually means the butter got too warm while you were smoothing, or maybe the ratio of powdered sugar to liquid was slightly off. If it’s crumbly, it usually means you need slightly more cream or milk, added just a teaspoon at a time while the mixer is running low. If it’s too soft, add just a quarter cup more of sifted powdered sugar.
A quick tip about that black cocoa flavor: if you find it tastes slightly metallic or bitter (which can happen with some strong black cocoas), you can balance that out right in the buttercream by adding just one extra teaspoon of vanilla extract or a tiny splash of strong black coffee when you mix in the liquids. It deepens the chocolate note and smooths out any sharpness. Easy fix!
Frequently Asked Questions About This Celebration Cake
I know you’re probably itching to start baking, but sometimes just a quick little Q&A session can save you hours of worry! These cakes are showstoppers, and questions are totally normal when you’re working toward that perfect Black and Gold aesthetic. I pulled together the ones I hear most often from people drooling over ordering or making their own.
If you’re curious about me or generally want to know more about where I source my inspiration, you can always check out my About Page to see what drives my passion for visual culinary art!
Can I make the layers ahead of time for my Black and Gold Drip Cake?
Oh, absolutely! If you want to make your life easier, you should definitely make the cake layers ahead of time—that’s how I tackle big projects. Once those dark cocoa layers are completely cool, wrap each one extremely tightly in plastic wrap. You can store them like that at room temperature for a couple of days, but honestly, they are fantastic when frozen! Pop them in the freezer and they’ll keep beautifully for up to a month. When you’re ready to assemble, just thaw them overnight on the counter first, still wrapped, so they don’t pick up any moisture from your fridge. Perfect for when you need a last-minute Drip Cake!
What is the best way to store a finished Drip Cake?
Because this cake is covered in a serious layer of chocolate buttercream, it behaves best in the fridge, tucked away from any strong smells. Cover it loosely with a cake dome or an upturned large bowl, making sure the covering doesn’t touch your delicate gold decorations. It’ll keep well in the refrigerator for about three to four days.
Now, this is important: Buttercream and ganache can get super hard right out of the fridge! If you plan to serve it the next day, take the cake out about an hour before you cut into it. Letting it sit on the counter allows that buttercream to soften up just enough so you get that beautiful, creamy texture you worked so hard for.
How do I achieve a true, deep black color without affecting the taste?
This is my absolute favorite part of the recipe design! The key here is leaning heavily on high-quality black cocoa powder for the cake layers and the frosting. Black cocoa is Dutch-processed to such an extreme degree that it pulls out the acidity and leaves this deep, dark, almost Oreo-like flavor profile that isn’t bitter at all. If you just use regular cocoa with a ton of black food coloring, you end up with a dusty, slightly sharp taste.
For the drip, we use a tiny bit of black gel food coloring because we need that extra boost to compete with the richness of the chocolate, but since gel is concentrated, you only need a couple of drops. Use the black cocoa powder as your base flavor booster, and use the gel coloring sparingly just for tinting!
Sharing Your Cake Masterpiece
Okay, deep breath, you did it! You created a towering, glittering, ridiculously impressive Black and Gold Drip Cake. Don’t let all that artistry die in your kitchen without telling someone about it!
Seriously, I live for seeing your triumphs. Pull out your phone, snap a gorgeous picture—make sure to catch that gold shimmer under the light—and share it with the world (and me!). Tag me in your creation so I can see how you personalized the decorations and see that amazing buttercream texture you achieved.
And please, if this recipe saved your party, made your friend cry happy tears, or just made you feel like a certified pastry artist, let me know! Head down to the comments below and give this recipe a star rating. Your feedback helps me know what recipes to refine and perfect next. Did you use edible pearls? Did you try a red accent instead of gold? Tell me everything!
Happy serving, everyone. Go on, show off your magnificent work!
Black and Gold Drip Cake
Ingredients
Equipment
Method
- Preheat your oven to 350 F/ 175 C. Line and grease three, eight-inch cake pans, or four, seven-inch pans.
- Combine flour, sugar, black cocoa powder, baking powder, baking soda, and salt in a large bowl. Whisk together until combined.
- In a separate, large bowl, add warm water, buttermilk, oil, eggs, and vanilla extract. Stir to combine.
- Pour the dry ingredients into the wet ingredients. Mix by hand until fully incorporated. The batter will be thin.
- Divide the batter evenly between the cake pans and bake for 24-27 minutes. Use a kitchen scale to weigh the pans for even layers.
- Remove cake layers from the oven and let them cool in the pans for 10 minutes. Loosen them with an offset spatula and flip onto wire racks to cool completely.
- Once cooled, level the top of each cake layer with a serrated knife. Wrap and freeze if making in advance.
- Beat butter on medium speed for 30 seconds until smooth.
- Add sifted black cocoa, vanilla extract, and salt. Mix on low until incorporated.
- Slowly mix in powdered sugar and heavy cream on low speed until combined.
- Mix in cooled, melted semi-sweet chocolate on low speed until fully incorporated and desired consistency is reached.
- Add black gel food coloring if a deeper black is desired. Cover frosting flush with plastic wrap to prevent crusting.
- Place semi-sweet chocolate chips in a heatproof bowl.
- Heat heavy cream in a heatproof bowl in the microwave for 45 seconds to 1 minute until steaming. Alternatively, heat on the stove until simmering.
- Pour hot cream over the chocolate chips. Let sit for 1-2 minutes.
- Add black gel food coloring, then stir slowly until smooth and combined.
- Set aside and cool for about 10 minutes, until slightly warm to the touch.
- Stack and frost the cake layers on a cake board, using a dab of frosting to secure the first layer.
- Add an even layer of buttercream between each cake layer with a large offset spatula.
- Spread a thin coat of frosting around the cake to cover the layers. Smooth with a bench scraper.
- Chill the cake for 30 minutes in the fridge or 10 minutes in the freezer until the frosting is firm.
- Add a second, thicker layer of frosting and smooth with a bench scraper.
- Chill the cake again for 20 minutes in the fridge or 10 minutes in the freezer until firm.
- Test the ganache consistency. If needed, gently warm it in the microwave for a few seconds.
- Add drips to the chilled cake using a squirt bottle or spoon.
- Decorate as desired. Pipe swirls on top with an open star tip, add sprinkles, or paint with edible gold paint.
Notes
Tried this recipe?
Let us know how it was!
Visual Culinary Artist & Aesthetic Designer
When the pandemic killed my career as a luxury hotel photographer overnight, I was stuck in my studio apartment with nothing but time and vegetables. That’s when I started treating meal prep like photography projects—and discovered that the same principles that made five-star dishes camera-ready could turn humble zucchini noodles into social media gold.
My fine arts degree from Parsons taught me that people eat with their eyes first. After years behind the lens capturing haute cuisine, I realized that successful dieting often depends more on visual satisfaction than pure nutrition. When your food looks amazing, you actually want to stick with your eating plan.
My recipe development feels more like an art studio than a test kitchen. I use color theory to guide ingredient selections—purple cabbage with golden cauliflower, emerald herbs against ivory cheese. My “Edible Landscapes” series transforms standard low-carb ingredients into miniature scenic compositions that make vegetables feel aspirational rather than obligatory.
I spend evenings exploring art galleries and practicing watercolor painting, always looking for inspiration. My philosophy is simple: make low-carb food visually irresistible, and dietary compliance becomes an aesthetic choice rather than a health sacrifice.