
Sometimes, we just need a side dish that absolutely *sings*. You know, the kind of food that makes even the pickiest eaters clean their plates? For me, that means potatoes, but not just any potatoes—they have to be loaded with crunch! Today, I’m sharing my foolproof method for **Crispy Smash Potatoes**, the secret to getting those incredible golden, crunchy edges with a fluffy center, but with hardly any fuss at all.
I still vividly remember the first time I made these for my son after his diagnoses. It was a chilly evening, and I wanted to create something special that would remind him of the carefree meals we used to enjoy together. I carefully selected gluten-free ingredients and used my systematic kitchen protocols to ensure everything was safe for him, all while keeping the joy of cooking alive. When those crispy, oven-baked potatoes came out of the oven, I watched his eyes light up with excitement as he took the first bite. His smile was a reassuring reminder that even within our dietary limitations, we could celebrate flavors and experiences that felt somewhat normal again.
Trust me, once you try this technique, you’ll never go back to regular roasted potatoes. This is truly the easiest path to an amazing, satisfying, and safe **Easy Side Dish** for everyone at your table.
Why You Will Love These Crispy Smash Potatoes
Honestly, I think these might be my most requested side dish now—and for good reason! They hit every single mark we look for when making a comforting meal, especially when juggling different needs at the dinner table. They just work, and they taste like happiness.
- Super Quick Prep: You only boil the potatoes for under 30 minutes, and that’s the hardest part! Everything else is just a quick smash and a drizzle.
- The Best Texture Ever: Seriously, the texture is what sets these apart. You get those phenomenal, golden, super crunchy edges every single time, which is why we call them Crispy Smash Potatoes.
- Foolproof Baking: Because they’re Oven Baked, you don’t have to hover over the stove. Set the timer and go enjoy time with your family.
- Total Versatility: These are the best potato base for everything! They work with simple herbs or go totally wild with cheese and bacon crumbles. Check out some quick ideas here: easy low-carb sides if you need inspiration for the rest of the meal.
Best Potatoes For Crispy Smash Potatoes and Equipment Needed
Okay, let’s talk about the MVP of this whole operation: the potato! You can use almost anything, but to guarantee those ridiculously crunchy results, you need to think about starch. For me, a slightly higher starch potato—like a Yukon Gold, or even a standard Russet if they are smaller—works wonders because when you boil them, the starch loosens up. This fluffier interior gets amazing when you smash it, creating those super delicate edges that crisp up when they bake.
Small potatoes are the secret weapon for making these a true Party Favorite finger food, but medium ones give you that perfect crispy top layer with a massive fluffy inside. Consistency is key here; try to pick potatoes that are all roughly the same size so they cook evenly during that initial boil.
Essential Equipment for Perfect Crispy Smash Potatoes
You don’t need anything fancy, which is another reason I love this as a go-to recipe when I’m cooking under pressure. I always pull these items out first:
- A large pot for boiling.
- A colander for draining.
- A sturdy baking sheet—this is where the magic happens!
- A large, heavy fork for squishing.
- A potato masher, if you prefer more *oomph* to your smash.
Make sure your baking sheet is big enough so the potatoes aren’t touching too much. We need personal space for maximum crispiness!
Gathering Ingredients for Your Crispy Smash Potatoes
Getting these ingredients together is incredibly simple, and honestly, it’s so reassuring because most of this stuff is probably already in my pantry! Remember, precision matters here because we are laying the foundation for flavor, especially when it comes to seasoning. I’ve broken down exactly what you need so you can pull everything out at once.
For the Potatoes
You have a choice here depending on how you want to serve them. If you want something you can truly eat like a little finger food, grab the small ones. If you want a big, fluffy center, go for the medium ones, like I usually do for a nice, hearty side.
- Small potatoes: You’ll need about 700g of these, which usually works out to around 12 to 14 little nuggets.
- Medium potatoes: If you go this route, aim for 1kg, which usually nets you 6 to 8 potatoes.
For Cooking and Seasoning the Crispy Smash Potatoes
This is where we set up the perfect crunch! Don’t skimp on the fat here; that melted butter and olive oil mix is what turns these into beautifully golden Crispy Smash Potatoes once they hit the high heat of the oven.
- Salt for boiling: You need about 1 tablespoon of salt just to flavor the water—this really helps season the potato from the inside out while boiling.
- Unsalted butter: We need 30g, measured, and it must be fully melted.
- Olive oil: Just 1 tablespoon of good olive oil.
- Salt for sprinkling: About 3/4 teaspoon, this is for that final sprinkle before baking.
- Black pepper: A quarter teaspoon is perfect to start.
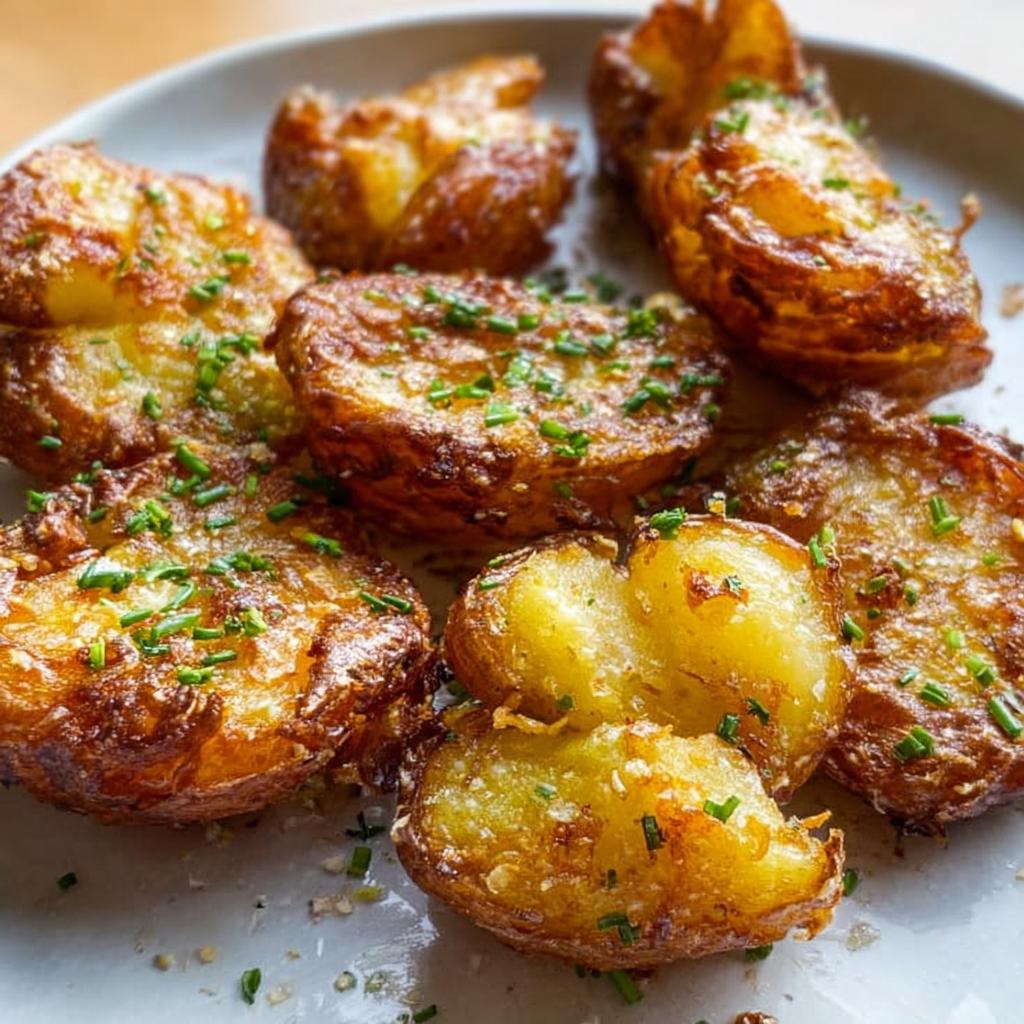
- Parsley: If you want that pretty green color on top, finely chopped fresh parsley is optional for garnish right at the end.
See? So straightforward! Having everything measured keeps that cooking flow going smooth, which is essential for success when you’re making an Easy Side Dish for the family.
Step-by-Step Guide to Oven Baked Crispy Smash Potatoes
This is where the real fun begins! We are going from soft, boiled potatoes to those gorgeous, crunchy, irresistible little discs. The whole point of this method for our Oven Baked Crispy Smash Potatoes is to maximize the surface area that touches the hot oil and the pan. Don’t rush the boiling, but definitely don’t skip the drying part—that’s the secret handshake for crunch!
Boiling and Drying for the Best Crispy Edges
First, get your water boiling, making sure you add that tablespoon of salt right into the pot. I usually pop my potatoes in when the water is already at a rolling boil. Small potatoes take about 20 to 25 minutes, but the medium guys might sneak up on you and need 30 minutes. You’ll know they’re done when the skin gives way easily and might even start to split when you wiggle them with a fork. That skin splitting? It’s a good sign! It means they are tender all the way through.
Right after draining them in the colander, we hit that crucial step: drying! You absolutely must let them sit there and steam dry for a full 5 minutes. Trust me, moisture is the enemy of crispiness. If you skip this, you’ll end up steaming the potatoes on the pan instead of roasting them, and that’s just sad. If you are ever worried about the texture of batters, remember how important it is to control moisture; it’s the same principle we use when making perfect gluten-free roux!
The Art of Smashing Your Potatoes
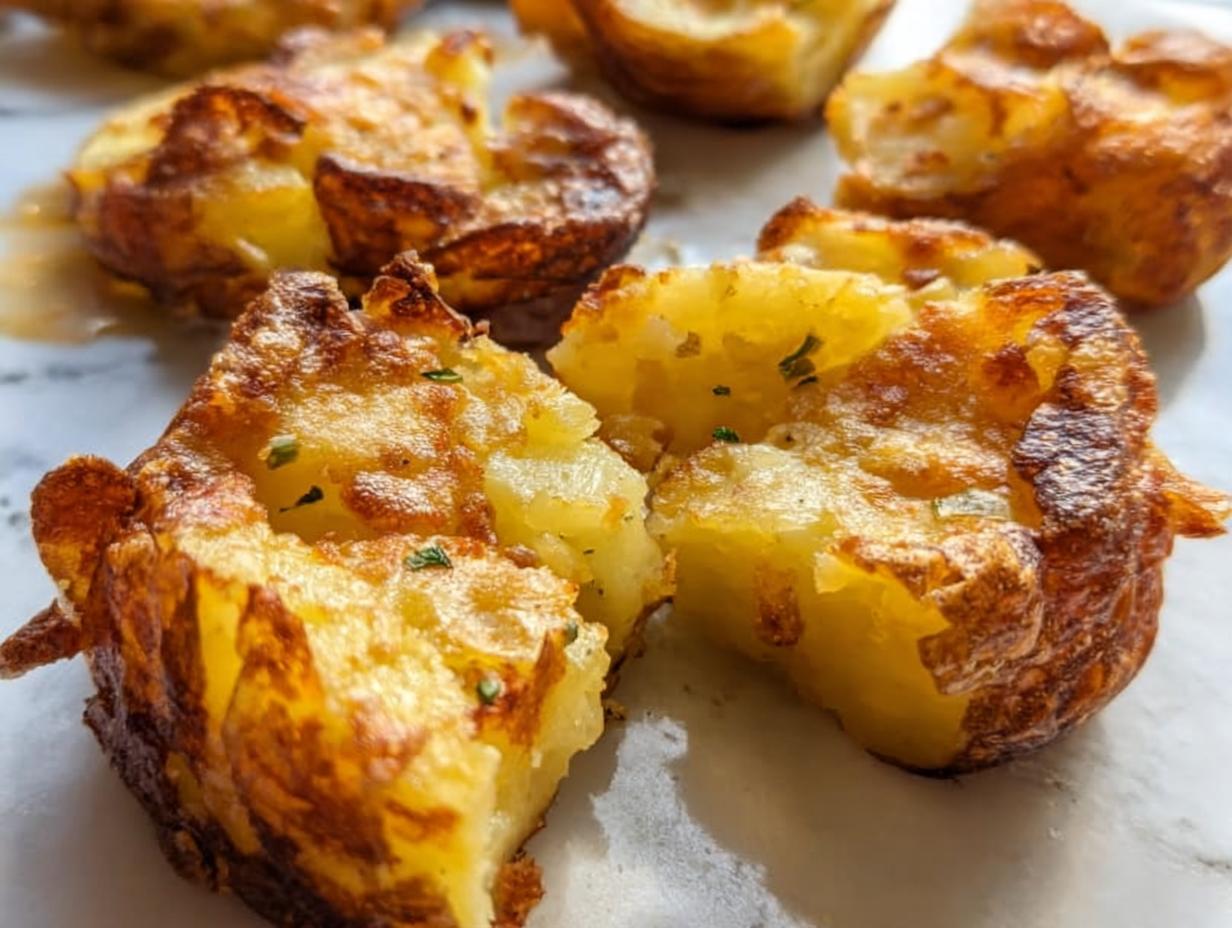
Once they’ve sweated off their immediate liquid, it’s smashing time! Lay them out in a single layer on your prepared baking sheet. I find that using a large, ordinary fork works best because you can really control the pressure. You’re not trying to mash them into baby food! You just want to gently squish them down.
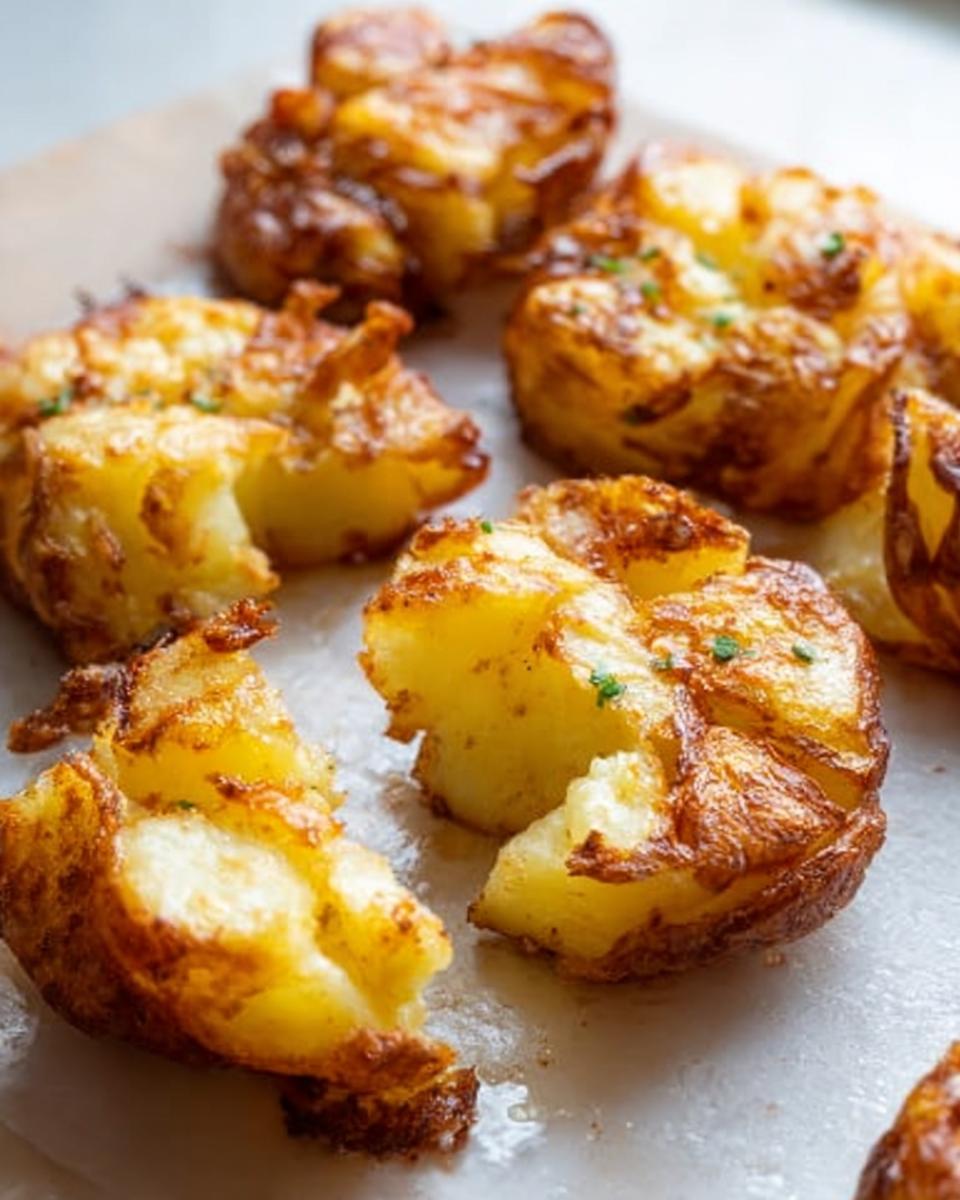
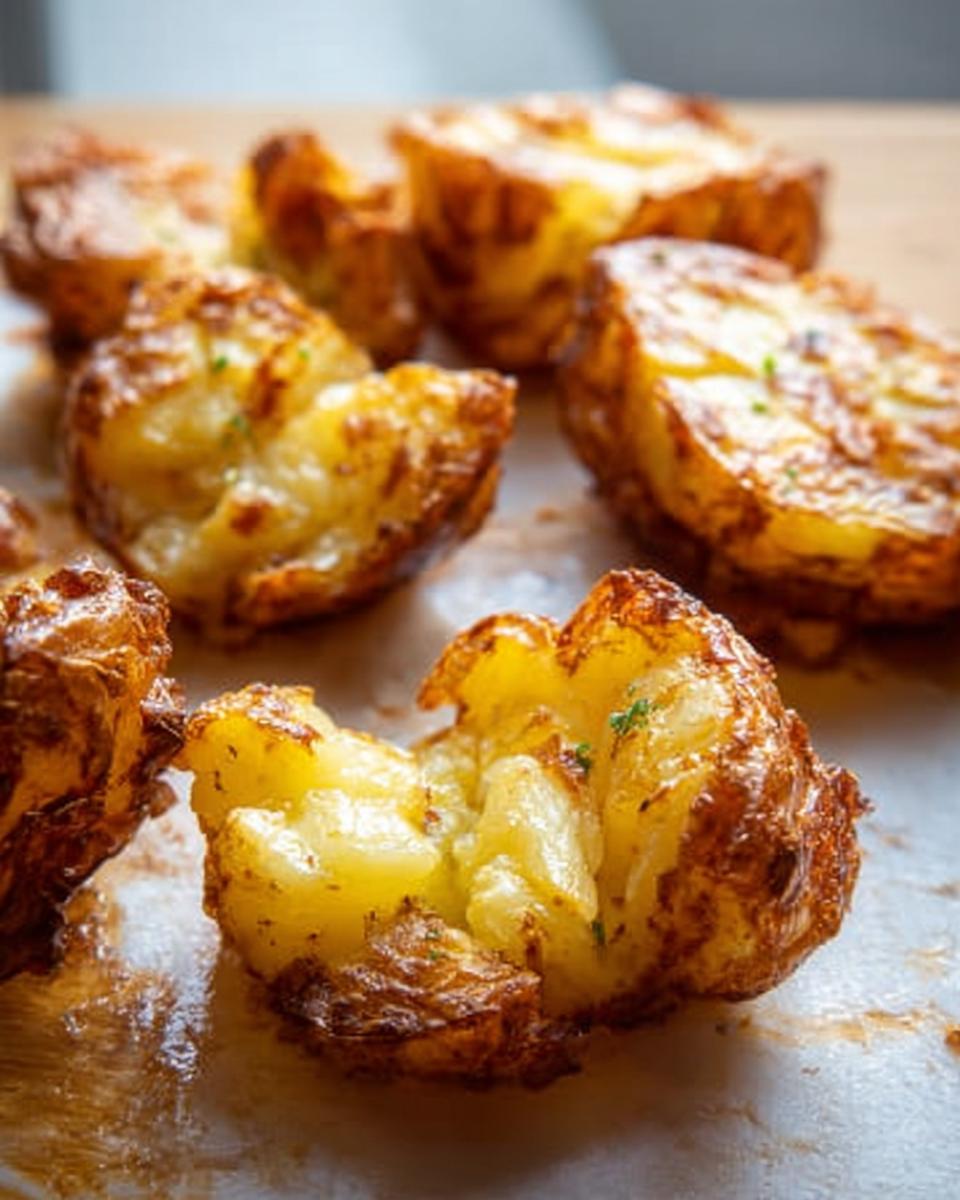
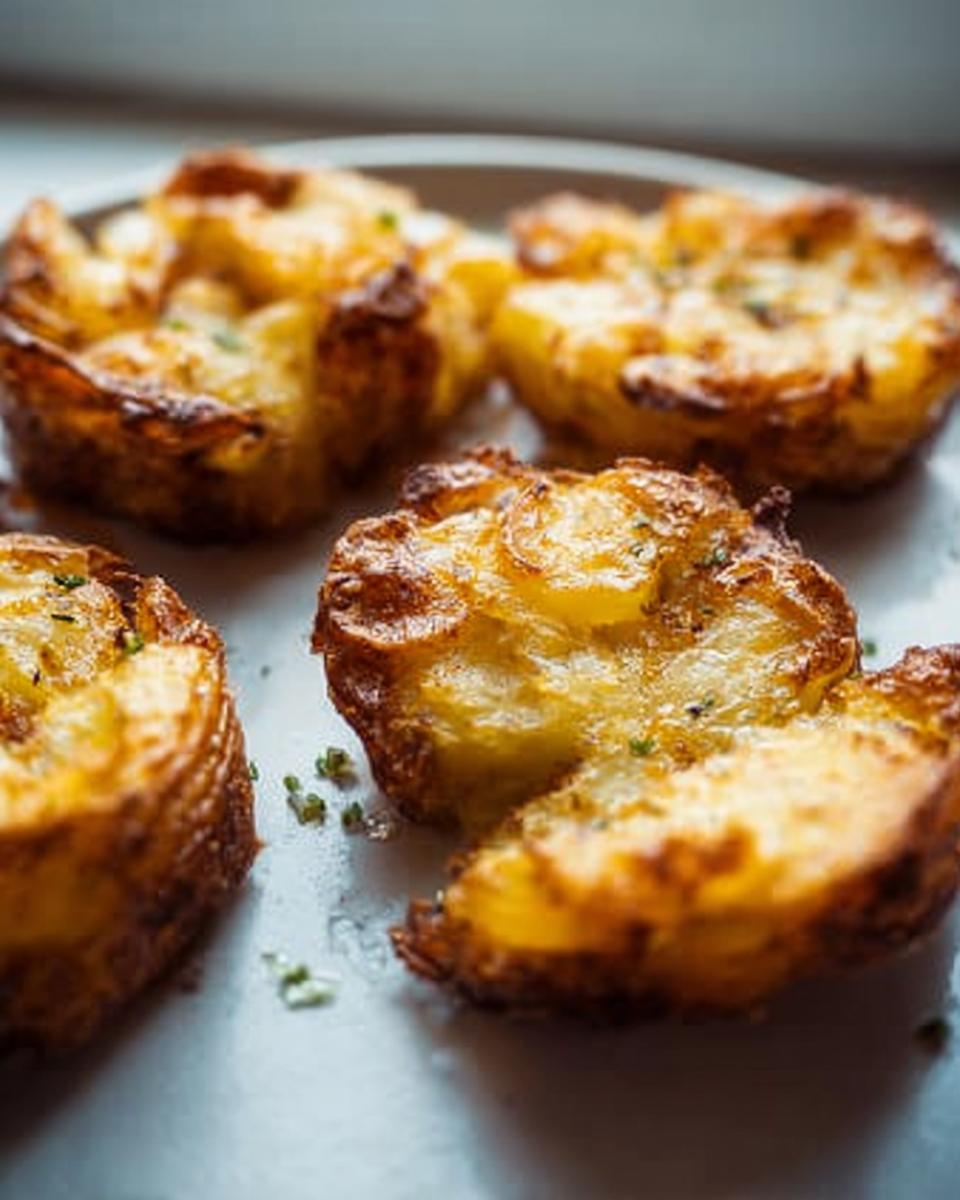
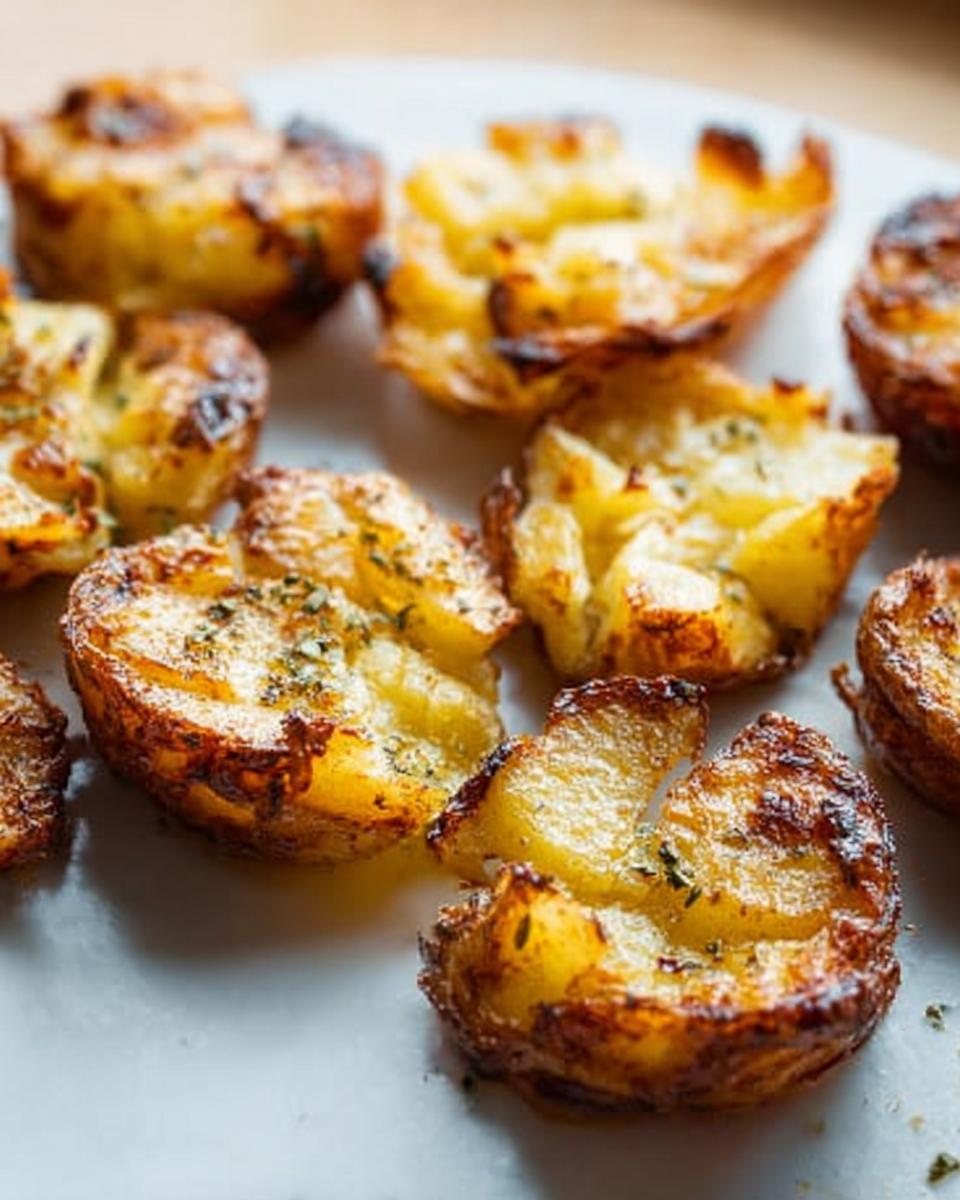
Here’s the technique tip: aim to get them thin, maybe half an inch or less, but don’t worry if they break slightly—that’s actually great! We want an uneven, rugged bottom surface. Those peaks and valleys are going to catch all the butter and oil and become unbelievably crispy.
Baking for Golden Crispy Smash Potatoes
Now that they are smashed and looking a little vulnerable, it’s time to dress them up. Drizzle that melted butter over everything, followed by the olive oil, and shower them with that finishing salt and pepper mix. Make sure the oil gets into all those rough edges we just created. Aim those fats right at the surface!
Preheat your oven to 200°C (390°F). High heat is necessary here! Slide that tray into the oven. And here’s the cardinal rule for achieving peak crunchiness: Do not flip them! I know it’s tempting, but flipping them releases the steam trapped underneath and cools down the part that’s trying to crisp. Let them bake undisturbed for 45 minutes (if small) up to 55 minutes (if medium). You’ll know they are done when the edges are dark golden brown and you can hear them gently crackling when you nudge the pan close. For more great baking tips, especially when using high heat, check out this guide on crispy potatoes from RecipeTin Eats!
Tips for Success with Crispy Smash Potatoes
I’ve baked a lot of potatoes in my day, especially while trying to keep things safe and delicious for my son, and I’ve figured out a few little tricks that really bump these Crispy Smash Potatoes up to the next level. You don’t need gourmet equipment; you just need to know how the potato behaves!
First, remember what I said about potato types? High-starch potatoes will get you that creamy, fluffy interior that crumbles apart just perfectly when you smash them. Waxy potatoes, like new potatoes, are tougher and tend to hold their shape more—they still get great crisp edges, but the inside will be creamier rather than fluffy. It’s just a preference, honestly. If you’re looking for gravy pairings, make sure you check out my tips for rich low-carb gravy to go alongside these!
Now, for the flavor layering—this is where you can really customize things!
- Garlic Power Infusion: If you want that deep, mellow garlic flavor without burning the garlic on the high-heat bake, try this simple infusion. Take two cloves of garlic, smash them slightly so they burst open, and throw them into the small saucepan with your butter *before* you melt it. Let that butter hang out with the garlic for about five minutes over low heat—it soaks up all that savory goodness. Just pull the garlic cloves out before you drizzle the butter over the smashed potatoes. Voila!
- Herbs Welcome: Don’t be afraid to add herbs to the boiling water! Toss in a few sprigs of fresh rosemary or thyme while the potatoes are cooking. The potatoes absorb those lovely aromatics. Just make sure you fish them out before you smash them, otherwise, you’ll end up with little twig bits in your dinner!
The main takeaway here is that these potatoes are forgiving. Don’t sweat if one breaks bigger than another. Those broken pieces are just extra surface area for crunch! That’s what makes this method so reliable for quick, satisfying meals.
Toppings And Seasonings Ideas for Smashed Potatoes
So, you’ve mastered the boil, the smash, and the bake? Fantastic! Now we get to the really fun part: dressing these crispy beauties up. While the basic salt, pepper, and fresh parsley make for a lovely, simple side dish, if you’re making these for a gathering (and trust me, they always become a huge hit!), you need to go a little bigger. These potatoes are the perfect blank canvas for flavor explosions!
Think of the crispy texture as the base for something indulgent. Since everything hinges on that crunch, adding a topping right after they come out of the oven—while they are piping hot—is the key. That residual heat melts the cheese or makes the sour cream just wobble perfectly on top.
For the ultimate **Party Favorite**, let’s kick things up a notch:
- Smoky Sensation: Before you put them in the oven with the oil and butter, sprinkle generously with smoked paprika and a pinch of cayenne pepper if you like a little kick. The paprika toasts up beautifully during the long bake time.
- Cheesy Crown: Once they are out of the oven, immediately sprinkle shredded sharp cheddar or Monterey Jack cheese over the hot potatoes. Cover the pan loosely with foil for about three minutes—it traps the heat and melts the cheese into gooey rivers over those crispy edges.
- The Rancher’s Delight: After baking, skip the butter drizzle (or reduce it) and top with a healthy dollop of full-fat sour cream or, even better, a thick Greek yogurt alternative. Sprinkle with chives and a dash of garlic powder. Heavenly!
- Mediterranean Twist: Once they are out, crush some feta cheese over everything and drizzle with a tiny bit of fresh lemon juice. It cuts through the richness of the oil perfectly.
If you’re looking for other ways to make a big impression with sides, I put together a whole list of Thanksgiving side dishes that work year-round. But honestly, nothing beats the simplicity and wow-factor of these perfectly seasoned **Crispy Smash Potatoes**!
Storage and Reheating Instructions for Crispy Smash Potatoes
I know that sometimes those amazing Crispy Smash Potatoes don’t all get eaten in one sitting. They are so good, but life happens, right? The good news is that leftovers are actually quite manageable if you store them correctly, and you can bring back that phenomenal crunch!
If you happen to have any left over, the most important thing to know is to let them cool down almost completely first. Storing hot or warm potatoes traps steam, which turns that lovely crispy crust into sad sogginess overnight. Once they are fully cool, put them in an airtight container. They’ll do well in the fridge for about three days, but honestly, the texture starts degrading after day two. They are best eaten fresh, but leftovers are a lifesaver!
Now, for the reheating—this is where we save them from being destined for the compost bin! You absolutely cannot use the microwave. I know it’s fast, but nuking them turns the outside soft and mealy. We need that dry, high heat to bring the crisp back.
My absolute favorite way to reheat these is in the air fryer. It’s fast, efficient, and simulates that direct heat needed for the crackle. You just pop them in at about 375°F (190°C) for maybe 5 to 8 minutes, depending on how many you have in there. Make sure they are in a single layer, of course! If you don’t have an air fryer, the oven is your next best bet. Spread them back out on a baking sheet—just like the first time—and pop them into a hot oven (around 400°F or 200°C) for about 10 minutes until they are singing again.
Having great leftovers means you always have an Easy Side Dish ready to go for lunch the next day! If you’re planning your meals ahead, you might find some inspiration in my list of one-pan dinner ideas. Fewer dishes to clean means more time enjoying your perfectly crispy potatoes!
Frequently Asked Questions About Smashed Potatoes
I know when you’re trying to get dinner on the table smoothly, you have questions! That’s totally normal. Dealing with different needs in the kitchen means we have to be a little more precise sometimes, but these Smashed Potatoes are pretty straightforward. Here are the final little bits of wisdom I gathered from testing these over and over again!
Can I make these ahead of time?
Yes, you absolutely can! This is actually fantastic for when you have company coming over. You can boil the potatoes until they are tender, drain them, and even smash them gently onto the baking sheet. Now, here’s the key to making sure they turn out right later: put the pan in the fridge *without* the butter or oil on them. Let them cool completely first! When you are ready to serve them later that day or the next, just proceed right to the oiling/buttering step and follow the baking instructions. It saves so much time!
What is the secret to getting truly crispy edges?
If you want that beautiful, golden crunch, it all boils down to eliminating moisture before the high heat hits. I emphasized this above, but it bears repeating because it’s the difference between Crispy Edges and soggy bottoms! Make sure you let them steam dry for those full five minutes after boiling. Then, after you smash them, let them sit *again* for five minutes to steam dry before you add the oil. And don’t you dare touch them while they bake! Keeping them on one single layer without flipping seals the deal for maximum crispiness.
Can I use sweet potatoes for this recipe?
You can certainly try! Sweet potatoes are a bit different internally; they are softer and wetter than regular potatoes, so they won’t get quite the same internal fluffiness when smashed. If you do use them, you’ll notice they might need slightly less boiling time—maybe just 15 to 20 minutes max—because they cook faster. Also, they tend to brown more quickly due to their sugar content, so keep a close eye on them in the oven and maybe drop the temperature down by about 25°F. They are still delicious, just bake a bit differently!
If you ever want to browse through some other reliable techniques and recipes that work well for tricky dietary needs, you can always check out my main index for all my recipes here. Happy cooking!
Share Your Culinary Wins
Well, we made it! We took humble little potatoes and turned them into the superstars of the dinner table. I truly hope you found this guide to making the perfect Crispy Smash Potatoes as exciting and stress-free as I do every time I make them. That combination of fluffy inside and crunchy edges is just unbeatable, even when you are cooking with dietary restrictions in mind.
Now the best part: I want to hear from you! Did you try one of those fancy topping ideas? Did you use smoked paprika, or did you stick to simple salt and pepper? Please don’t be shy—leave a rating down below and tell me about your favorite way to customize these!
Your success in the kitchen is exactly why I share these methods. It’s all about proving that being resourceful and careful doesn’t mean sacrificing flavor or joy at mealtime. If you want to stay connected, ask questions, or share photos of your stunningly crisp potatoes, you can get in touch with me directly here. Keep cooking with confidence, my friends!
Crispy Smash Potatoes
Ingredients
Equipment
Method
- Boil the potatoes: Bring a pot of water to a boil, add 1 tablespoon of salt. Cook the potatoes until they are soft. Small potatoes will take about 20 to 25 minutes, and medium potatoes may take around 30 minutes. The skin splitting is okay.
- Preheat your oven to 200°C (390°F) or 180°C fan.
- Drain and dry the potatoes: Drain the cooked potatoes and let them dry in the colander for about 5 minutes.
- Smash the potatoes: Place the dried potatoes on a baking sheet. Use a large fork or a potato masher to gently squish them, trying to keep them in one piece. Aim for thinness for crispier results, or slightly thicker for fluffier insides. A more uneven surface will create better crunch.
- Steam dry again: Leave the smashed potatoes on the baking sheet to steam dry for another 5 minutes. This step helps them become crispier.
- Add toppings: Drizzle the potatoes with melted butter, then with olive oil. Sprinkle evenly with salt and pepper.
- Bake until golden: Bake for 45 minutes for small potatoes or 55 minutes for medium potatoes, or until they are deep golden brown and crispy. Do not flip them during baking.
- Serve: Serve the crispy smash potatoes hot. Sprinkle with fresh parsley if desired.
Nutrition
Notes
Tried this recipe?
Let us know how it was!
Dual-Restriction Recipe Engineer & Cross-Contamination Specialist
Everything changed when my teenage son got hit with celiac disease and Type 1 diabetes diagnoses within six months of each other. Suddenly, pizza and pasta were off the table, and most “diabetic-friendly” foods contained gluten. I went from regular mom cooking to navigating what I call “compound restriction cooking”—and I had a kid’s appetite and taste buds to satisfy.
Lucky for us, my background in pharmaceutical quality control gave me the systematic mindset this level of precision requires. My kitchen now operates under pharmaceutical-grade protocols adapted for home use: dedicated prep surfaces, separate storage systems, and testing procedures that verify both carb counts and gluten absence before any recipe gets published.
I’ve developed over 220 recipes that clear multiple dietary hurdles simultaneously—finding gluten-free thickeners that don’t spike blood sugar, creating bread alternatives that meet both keto ratios and celiac safety, and developing desserts that actually taste good to a teenager despite impossible restrictions.
Through my “Safe Kitchen Certification” program, I teach other parents that managing multiple dietary restrictions isn’t about multiplying limitations—it’s about systematic thinking that reveals unexpected possibilities. When you engineer solutions instead of making compromises, restriction becomes innovation rather than deprivation.