
Oh, those chaotic mornings, right? I remember them so clearly—staring into the fridge realizing I have five minutes before I have to run out the door and knowing that settling for sugary cereal just wasn’t going to cut it for fueling a long day. That’s exactly why I fell head-over-heels for batch cooking. Seriously, making a big haul of my Protein-Packed Breakfast Burritos (Meal Prep) has changed my whole week!
This isn’t just about fast food; it’s about having something truly satisfying tucked away in the freezer. I vividly remember the mornings when I would scramble to put something healthy on the table before heading out the door. It was during those hectic days that I discovered the magic of meal prep. One Sunday, I set aside time to create my first batch of these burritos. As I chopped vibrant peppers and sautéed fluffy eggs, it felt less like cooking and more like an art session. Each burrito I wrapped was filled with a burst of color and flavor, and the first bite on a Monday morning reaffirmed my love for thoughtful, satisfying meals.
Now, I eagerly whip up these high-protein, freezer-friendly masterpieces weekly. They honestly start my day off right, feeling nourished and ready to tackle whatever comes next. You are going to love how easy they are!
Why These Protein-Packed Breakfast Burritos (Meal Prep) Are Your New Morning Staple
Seriously, once you try having these in your rotation, you won’t understand how you managed busy weekdays before. We packed these little rolls with everything you need to feel great, not just full.
-
Grab & Go Convenience
That’s the name of the game here! When your alarm goes off, you don’t want to *cook*. You need something you can grab straight from the fridge or freezer, pop in the microwave for a minute, and run out the door. Pure Grab & Go satisfaction!
-
High Protein Content for Lasting Energy
Forget that 10 AM sugar crash. These burritos are loaded with eggs and sausage, making them incredibly Protein Packed. That means sustained energy keeps you focused right until lunchtime!
-
Freezer Friendly Meal Prep
This is the real magic. You spend one hour cooking on Sunday, and you have breakfast ready for practically the entire week! They are super Freezer Friendly, and reheating them is just as wonderful as making them fresh.
Gathering Ingredients for Your Protein-Packed Breakfast Burritos (Meal Prep)
Okay, let’s talk shopping. Good meal prep starts with good ingredients, and frankly, if you stick to this list, you can’t go wrong. Think color, think flavor—we’re building something great here! I always try to grab my ingredients on a Saturday so I can dedicate Sunday afternoon to the cooking frenzy. If you want to explore some of my other go-to pantry stock-ups, you can check out my recipe staples list right here.
You aren’t going to need a crazy custom grocery run for this, which is another win!
For the Burrito Filling
Here’s what you need to pull this recipe together for ten wonderful burritos. Make sure all your veggies are chopped and ready to go before you start cooking—prep is everything when you’re batch cooking!
- 1 lb frozen tater tots (that’s about 3 cups, by the way!)
- 1 lb ground turkey or pork breakfast sausage
- 2 teaspoons olive oil
- 1 bell pepper, any color, diced (about 1 cup worth)
- 1/2 small yellow onion, finely diced (about 1/2 cup)
- 12 large eggs
- 1 cup shredded cheddar cheese (or skip it if you need to keep it dairy-free!)
- 10 flour tortillas (make sure they are the big 10-inch burrito size, that makes rolling so much easier)
Essential Equipment for Making Protein-Packed Breakfast Burritos (Meal Prep)
You don’t need anything fancy here, which is great news for those of us who don’t have a commercial-grade kitchen! Trust me, having the right tools makes the weeknight chaos feel more manageable. Since we are doing some cooking and a lot of wrapping, make sure you have these basics ready to go before you turn on the stove.
Since we’re baking the tots and then using skillets for the filling, you’ll want these items easily accessible:
- An Oven (for those tots!)
- A sturdy Skillet (we use two, one for sausage and one for eggs)
- A large Bowl for whisking those twelve eggs—don’t try to squeeze them into a tiny one!
- A good, dependable Spatula for stirring and folding
- Paper towels (essential for draining the grease off the sausage)
- A Baking sheet to temporarily hold the assembled burritos
- Parchment paper (this is key for the freezer wrapping step)
- Aluminum foil (for the final freezer layer)
That’s really it! No fancy stand mixers required for these easy Protein-Packed Breakfast Burritos (Meal Prep). Just basic gear and a little elbow grease!
Step-by-Step Instructions for Perfect Protein-Packed Breakfast Burritos (Meal Prep)
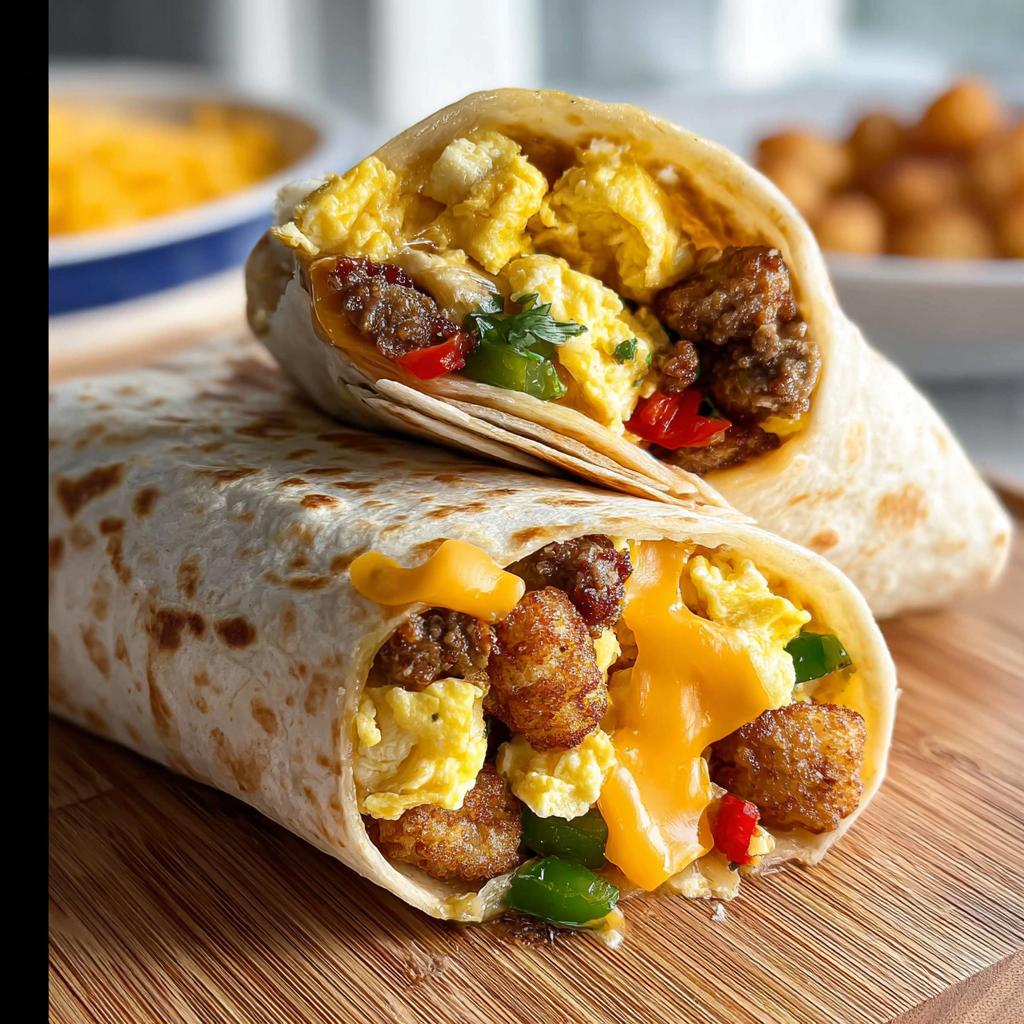
Okay, this is where the magic happens. Remember how I said cooking felt like art? This is the painting part! We need to work efficiently, but don’t rush the flavors. First thing out of the gate: preheat your oven and bake those tater tots as the bag suggests. You need about 40 perfectly crisp tots total, so 4 per burrito.
Cooking the Meat and Vegetables
Grab your skillet and crank up the heat to medium-high. Drop in that breakfast sausage and get to work breaking it up with your spatula. You want it beautifully crumbled and totally cooked through—that takes about 7 minutes. Once it’s done, pull all that cooked meat off the heat and set it on a plate lined with paper towels to drain off the extra grease. Now, wipe out that pan, drop in your olive oil, and gently sauté your diced bell pepper and onion until they smell amazing and are nice and tender, which usually takes about 6 minutes.
Scrambling the Eggs and Combining Filling
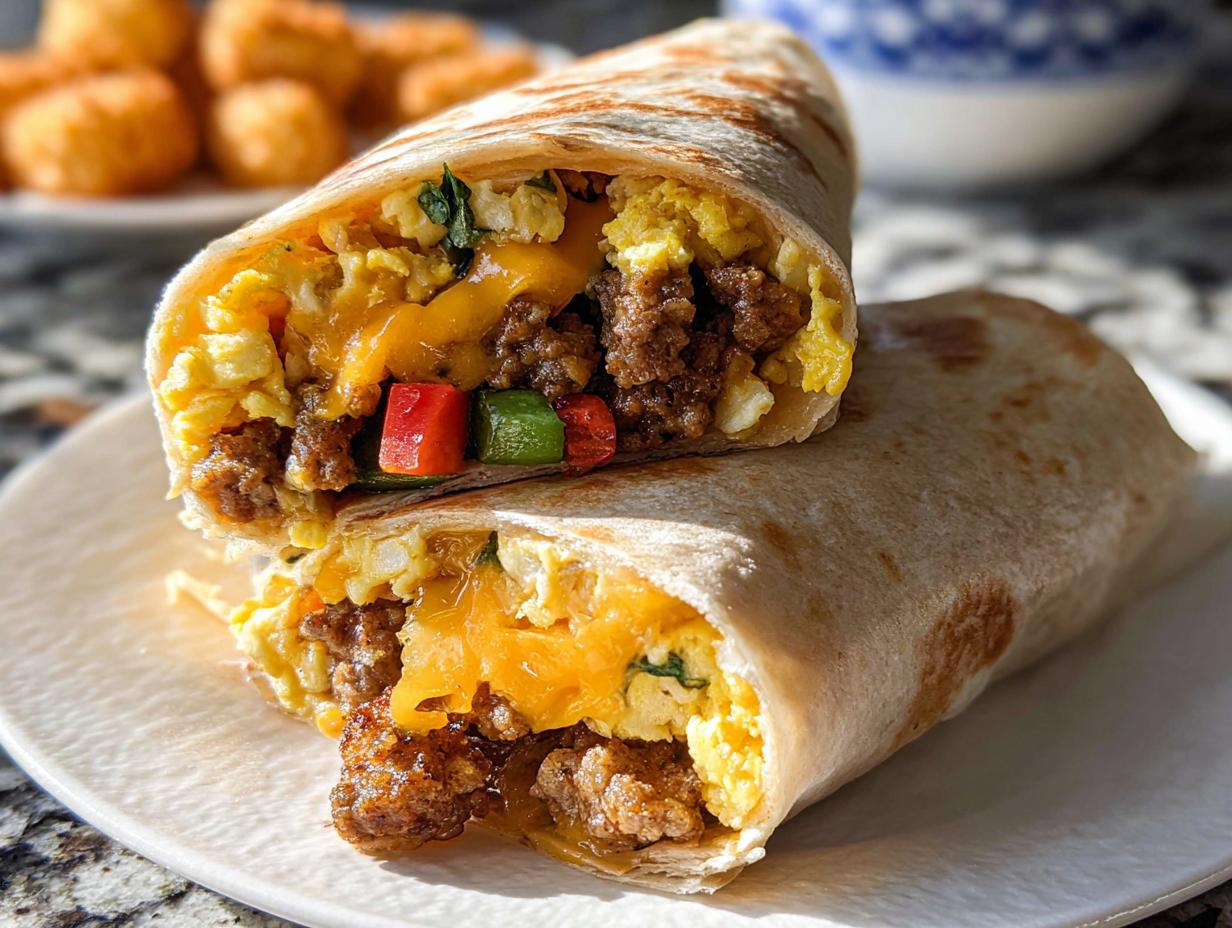
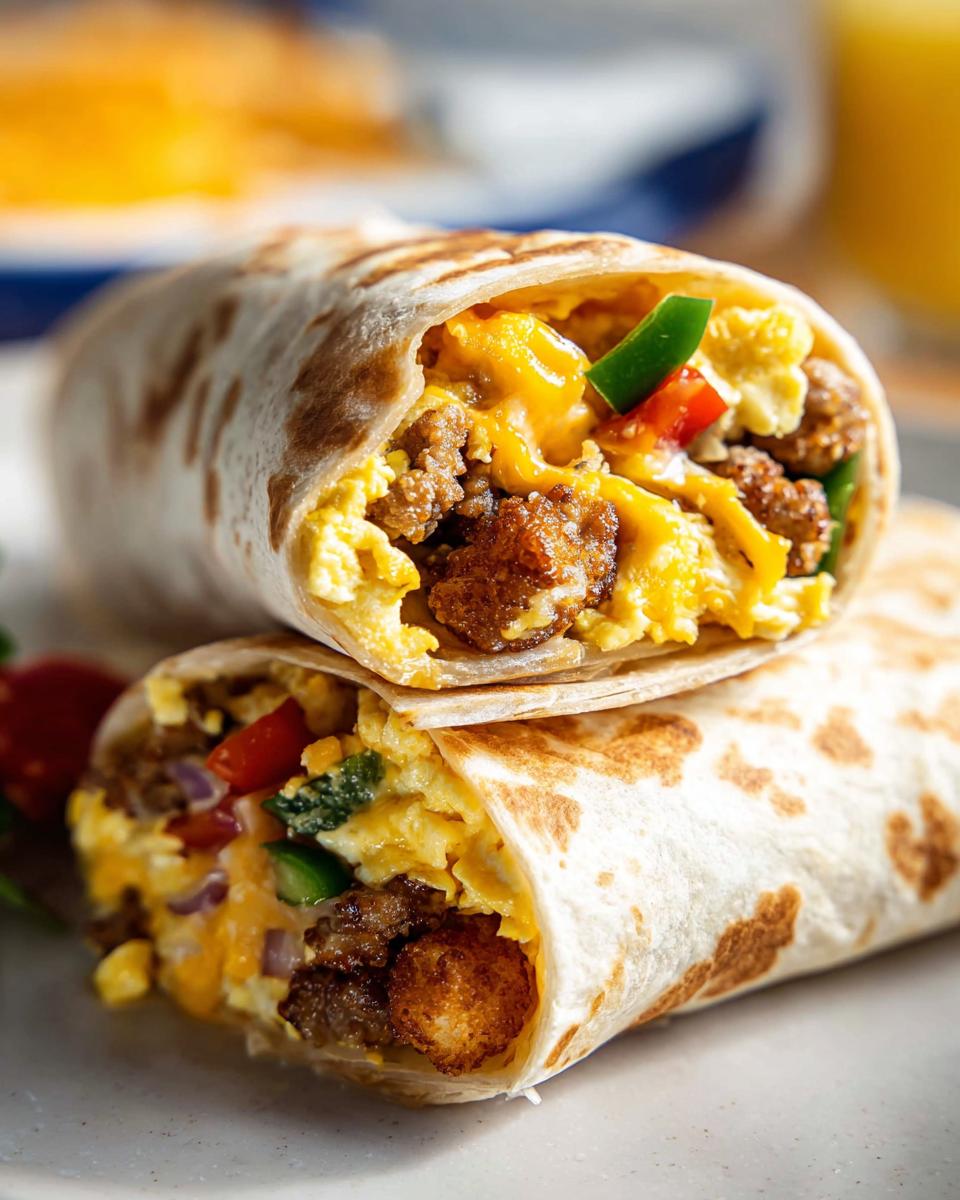
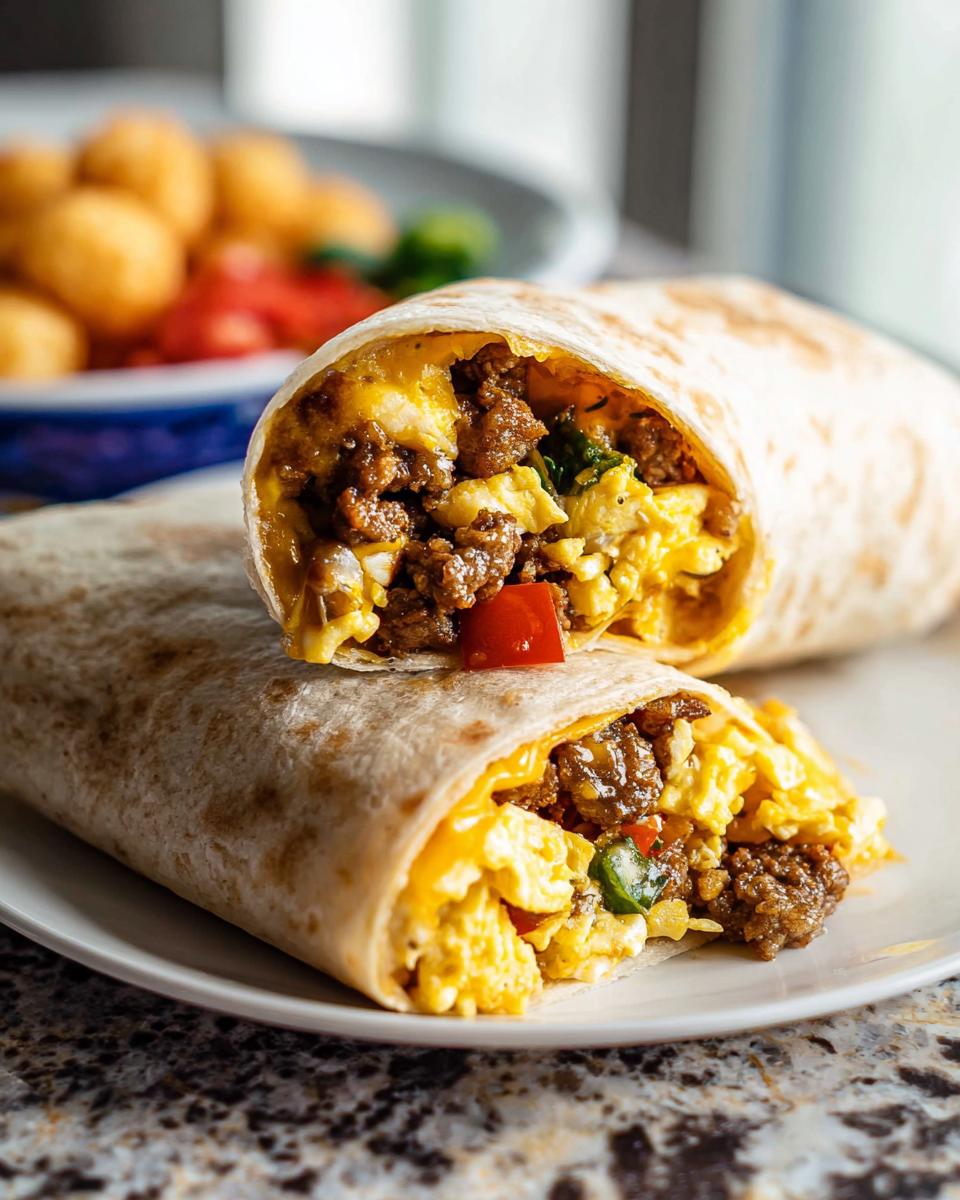
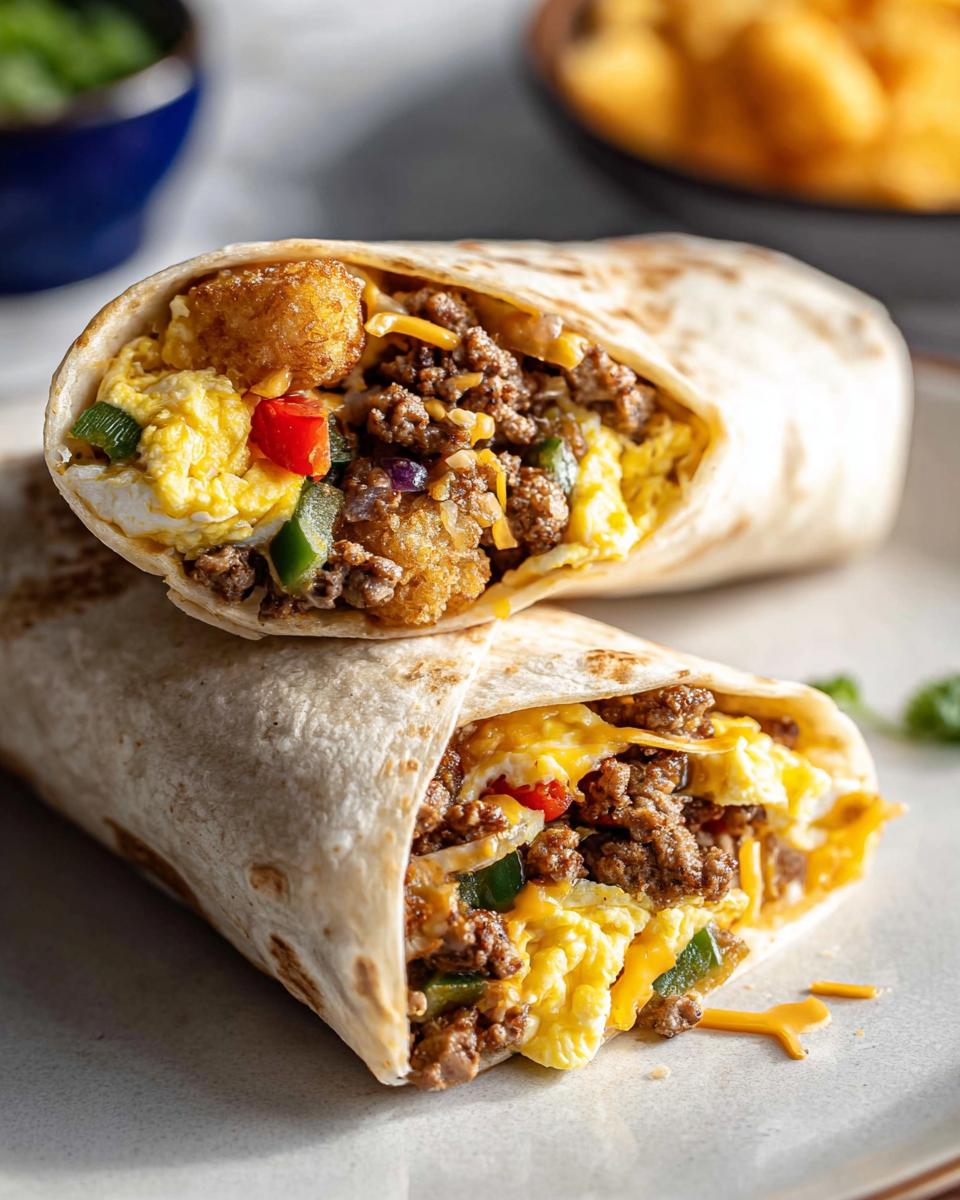
While that’s happening, whisk your 12 eggs in a separate bowl until they are fluffy—we want the lightest scramble possible! Pour those eggs right into the veggie skillet. Cook them gently, pushing them around with your spatula until they are fully set but still look soft. Do NOT overcook them! Then, fold that drained, cooked sausage right into the eggs. Take the entire skillet right off the heat. This next step is critical for a tight wrap: let this entire mixture cool down for a solid 10 minutes. Warm filling makes super sad, floppy tortillas!
Assembling and Rolling Your Protein-Packed Breakfast Burritos (Meal Prep)
Now that the filling has cooled just a bit, it’s time to make these beauties easy to handle later. Wrap your 10 tortillas in damp paper towels and microwave them for about 15 to 20 seconds. This makes them so pliable you won’t tear them when rolling. Lay one flat. Scoop in about a cup of that awesome egg-sausage mix, then strategically place 4 tots and a couple of spoonfuls of cheese right in the center. Fold that edge up and over the filling, pulling it back tight toward you. Tuck in the sides neatly, and then roll it all the way up. I love this part; each one feels like a perfect little gift you’re giving your future self!

Freezer Prep for Future Grab & Go Meals
To make sure these last and reheat beautifully without turning into a mushy mess, we double-wrap them. Lay each rolled burrito on a piece of parchment paper and wrap it snugly. Then, take that parchment-wrapped bundle and wrap it again tightly in aluminum foil. That foil is your best friend for the freezer! Label them with the date—they are good to go for up to 3 months, ensuring you always have a fantastic Grab & Go option ready!
For more tips on saving time during your cooking sessions, check out how I handle chicken for busy weeknights—it uses similar time-saving tricks! If you’re looking for a great external guide, this breakdown on freezer burrito prep is also super helpful.
Ingredient Notes and Substitutions for Protein-Packed Breakfast Burritos (Meal Prep)
Listen, I know everyone’s kitchen looks a little different, and dietary needs pop up all the time. When I wrote down these instructions for the Protein-Packed Breakfast Burritos (Meal Prep), I made sure you could easily swap a few things out without messing up that perfect texture or flavor profile. Meal prep is supposed to make your life easier, not harder!
The notes on the recipe card were really clear about adapting for common needs, especially gluten-free and dairy-free situations. If you’re navigating stricter diets, you know how important it is to have reliable swaps, and I’ve got you covered here. You can totally customize this blend!
For some really great ideas on adapting meals for finicky eaters—which often happens when you’re batch cooking for the family—you should definitely take a look at my post on 27 Low-Carb Meals Your Picky Eaters Will Actually Love.
Making Them Gluten-Free
This one is super simple, honestly. The only thing standing between you and a fully gluten-free batch is that tortilla! You’ll want to swap out those regular flour ones for a high-quality gluten-free version. I’ve had great luck with the grain-free wraps out there—Siete makes one that holds up really well to the fillings and handles the reheating process beautifully.
A little pro tip for gluten-free tortillas: they often don’t stretch as easily as flour ones, so heating them up individually in a dry skillet until they are nicely warm and pliable before you fill them makes a world of difference. Don’t skip that quick pan-warm!
Keeping It Dairy-Free
If you need to skip the cheese, don’t stress about it. The cheddar is really just there for that creamy ‘mouthfeel’ and flavor pop, but it’s not essential to the structure of the burrito. If you want that cheesy element, you can absolutely use a dairy-free shredded cheese alternative. They melt surprisingly well these days!
But honestly? If you leave it out entirely, you’re still left with an incredibly hearty, protein-packed sausage and egg filling. The olive oil and meat grease are enough to keep it from feeling dry. Just omit it, and you’re golden!
Protein Swaps in the Filling
If you’re trying to cycle through your freezer stock, you can easily switch up the meat. Smoked ham cubes work great in place of sausage, and if you’re feeling vegetarian, you can use scrambled tofu mixed with smoked paprika and nutritional yeast for a similar savory vibe. Just make sure whatever protein you swap in is fully cooked before folding it into the eggs!
Tips for Success When Meal Prepping Breakfast Burritos
When you’re making ten burritos at once, a few tricks can turn a good batch into an absolutely legendary one. I’ve learned the hard way what prevents that dreaded soggy outcome when reheating, and trust me, you want to nail the texture!
Since these are going into the freezer, we have to pay extra attention to moisture control during the initial cook. We’re building layers of flavor, but we need to keep the structure tight. If you want to see how I approach making other things foolproof for batch cooking, I wrote a whole guide on how to make chicken foolproof that applies here too—it’s all about managing the heat!
Don’t Overfill! It’s the Golden Rule
This sounds simple, but it ruins more meal-prepped burritos than anything else! If you jam too much filling in there, the tortilla will split when you try to fold it, or worse, it’ll split in the microwave when you reheat it later. I always measure out roughly one cup of the egg/sausage mix. It seems stingy, but remember all those tots and cheese you’re adding on top!
If the tortilla is bulging awkwardly *before* you even try to fold the sides in, you know you’ve gone too far. A tight, thin burrito freezes better and reheats exponentially better.
Drain, Drain, Drain Everything
Moisture is the enemy of the freezer life. We already drained the sausage, which is great, but we need to be serious about the eggs, too. When you scramble your eggs with the turkey sausage and veggies, make sure you cook them until they are *set* and no longer look wet or shiny in the pan. If you see any standing liquid amongst the eggs after they are cooked, just tilt the pan and use your spatula wall to spoon out that excess liquid before combining everything in the cooling bowl.
The Importance of the Double Wrap
I mentioned this in the assembly section, but it bears repeating because it saves your sanity! The parchment paper is non-negotiable. It touches the food, absorbs any lingering moisture over months in the freezer, and prevents the aluminum foil—which can sometimes tear or stick—from adhering directly to your delicious filling. It’s a two-security-layer system designed to keep freezer burn away and maintain fresh flavor!
Reheating Your Protein-Packed Breakfast Burritos (Meal Prep)
This is the final hurdle, isn’t it? You’ve done all the hard work, and now you just want that perfect, hot, slightly crispy bite without turning your kitchen into a disaster zone. Since these are wrapped up so nicely with that parchment and foil combo, reheating them is surprisingly painless!
For me, there are two main routes, depending on how much time you have. If you have five minutes and are willing to give up a tiny bit of texture, the microwave is quick. But if you have ten minutes to spare, I absolutely swear by the oven or toaster oven method. It brings back that perfect, slightly toasted exterior that you miss with microwave reheating. For some great ideas on simplifying your weeknight cleanup, check out my post on one-pan dinner ideas—the principle is similar: minimal fuss!
The Best Way: Reheating in the Oven or Toaster Oven
If you want that fresh-from-the-skillet taste, the oven is your best friend for these little guys. First thing you have to do is carefully unwrap them completely—get rid of all that foil and parchment paper! Seriously, don’t microwave them wrapped, that’s a fire hazard waiting to happen!
Set your oven or toaster oven to 350°F (175°C). Place the unwrapped burritos directly on the oven rack or on a small baking sheet. I find that heating them straight on the rack gives the bottom exterior a little chance to crisp up, which I adore. This method takes about 15 to 20 minutes if they are coming straight from the freezer. You want them steaming hot all the way through. Let them sit for just a minute before biting in, because they will be lava hot!
The Quick Fix: Microwave Method
I get it—sometimes you just need breakfast *now*. If you’re in a major rush, the microwave will do the trick, but we must be careful not to turn them into rubbery clouds. Make sure you unwrap the foil and parchment paper completely before placing the burrito on a paper towel-lined plate.
Microwave on medium power (not full blast!) for about 60 seconds. Flip it over and microwave for another 30 to 60 seconds, depending on your microwave’s strength. Medium power prevents the tortilla edges from getting tough or dried out too quickly. It won’t be crispy, but it will be warm, cheesy, and ready to fuel your meeting!
Pro Tip: Crisp the Tortilla After Heating
If you use the microwave and find the tortilla is a little limp (which usually happens), here’s my favorite trick: after the microwave heat-up, grab a dry skillet, heat it to medium, and briefly place the burrito in the hot, dry pan for about 45 seconds per side. This works wonders to restore a little structure and gives you that satisfying, slightly crisp bite back without drying out the inside!
Nutritional Snapshot of These Protein-Packed Breakfast Burritos (Meal Prep)
I know lots of you are tracking macros or just trying to make sure your breakfast is actually going to power you through the morning slump, so let’s talk numbers for these Protein-Packed Breakfast Burritos (Meal Prep). Since we’re loading these up with turkey sausage, eggs, and those little tater tots, we get a really robust profile here.
Keep in mind, these figures are estimates based on the ingredients listed in the recipe. If you swap out turkey sausage for pork sausage, or use heavy cheese vs. low-fat cheese, those numbers will shift on you. But overall, this gives you a great baseline for what a satisfying, balanced meal this is!
For one complete burrito, here’s the approximate breakdown:
- Calories: 530
- Protein: 21 grams – Wow, that’s a serious punch to start the day right!
- Fat: 30 grams (10g Saturated)
- Carbohydrates: 44 grams
- Fiber: 4 grams
What I love most about this snapshot is that 21 grams of protein. That’s what keeps you full and focused! If you were cutting carbs severely, you’d obviously want to swap the tater tots for something like roasted black beans or skip them entirely to drop the carb count significantly. But for a standard, high-fuel breakfast, these Breakfast Burritos really hit the mark for a healthy Meal Prep option.
Frequently Asked Questions About Freezer Friendly Breakfast Burritos
I knew you’d have questions! Whenever I get excited about a new Meal Prep system, my brain starts spinning with all the ways I can tweak it or what those long-term storage rules are. These Breakfast Burritos are so versatile, after all. Let’s clear up a few things so your batches come out perfect every single time, whether you plan to eat them tomorrow or next month!
How long can I safely store these Breakfast Burritos in the freezer?
Honestly, these things are built to last! If you take the time to wrap them properly—that double-layer of parchment and foil we talked about—they will keep wonderfully for up to three months in the freezer. I usually try to make sure I eat the ones I made first, just out of habit, but they stay tasting fresh and delicious well past that mark if your freezer temperature is steady. It’s great peace of mind knowing you have that many breakfasts ready!
Can I add more vegetables to my Meal Prep?
Oh, please do! I love hearing how people customize their Meal Prep. If you want to throw in more volume with veggies, go for it! Hardy choices like mushrooms or even some shredded zucchini are great additions. But here’s the key: you MUST cook them down first. If you add raw veggies, they will release water during the freezing/reheating process and you’ll end up with a wetter filling. Sauté those mushrooms until they stop releasing liquid, and they integrate perfectly into the egg mixture. If you’re looking for more veggie inspiration generally, check out the breakfast category on my site here.
What is the best way to reheat a frozen burrito without it getting soggy?
If you want to maximize texture and avoid sogginess, ditch the microwave entirely! The very best method is to fully unwrap the foil and parchment, place the frozen burrito right on a wire rack in a toaster oven or regular oven preheated to 350°F. This allows heat to circulate all around the burrito, drying out any residual moisture while melting the cheese perfectly. Give it maybe 18-20 minutes, and it’s like you just made it fresh!
If you’re in a rush, the microwave is okay, but immediately after heating, throw that burrito on a hot, dry skillet for about a minute per side. That little blast of dry heat on the outside restores the texture almost magically!
Share Your Experience Making These Protein-Packed Breakfast Burritos (Meal Prep)
I am so excited for you to get your hands dirty and make these! Honestly, the best part of sharing these recipes isn’t just seeing you eat well; it’s seeing how you make them your own. These Protein-Packed Breakfast Burritos (Meal Prep) are just the starting point for your own culinary creativity!
When you finish your batch—whether you’re stocking your freezer or just making a huge breakfast for Sunday brunch—I really want to hear about it. Did you add spinach? Did you use chicken sausage instead? Let me know what modifications you tried!
Tell Me What You Think!
If this batch made your busy week feel lighter, please, please let me know! Down in the comments section, throw a rating on the recipe—even a quick star rating lets me know what’s working for you all! Your feedback helps me refine things even more for future Meal Prep adventures.
Show Me Your Burrito Art!
And seriously, if you snap a picture of your perfectly wrapped, foil-shining, ready-for-the-freezer beauties, tag me on social media! I absolutely live to see that organized freezer stash. It proves that healthy eating doesn’t have to be complicated or rushed.
If you need to reach out directly with any super specific questions about substitutions or storage that the FAQ didn’t cover, you can always drop me a line through my contact page. Happy cooking, my friends—I hope these hearty little rolls bring the same kind of morning joy to your house that they bring to mine!
Protein-Packed Breakfast Burritos (Meal Prep)
Ingredients
Equipment
Method
- Preheat your oven and bake tater tots according to package directions. You will need 40 tots (4 per burrito). If you use the full pound, you will have some leftover.
- Place a medium skillet over medium-high heat. Add the breakfast sausage, stirring to break it up and crumble. Cook until the meat is cooked through, about 7 minutes. Remove the cooked sausage to a paper towel-lined plate and set aside.
- While the sausage cooks, place a separate large skillet over medium heat. When hot, add the olive oil, bell pepper, and onion. Sauté until the vegetables are tender, stirring often, about 6 minutes.
- While the vegetables and meat are cooking, place the eggs in a medium bowl and whisk well.
- Pour the eggs into the large skillet with the peppers and onions. Push the eggs around with a spatula as they cook. Cook until the eggs are set, about 3-5 minutes.
- Gently fold the cooked sausage into the egg mixture. Remove from heat and allow to cool for about 10 minutes.
- To prepare the tortillas, wrap them in damp paper towels and microwave for 15-20 seconds to make them pliable.
- For burrito assembly, scoop about a 1-cup measure of the egg-sausage-veggie mixture into the center of each tortilla. Add 4 tater tots and about 1 to 2 tablespoons of cheese. Fold one edge of the tortilla up and over the filling, pulling it tightly toward the center. Fold in the sides of the tortilla and continue to roll. Place the wrapped burritos on a baking sheet while you assemble the rest.
- To prepare burritos for the freezer, wrap each burrito in a sheet of parchment paper, then wrap again in a square sheet of aluminum foil. Label the burritos and place them in the freezer for up to 3 months.
Nutrition
Notes
Tried this recipe?
Let us know how it was!
Visual Culinary Artist & Aesthetic Designer
When the pandemic killed my career as a luxury hotel photographer overnight, I was stuck in my studio apartment with nothing but time and vegetables. That’s when I started treating meal prep like photography projects—and discovered that the same principles that made five-star dishes camera-ready could turn humble zucchini noodles into social media gold.
My fine arts degree from Parsons taught me that people eat with their eyes first. After years behind the lens capturing haute cuisine, I realized that successful dieting often depends more on visual satisfaction than pure nutrition. When your food looks amazing, you actually want to stick with your eating plan.
My recipe development feels more like an art studio than a test kitchen. I use color theory to guide ingredient selections—purple cabbage with golden cauliflower, emerald herbs against ivory cheese. My “Edible Landscapes” series transforms standard low-carb ingredients into miniature scenic compositions that make vegetables feel aspirational rather than obligatory.
I spend evenings exploring art galleries and practicing watercolor painting, always looking for inspiration. My philosophy is simple: make low-carb food visually irresistible, and dietary compliance becomes an aesthetic choice rather than a health sacrifice.