
There’s just something magical about a plate of homemade pasta, isn’t there? That perfect bite, the way it hugs your favorite sauce… it’s pure comfort. Learning How to Make Pasta Recipes Like a Pro (2025) is more than just a cooking skill; it’s about bringing a little bit of that authentic Italian joy right into your own kitchen. For me, this journey really kicked off after my son was diagnosed with celiac disease. I was determined to find a way for our whole family to enjoy incredible pasta, no matter the dietary needs. It reminded me of my own grandmother, whose kitchen always buzzed with laughter and the aroma of freshly made dough. That drive to create delicious, inclusive meals for everyone at our table is what fueled my passion, and I can’t wait to share that with you!
Why You’ll Love How to Make Pasta Recipes Like a Pro (2025)
Seriously, diving into learning How to Make Pasta Recipes Like a Pro (2025) is one of the most rewarding things you can do in the kitchen! You might think it’s complicated, but trust me, it’s way more approachable than you imagine and opens up a whole new world of flavor. Here’s why you’ll become obsessed:
- It’s Surprisingly Easy to Master: Once you get the hang of the basic dough, the rest just flows. It’s all about a few key steps!
- Unbeatable Flavor & Texture: Nothing, and I mean NOTHING, beats the taste and the perfect “al dente” chew of fresh, homemade pasta. It’s a game-changer.
- Endless Versatility: From delicate ravioli to hearty fettuccine, you can shape it, fill it, and sauce it however you dream!
- Inclusive for Everyone: This is huge for me – you can easily adapt recipes for gluten-free or other dietary needs, meaning absolutely everyone gets to enjoy amazing pasta.
Essential Tools for Pasta Perfection
Alright, let’s talk tools! To make really fantastic pasta at home, you don’t need a million gadgets, but a few key pieces will make your life SO much easier and your pasta SO much better. Think of these as your pasta-making best friends.
First up, a pasta machine. Whether it’s a classic hand-crank model or a fancy electric one, this is your ticket to consistently thin, even sheets of dough. It’s amazing for getting those perfect strands of spaghetti or fettuccine. If you don’t have one, no worries! A good old-fashioned rolling pin and a bit of elbow grease will absolutely do the trick. It takes a bit more effort, but the tactile connection with the dough is pretty special.
You’ll also want a sturdy drying rack. Fresh pasta can get sticky fast, so giving it somewhere to hang out and dry a bit is crucial. Sometimes, I even use the back of clean chairs if I’m making a huge batch!
Pasta Machine vs. Rolling Pin
So, the big question: machine or rolling pin? Honestly, both have their charms! A pasta machine is a total game-changer for speed and consistency. You can crank out perfect sheets for lasagna or cut precise strands of spaghetti in no time. It’s fantastic for beginners and pros alike because it takes the guesswork out of getting the dough just right. But, don’t count out the humble rolling pin!
Using a rolling pin is a more hands-on experience. You really get a feel for the dough, its texture, and its elasticity. It’s perfect for shapes that don’t need extreme thinness, or if you just love that rustic, handmade vibe. It might take a few more minutes to get your dough rolled out thinly enough, and you’ll need a bit of strength, but the result is incredibly rewarding. Plus, you never need to worry about a rolling pin breaking down!

Mastering the Dough: Your Guide to How to Make Pasta Recipes Like a Pro (2025)
Okay, we’re getting into the heart of it now – the dough! This is where the magic *really* starts when you’re learning How to Make Pasta Recipes Like a Pro (2025). Getting the dough consistency just right is the absolute key. It determines whether you get those lovely, slurpable strands or something a bit… well, less cooperative. Don’t sweat it if your first try isn’t spot-on; it takes a little practice to feel it out. But once you nail that perfect texture, your pasta game will be forever changed. Trust me, it’s a game-changer for any low-carb, gluten-free kitchen! We’ll get into the nitty-gritty of what makes a dough happy and how to keep it that way, drawing inspiration from experts who’ve mastered this art.
Ingredient Clarity for Perfect Pasta Dough
Let’s talk ingredients for a super basic, classic egg pasta dough, because we’re going for that authentic Italian vibe! My go-to starts with all-purpose flour – about 2 cups should do for a good batch. Then, we need eggs, typically one large egg for every cup of flour works like a charm. So, for that 2 cups of flour, we’re looking at 2 large eggs. A little pinch of salt, of course, wakes up all those flavors. Now, for those navigating dietary needs, this is where you get creative! For gluten-free pasta, you can use a good all-purpose gluten-free flour blend. Some folks like to add a little Xanthan gum to help bind it, just follow your GF flour blend’s package instructions. Sometimes, a splash of olive oil can help with elasticity, especially in GF doughs. The trick is to start with the basic ratios and then adjust based on how the dough feels. It’s all about finding that perfect balance!
Kneading and Resting: The Pro Secrets
This is where the true pasta artistry happens! Kneading is like giving your dough a good workout. You want to push, fold, and turn it until it becomes this wonderfully smooth, elastic ball – no longer sticky, but soft and pliable. It takes about 8-10 minutes of good, honest kneading by hand. You’ll feel the dough change under your hands; it’ll become less resistant and more forgiving. Think of it as developing all the gluten strands (or their GF equivalent!) that give pasta its structure. After all that hard work, the dough needs a little spa time: resting. Wrap it up tight in plastic wrap – and I mean *tight*, so no air gets in – and let it chill for at least 30 minutes. This little break lets the gluten relax, making the dough super easy to roll out later. It’s like magic; the dough just becomes so much more cooperative!
Shaping Your Creations: Advanced Pasta Techniques
Okay, now for the really fun part – turning that beautiful dough into actual pasta shapes! This is where you get to be creative and really make it your own. Whether you’re going for delicate strands or hearty sheets, mastering these shaping techniques makes all the difference. We can do this by hand, or with our trusty pasta machine, and honestly, both ways bring their own special charm. Think of all the delicious one-pan pasta recipes you’ll be able to whip up with your homemade creations!
Rolling and Cutting Techniques
Rolling out your dough is your canvas moment. If you’re using a rolling pin, start in the center and work your way out, rotating the dough as you go. You want it thin—think almost see-through for delicate shapes like angel hair, or about the thickness of a coin for fettuccine or tagliatelle. If you’ve got a pasta machine, just start on the widest setting and keep passing the dough through, narrowing the settings each time until you reach your desired thickness. For cutting, you can use a sharp knife or a pizza cutter. For fettuccine or tagliatelle, just fold the sheet loosely and slice across into ribbons. For lasagna sheets, simply trim the edges to make perfect rectangles. So satisfying!
Extruding Pasta with a Machine
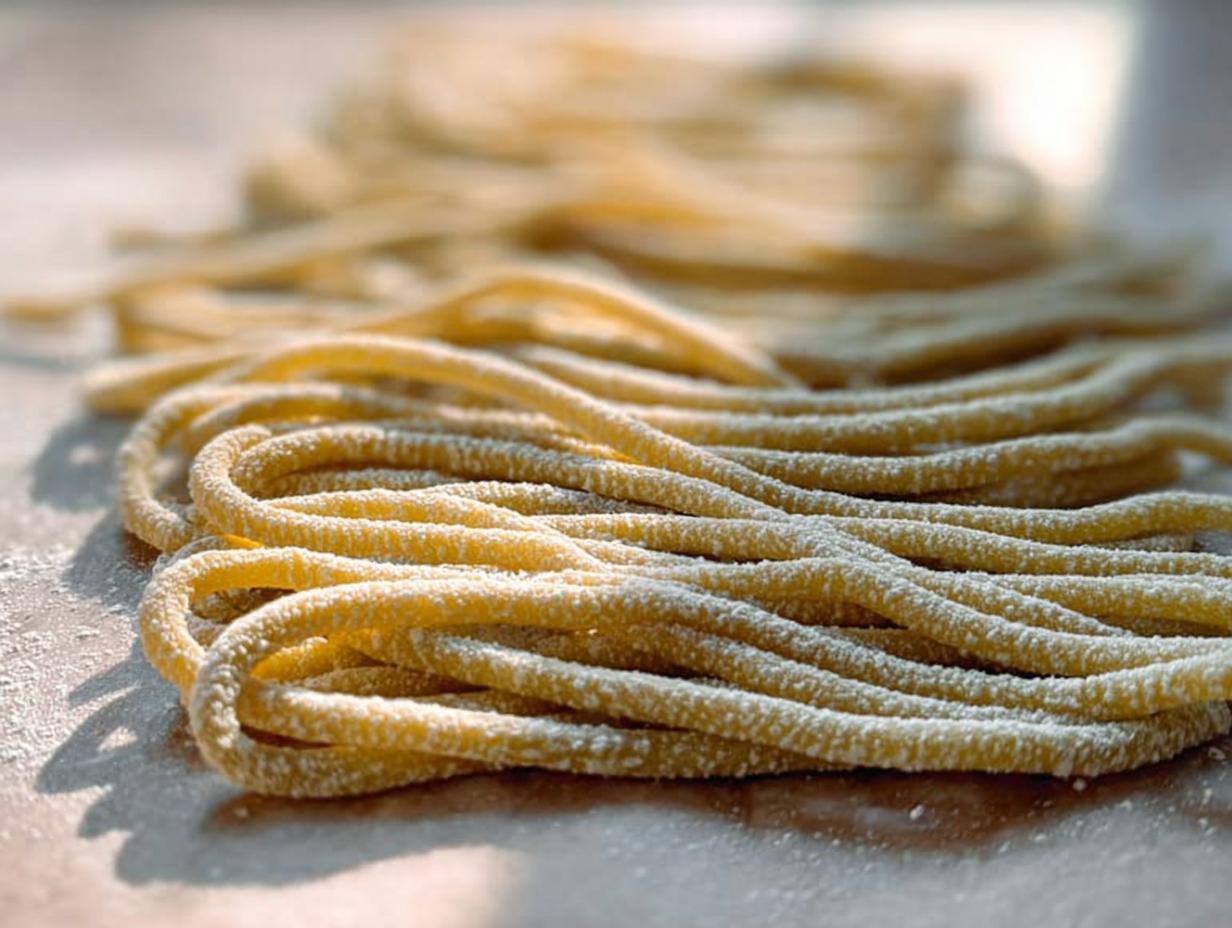
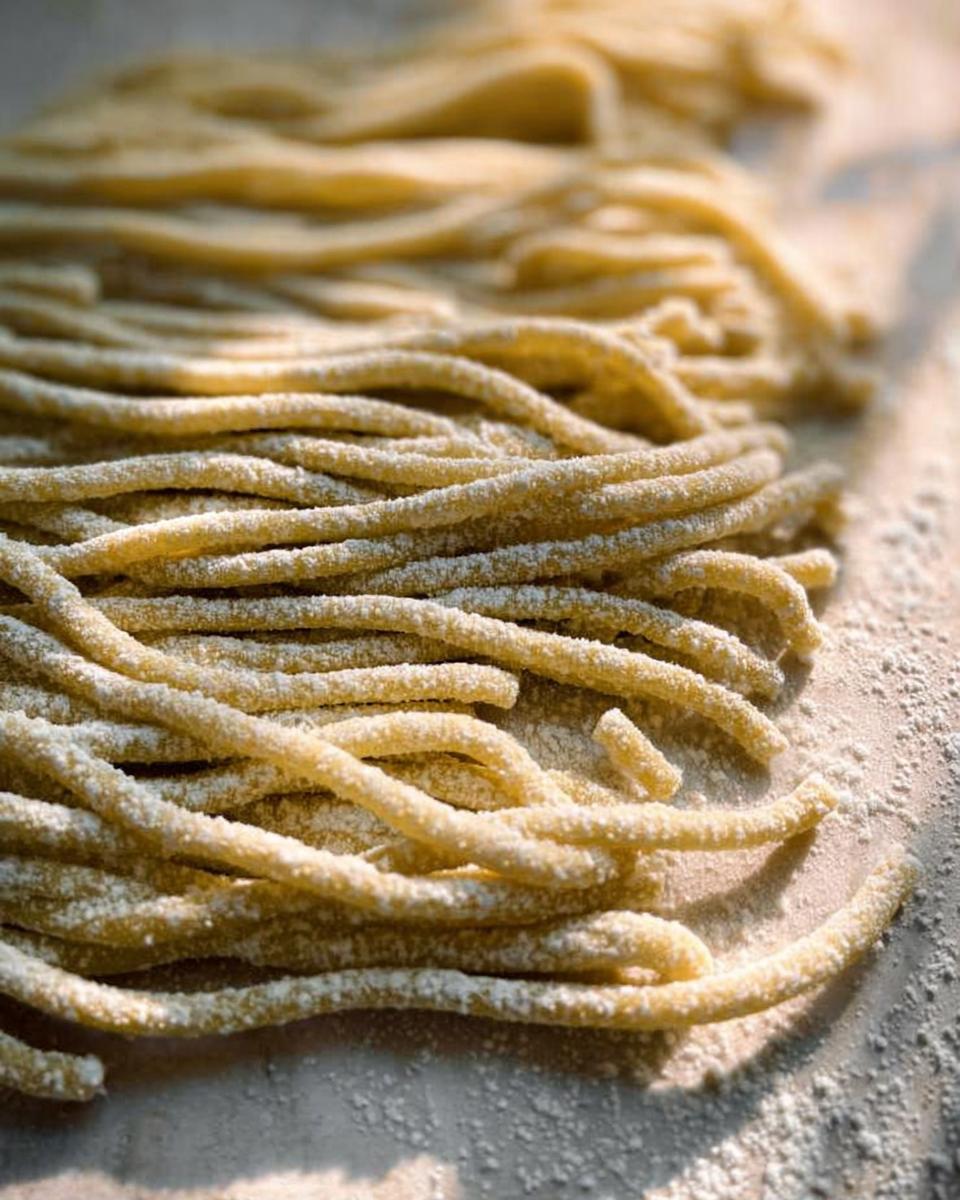
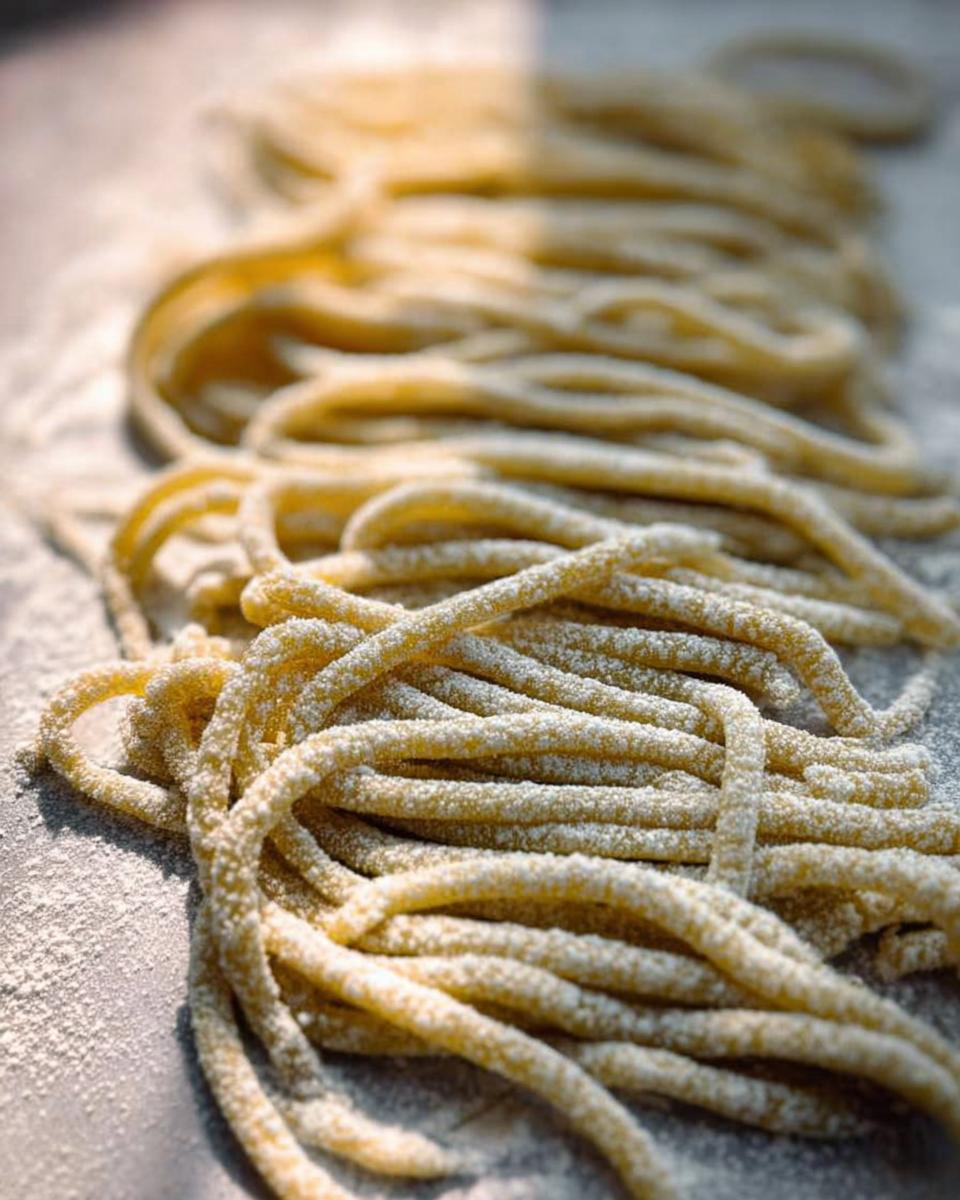
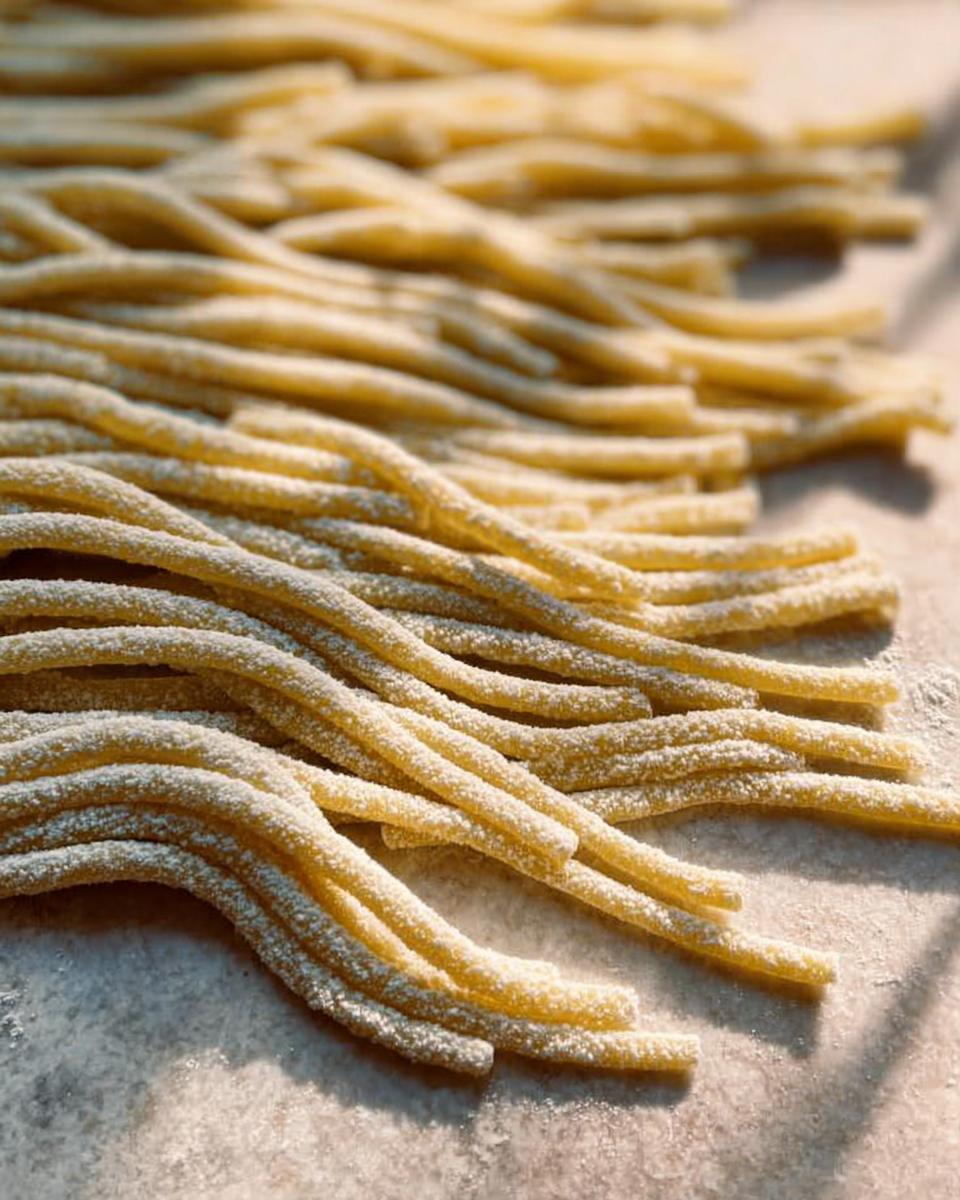
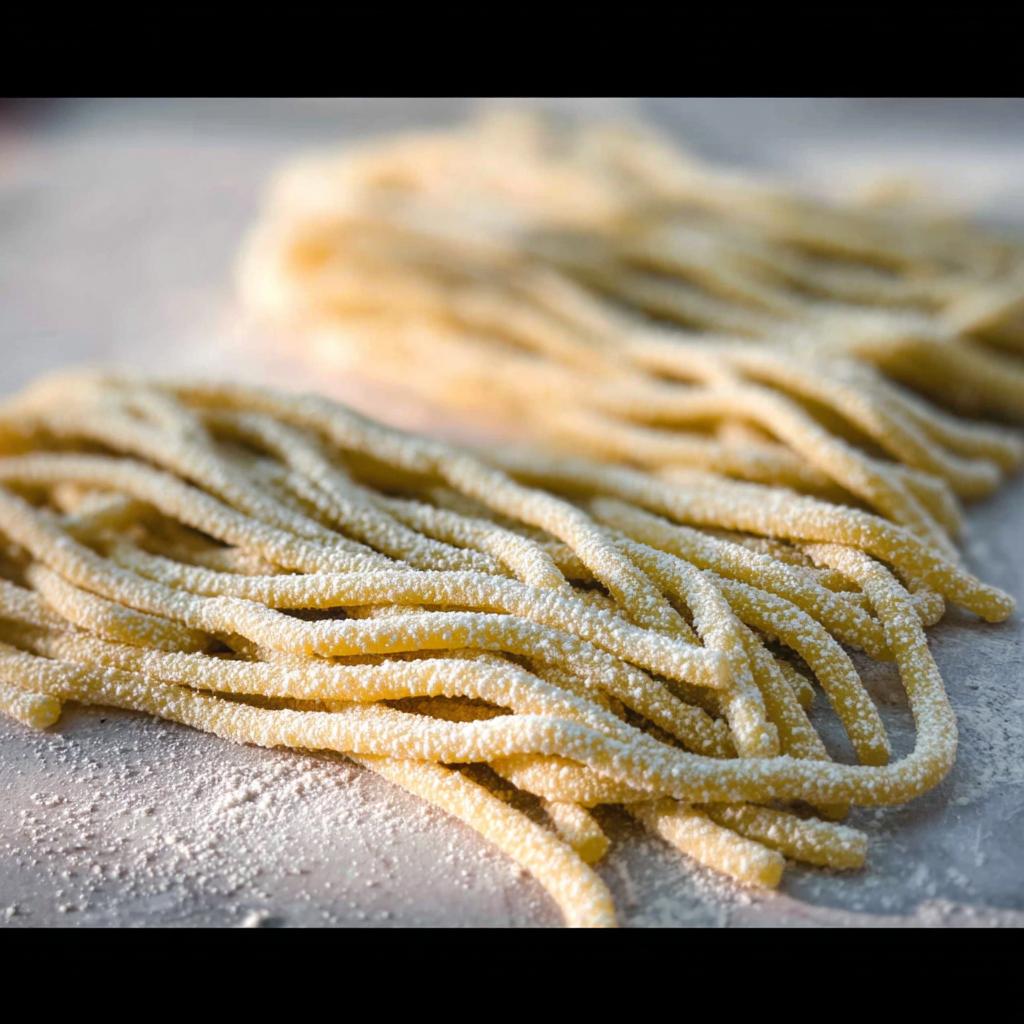
Using a pasta machine to extrude shapes like spaghetti, bucatini, or rigatoni is just pure joy! Once your dough is rolled out thinly (the machine usually does this for you), you feed it through the cutting attachments. For spaghetti, it’ll come out as delicate strands. For bucatini, it’s like spaghetti with a little hole in the middle! Rigatoni pieces are cut into short tubes. The key here is to have your semolina ready to dust the pasta *immediately* as it comes out. This stops it from clumping together before it gets a chance to dry a bit. Keep the pasta moving and try to cut it into manageable lengths as it emerges—it’s way easier to handle that way.
Drying and Storing Your Homemade Pasta
Alright, so you’ve made your beautiful pasta shapes – amazing job! Now, before we jump into cooking, we’ve got to talk about drying. This step is super important, especially if you’re not cooking it all right away. It stops your pasta from getting all sticky and clumpy. My absolute favorite way is to use a pasta drying rack. Just drape those strands or shapes over it, and they hang there beautifully. If you don’t have one, no sweat! You can totally use the back of clean chairs or even the drying rack on your dishwasher. Just make sure whatever you use is spotless!
The trick to preventing sticking? Semolina flour! As soon as the pasta comes off your cutter or out of the machine, give it a good dusting. It acts like tiny little ball bearings, keeping everything separate. For pasta you plan to cook right away, just letting it air dry for about 15-30 minutes is usually enough. But if you want to save it for later, you’ll need to dry it much longer, maybe even overnight, until it feels completely stiff. Properly dried pasta can last a really long time and is perfect for those upcoming meal prep sessions!
Cooking Fresh Pasta to Perfection
Now for the moment of truth – cooking your gorgeous, homemade pasta! This is actually way quicker than you might think. The absolute golden rule? Use a HUGE pot with tons of boiling, salted water. We’re talking liters of water and a good, generous pinch of salt – think sea water! This helps the pasta cook evenly and prevents it from sticking together.
Fresh pasta cooks SO fast, usually just 2-4 minutes, depending on how thick you rolled it and the shape. You want it perfectly “al dente” – tender but with a slight, delightful bite. Keep a close eye on it, taste a piece to check, and scoop it out right when it’s ready. Overcooked fresh pasta can turn mushy in a heartbeat, and that’s just a crying shame!
Troubleshooting Common Pasta-Making Issues
Okay, let’s get real for a sec. Even pros hit a snag now and then when making pasta from scratch! It’s totally normal. Most of the time, it’s just a little tweak needed. If your dough feels too sticky to handle, like it’s glued to your fingers, just add a tiny bit more flour, maybe a tablespoon at a time, until it’s smooth and elastic. On the flip side, if it feels too dry and crumbly, add a teaspoon of water or an egg yolk and knead it in gently. It’s all about finding that sweet spot! You can find some great tips for all sorts of kitchen fixes, even for things like making a matcha green tea latte, that might inspire you with troubleshooting too!
And what about pasta that breaks or sticks? If your dough is breaking while you roll it thin, it might be too dry and needs a little more moisture. If your pasta sticks together when you’re cutting it or trying to dry it, that’s usually a sign you need more semolina flour! Don’t be afraid to really dust it. For cooking, remember that huge pot of boiling, salted water we talked about? That’s your best defense against sticking. Just keep it cooking and give it a gentle stir now and then. You’ve got this!
Frequently Asked Questions About How to Make Pasta Recipes Like a Pro (2025)
Okay, let’s chat about some common pasta-making questions! I know when you’re learning How to Make Pasta Recipes Like a Pro (2025), things can pop up. Don’t worry, I’ve got you covered! Think of these as little tips to make your pasta dreams come true, and hey, sometimes you find great ideas for refreshing drinks, too, like a strawberry acai refresher, while you’re in the kitchen!
Can I make gluten-free pasta that tastes great?
Oh, absolutely! My whole pasta journey really started because I wanted delicious, inclusive meals for my family. You can totally make amazing gluten-free pasta. Using a good quality all-purpose gluten-free flour blend is your best bet. Sometimes, a touch of Xanthan gum helps with that elasticity, or you might find success with blends that have rice flour or tapioca. It might take a couple of tries to get your favorite mix just right, but the result is so worth it!
How long does fresh pasta last?
Fresh pasta is best when it’s cooked soon after making it. If you’ve shaped and dried it out properly until it feels really stiff, you can store it for a few days in an airtight container at room temperature. Freezing is another great option! Just dust it well with semolina, lay it flat on a baking sheet until frozen, then pop it into a freezer bag. It’ll keep well for about a month. Just cook it straight from frozen – no need to thaw!
What’s the secret to pasta not sticking when cooking?
The biggest secret here is simple: lots and lots of boiling, salted water! Seriously, use a huge pot and don’t be shy with the water or the salt. Your pasta needs room to dance around so it doesn’t clump up. Give it a gentle stir right after you drop it in to make sure nothing sticks to the bottom. And remember, fresh pasta cooks super quickly, so it’s usually not in the water long enough to get gummy.
My dough is too sticky, what should I do?
Sticky dough is usually just craving a bit more flour! While you’re kneading, add flour about a tablespoon at a time. Keep going until the dough feels smooth, elastic, and not tacky anymore. You want it to be soft and easy to work with, not glued to your fingers. It’s all about feeling for that perfect consistency. This is a super common little hiccup, but easily fixed!
Expert Tips for Elevating Your Pasta Dishes
Alright, you’ve mastered the dough, shaped your pasta, and cooked it to perfection – you are basically a pasta pro now! But we can always take things up a notch, right? These little tricks are what I consider the ‘pro secrets’ for turning a good homemade pasta dish into something absolutely unforgettable. They’re simple, but they make a world of difference, especially when you’re pairing your beautiful pasta with a delicious sauce. It’s all about putting those finishing touches on your culinary masterpiece!
First off, let’s talk about sauce pairing. Think of it like a dance – the shape of the pasta should complement the sauce. Delicate, thin strands like angel hair are perfect for light, buttery sauces or a simple garlic and oil. Heartier shapes, like rigatoni or pappardelle, can stand up to rich, chunky meat sauces or creamy ragus. The sauce needs something to cling to, so don’t be afraid to get adventurous!
And achieving that perfect *al dente* texture consistently? It’s an art, but here’s my secret: always reserve some of that starchy pasta water before you drain your pasta! That cloudy liquid gold is packed with flavor and helps emulsify your sauce, making it incredibly silky and coating your pasta beautifully. A little swirl of it in your pan with the pasta and sauce makes all the difference. You’ve got this!
Nutritional Information
Making fresh pasta from scratch is a wonderful culinary adventure! While the exact nutritional values can vary quite a bit depending on the specific flour you use (think all-purpose vs. gluten-free blends), the size of your eggs, and any added oils, here’s a general idea per serving of plain homemade pasta. Expect roughly 250-350 calories, 10-15g of protein, 40-55g of carbohydrates, and 5-10g of fat. These are just estimates, of course, but they give you a good baseline!
How to Make Pasta Recipes Like a Pro (2025)
Ingredients
Equipment
Method
- Prepare your chosen pasta dough recipe. Ensure you have all ingredients measured and ready.
- Knead the dough until it is smooth and elastic. This may require some physical effort.
- Allow the dough to rest for at least 30 minutes. This step is crucial for a workable dough.
- Decide on your pasta shapes. You can use a rolling pin for flat sheets or a pasta machine for various extruded shapes like spaghetti, bucatini, or rigatoni.
- Roll out the dough to your desired thickness. If using a machine, follow its instructions for consistent results.
- Cut the dough into your chosen shapes. For extruded shapes, you will need to slice the pasta as it comes out of the machine.
- Dry the pasta. You can lay it on a clean surface, hang it on a rack, or drape it over chairs. Dust generously with semolina to prevent sticking.
- Allow the pasta to dry for at least 30 minutes, or longer if preparing ahead for a meal. Properly dried pasta will hold its shape when cooked.
- Cook the fresh pasta in boiling salted water until al dente. Cooking time will vary depending on the thickness and shape of your pasta.
Notes
Tried this recipe?
Let us know how it was!
Mindfulness & Emotional Wellness Specialist
I never thought I’d leave my career as a corporate litigation attorney, but a panic attack in a courthouse bathroom changed everything. After struggling with emotional eating for over a decade—starting in college and getting worse through the stress of law school—I realized that no diet could fix what was really going on inside me.
My breakthrough came through mindfulness meditation training. Working with Jon Kabat-Zinn’s protocols, I discovered that my relationship with food reflected deeper patterns of anxiety and perfectionism that I’d been avoiding for years. That’s when I understood that sustainable eating changes require internal transformation, not just external rules.
Now I treat meal preparation as meditation practice. My “Mindful Kitchen” workshops help people transform ordinary cooking into opportunities for self-awareness and emotional healing. I’ve developed over 180 recipes designed for slow, mindful preparation—complex enough to keep you present, simple enough not to overwhelm your nervous system.
I believe food becomes medicine when we approach it with presence rather than reactivity. The kitchen can be our monastery if we choose to enter it with reverence.