
Ever looked at a showstopper cake and thought, “Wow, I could NEVER do that”? Trust me, I used to be right there with you! I still remember the first cake I ever made from scratch. It was a simple vanilla sponge, and I was nervous as I cracked the eggs and measured the flour, convinced disaster was looming. But as I layered the frosting and decorated it with fresh berries, I realized this was more than just baking—it was a form of self-expression. That moment sparked a passion in me to explore endless cake ideas and flavors, turning what began as a simple recipe into an art form. It taught me that every cake is a canvas waiting to be transformed, and it’s my joy to help others unleash their inner cake artist. So, get ready to learn How to Make Cake Ideas Recipes Like a Pro (2025), because we’re diving deep into creating cakes that wow!
This guide is all about sparking your creativity and giving you the confidence to tackle more adventurous cake projects. We’ll go beyond the basics, focusing on techniques and ideas that will elevate your bakes from ‘nice try’ to ‘absolutely stunning’. Whether you’re a seasoned home baker or just starting out, prepare to discover new possibilities and fall even more in love with caking!
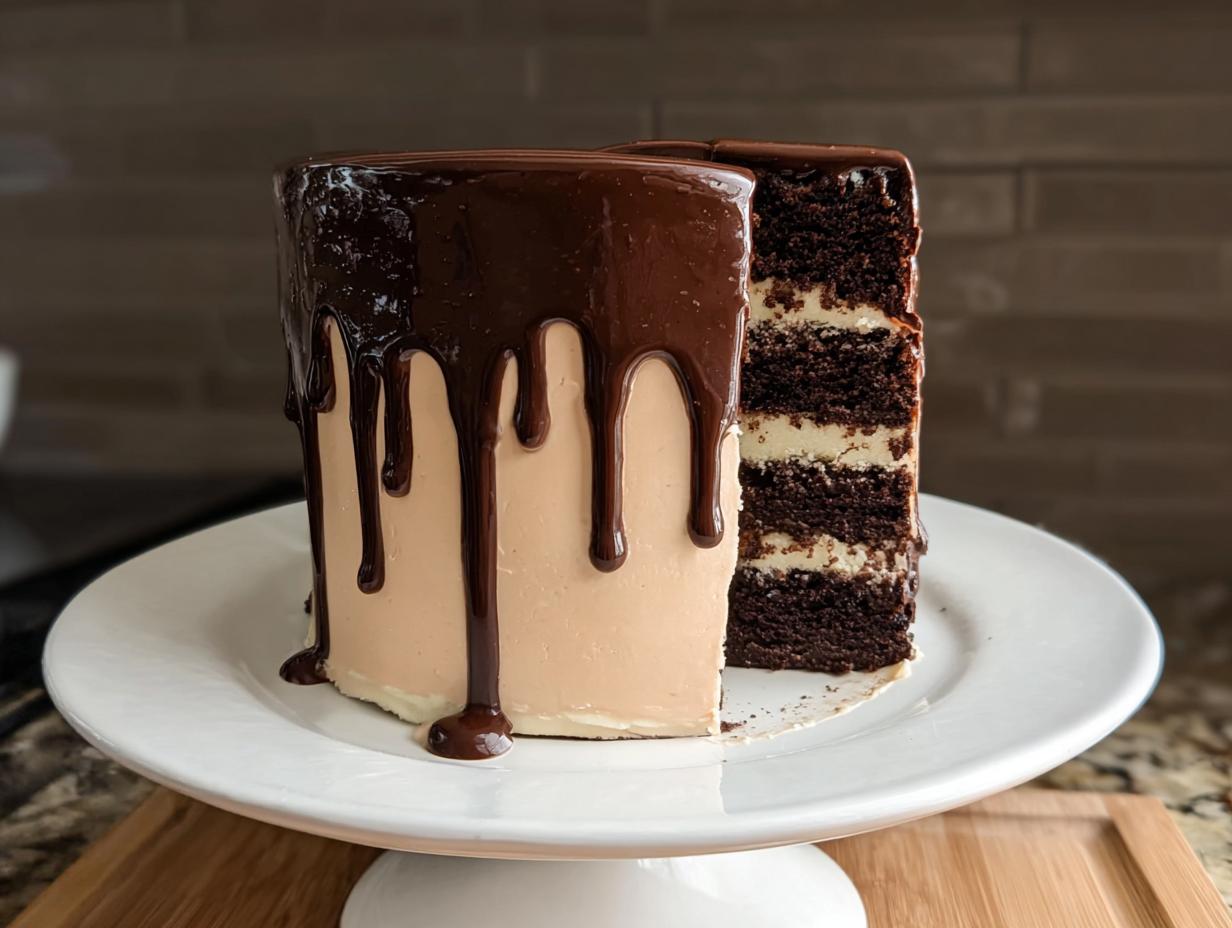
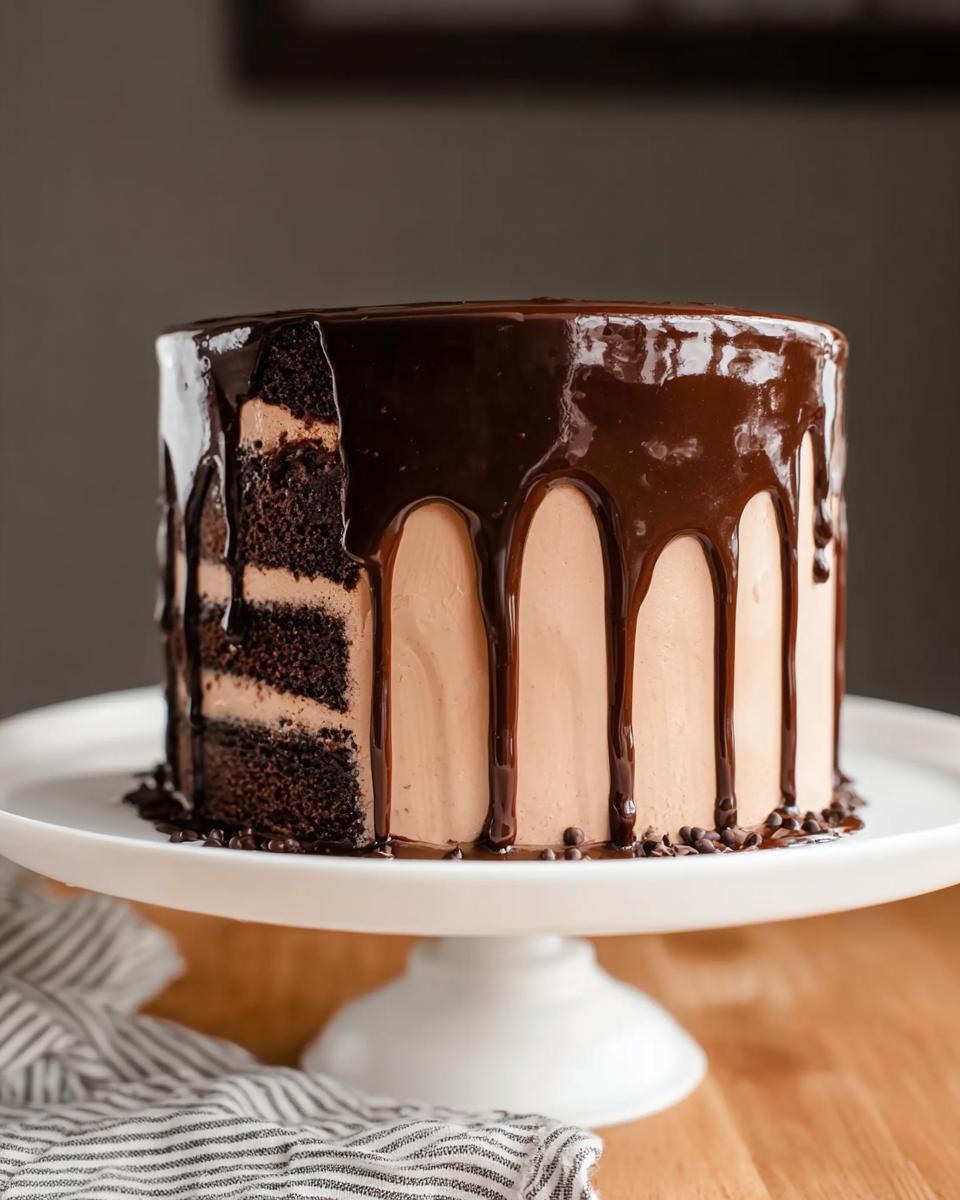
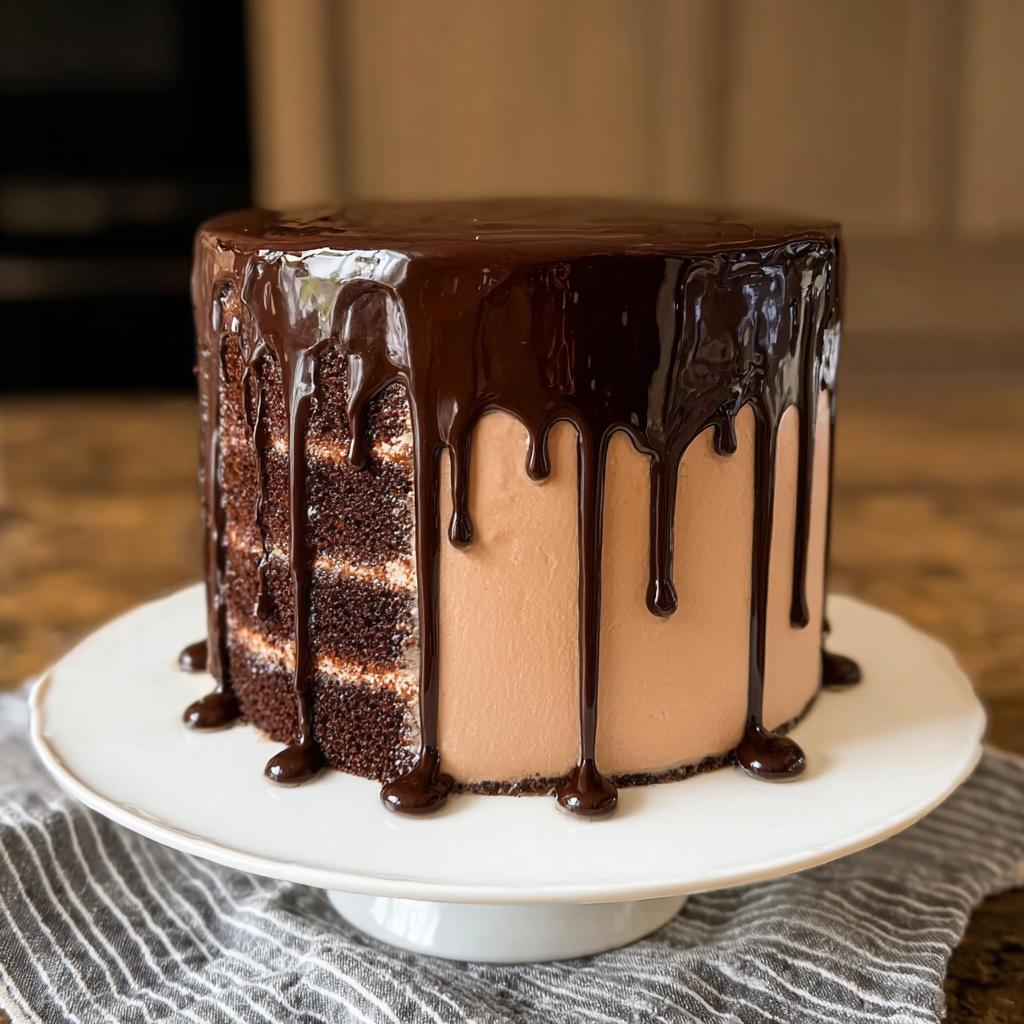
Why This Chocolate Mocha Cake is Your Next Pro Project
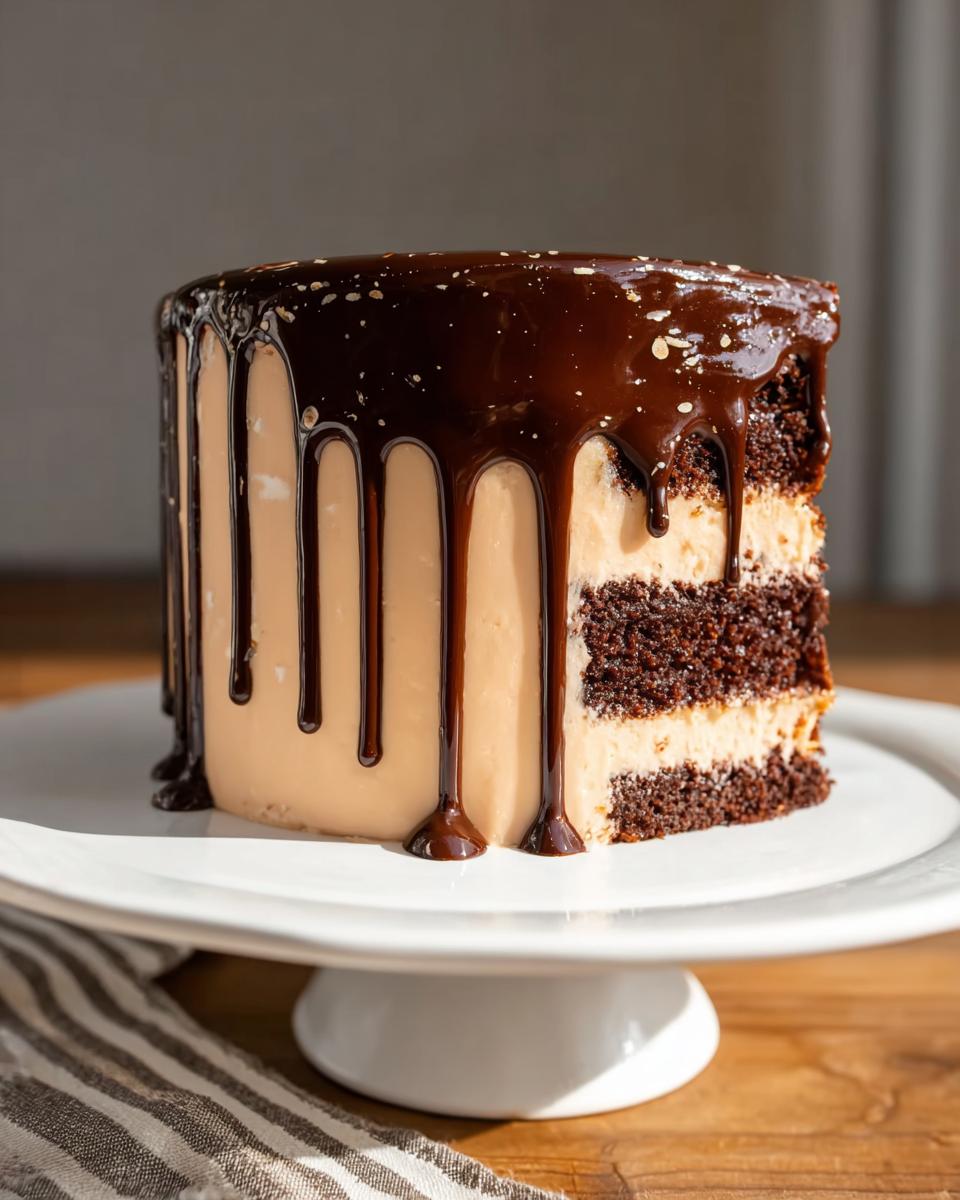
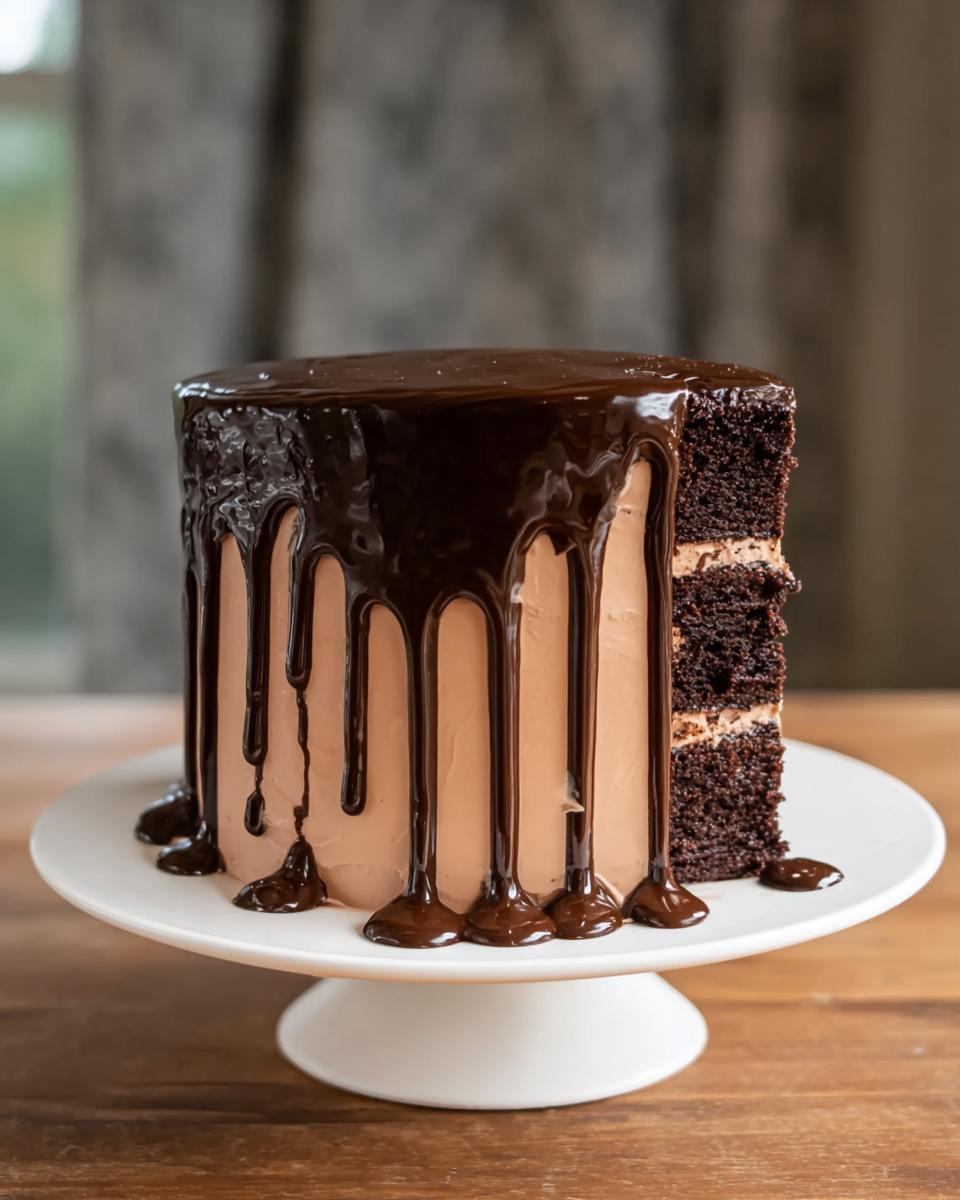
Okay, so why this cake? Because it’s the perfect project to level up your baking game! It’s not just about tasting amazing (though, trust me, it is), it’s about the whole experience. You get this super rich, moist chocolate cake, a silky mocha buttercream that’s just heavenly, and a dramatic ganache drip. Plus, mastering the drip and getting those smooth frosting sides? That’s where the pro skills really shine! It’s a beautiful cake that teaches you essential techniques you can use on any cake down the road. Seriously, this one’s a winner!
Gather Your Tools: Essential Equipment for Pro Cake Making
Alright, let’s talk gear! To make this chocolate mocha dream happen, you’ll want a few trusty companions in your kitchen. Having the right tools really does make a difference, transforming a good bake into a *great* one. We’re talking stand mixers, a sturdy paddle attachment, and a simple whisk. You’ll also need three 6-inch round cake pans – these are great for getting those perfect layers. Don’t forget parchment paper for easy release, and a cake tester to make sure your layers are baked through.
Specialty Tools for Precision
Now for a couple of my absolute favorites: a kitchen scale and a candy thermometer. Seriously, a scale is a game-changer for consistent baking – imagine getting those perfect measurements *every* time! And a candy thermometer? It’s your best friend for getting that buttercream just right, ensuring your sugar dissolves perfectly and your meringue is spot on. These little helpers turn pro results from a maybe into a definite!
Ingredients for Your Chocolate Mocha Cake Masterpiece
It’s time to round up everything you need to build this delicious cake! We’ve got our rich chocolate cake layers, that dreamy mocha buttercream, and of course, the star of the show – the ganache drip. Make sure you’ve got your ingredients measured out precisely; it really makes all the difference. For the cake itself, we’re using all-purpose flour, granulated sugar, sifted Dutch-processed cocoa powder (it’s darker and richer!), baking soda and powder, salt, veggie oil, buttermilk, hot brewed coffee (trust me on this!), eggs, and vanilla extract. For the buttercream, grab some egg whites, more sugar, lovely room-temp butter, vanilla, your dissolved instant espresso powder, and some melted dark chocolate. Lastly, for that gorgeous drip, just dark chocolate and heavy cream. Shopping list, here we come!
Ingredient Notes and Substitutions
Let’s chat about a couple of things that really make this cake shine. Using Dutch-processed cocoa powder is key for that deep, dark chocolate color and flavor. If you can’t find it, regular unsweetened cocoa works, but it won’t be quite as intense. And for the buttermilk? If you’re out, just pop a tablespoon of lemon juice or white vinegar into a measuring cup, then fill it up with regular milk. Let it sit for 5 minutes, and voilà – homemade buttermilk! It adds such a tender crumb to the cake. Also, using good quality dark chocolate for the ganache will really make that drip flavor pop!
Step-by-Step Guide: How to Make Cake Ideas Recipes Like a Pro
Alright, it’s time to roll up our sleeves and bring this beauty to life! Making a showstopper like this Chocolate Mocha Cake is all about following a few key steps, and trust me, it’s totally doable. First things first, get that oven preheated to 350°F (175°C). Then, grab your three 6-inch round pans. Grease them up, dust them with cocoa powder (to avoid those white flour marks on a chocolate cake!), and line the bottoms with parchment paper. Precision is your friend here!
Now for the cake batter. In your stand mixer bowl, dump in all the dry cake ingredients and give them a quick stir. In a separate medium bowl, whisk together all the wet stuff. Here’s a little trick: add that hot coffee slowly to the wet ingredients. This helps bloom the cocoa and makes the cake super moist, but you don’t want to scramble your eggs! Pour the wet into the dry in the mixer and let it run on medium speed for about 2-3 minutes. Don’t panic if the batter looks thin – that’s normal for this recipe. To make sure everything bakes evenly, use a kitchen scale to get the same amount of batter in each pan. Bake for about 30-35 minutes, or until a cake tester comes out clean with just a few moist crumbs sticking to it. For some fun ideas on jazzing up simpler cakes, check out how to give box mixes a makeover!
Crafting the Perfect Chocolate Cake Layers
The secret to these amazing cake layers is handling the batter just right. Making sure your dry ingredients are sifted and your wet ingredients are well combined before they meet is half the battle. Pouring the thin batter evenly into your prepared pans, using that kitchen scale, is super important. It guarantees all three layers bake at the same rate, so you don’t end up with one layer that’s done way before the others. And remember, don’t overmix once the wet and dry combine – a few minutes is all it takes to get everything just incorporated! It’s all about that perfect balance, just like in this fantastic mocha chocolate cake recipe from Liv For Cake.
Whipping Up Silky Mocha Buttercream
Okay, this buttercream is DIVINE. We’re making a Swiss meringue buttercream, which sounds fancy but is totally manageable. Start by whisking your egg whites and sugar in your stand mixer bowl. Make sure there’s absolutely no yolk in there and your bowl and whisk are super clean – grease is the enemy of meringue! Set the bowl over a pot of simmering water (like a double boiler) and stir constantly until the sugar is dissolved and the mixture is hot to the touch, around 160°F (71°C). Then, pop that bowl back on the stand mixer and whip it until you have stiff, glossy peaks and the whole thing is completely cool. Now, with the paddle attachment, start adding your room-temperature butter, one cube at a time. It might look curdled – seriously, don’t freak out! Just keep mixing. Eventually, it’ll smooth out into the silkiest buttercream you’ve ever had. Mix in the vanilla, espresso mixture, and that melted dark chocolate until it’s perfectly smooth and dreamy.
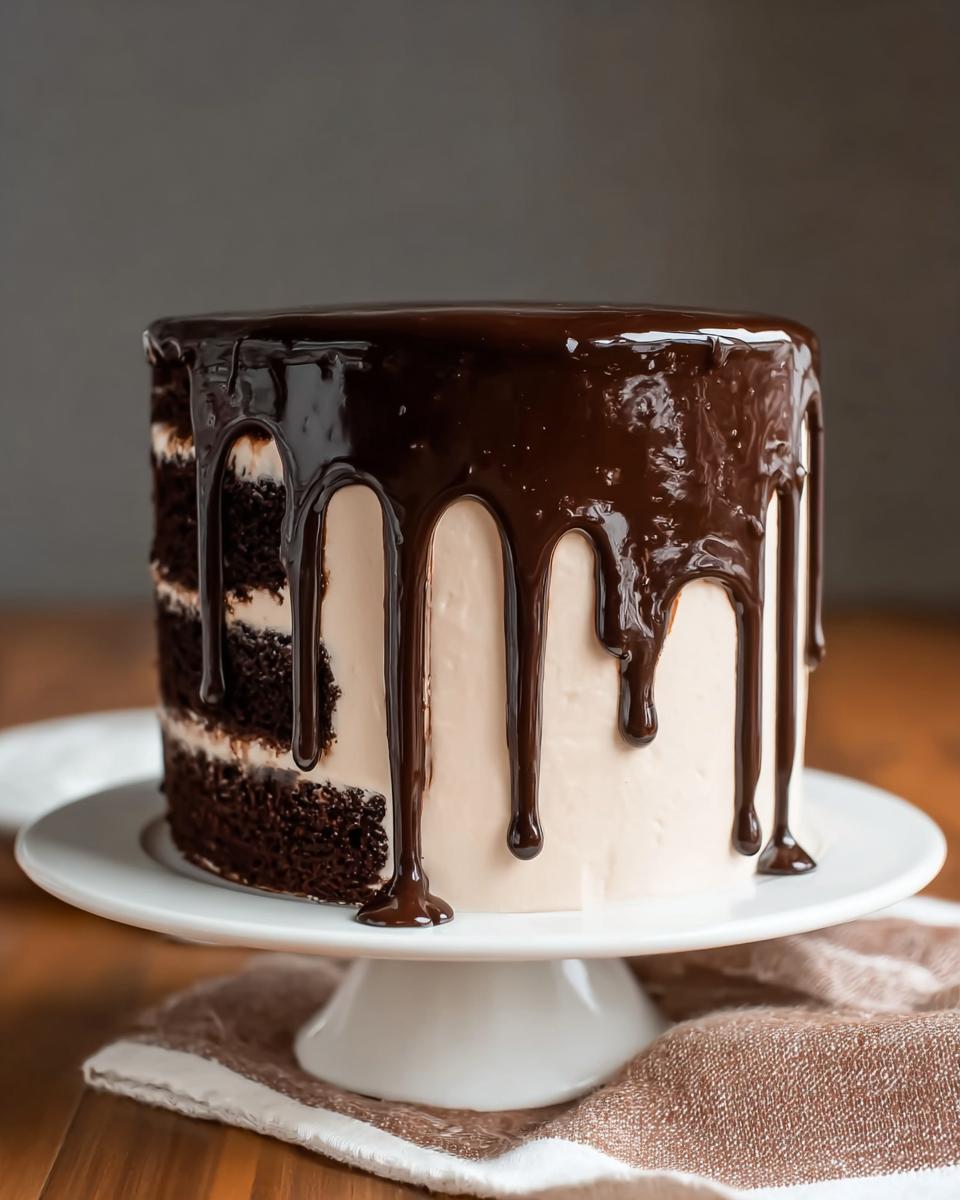
Creating the Glossy Ganache Drip
For the ganache, it’s almost embarrassingly easy. Finely chop your dark chocolate and put it in a heatproof bowl. Gently heat your heavy cream until it just starts to simmer around the edges – don’t let it boil! Pour that hot cream right over the chocolate, cover it with plastic wrap, and let it hang out for about 2 minutes. This gives the chocolate time to melt. Then, give it a gentle stir with a spatula until it’s all smooth and glossy. You want it to cool down and thicken up just enough so it Drips, not pours. If it’s too thin, let it sit a bit longer. Too thick? A quick 5-10 second zap in the microwave and a stir usually does the trick. Easy peasy!
Assembling and Decorating Your Masterpiece
Now for the fun part – putting it all together! Place your first cake layer on your stand or plate. Spoon about 2/3 cup of that incredible mocha buttercream on top and spread it out evenly. Repeat with your other two layers. For that smooth, pro finish, apply a thin crumb coat of frosting all over the cake. This catches all the loose crumbs. Pop it in the fridge for about 20 minutes to firm up. Then, add your final layer of frosting, smoothing the sides as best you can. Another 20 minutes in the fridge helps set it perfectly. Now, take your slightly cooled ganache and use a small spoon to carefully drizzle it around the top edge, letting it cascade down the sides. Fill in the top center with the rest of the ganache and spread it out with your offset spatula. Ta-da! Pure magic!
Pro Tips for How to Make Cake Ideas Recipes Like a Pro
You know, once you get the hang of the basics, taking your cakes from ‘homemade’ to ‘bakery-worthy’ is all about a few little tricks. My absolute favorite is making sure ALL your ingredients are at the right temperature – not just the butter! Eggs, buttermilk, even your milk for the coffee should be room temp. It helps everything emulsify perfectly, leading to a smoother batter and a more tender crumb. Seriously, it’s a revelation! Also, don’t be afraid to embrace the kitchen scale. Measuring by weight is SO much more accurate than by volume with dry ingredients. Trust me, it’s a small step that makes a HUGE difference in consistency, letting you nail recipes from this confetti cake to a rich chocolate truffle deal every single time. It gives you the confidence to experiment and truly make these cake ideas *your own*!
Frequently Asked Questions About Pro Cake Making
Got questions? You’re not alone! Baking, especially when you’re aiming for that ‘pro’ feel, can bring up a few head-scratchers. Let’s clear some of those up!
Can I use regular milk instead of buttermilk in this cake?
You totally can! If you’re fresh out of buttermilk, no worries. Just measure out your milk (you’ll need about 3/4 cup for this recipe) and stir in 1 tablespoon of white vinegar or lemon juice. Let it sit for about 5 minutes until it looks a bit curdled. That’s your DIY buttermilk! It gives the cake that lovely tender crumb. Honestly, it works like a charm and keeps the moisture factor high.
Why does my cake sometimes sink in the middle?
Oh, the sinking cake! It feels like the worst! Usually, this happens when the oven door is opened too early, causing a sudden temperature drop. Or, if you’ve used too much leavening (baking soda/powder) or not enough flour. Overmixing the batter too can develop too much gluten, making it heavy. For this specific cake, though, keeping an eye on your bake time and resisting the urge to peek too soon is key!
How should I store a decorated cake like this?
For a cake with buttercream and ganache, the fridge is your best friend. Put it in an airtight container or cover it well with plastic wrap. The buttercream and ganache actually help preserve the cake, so it’ll stay delicious for a good 3-4 days. Just let a slice sit out at room temperature for about 20-30 minutes before serving so the frosting and cake soften up a bit. For other lovely cake ideas like this champagne layer cake, the same storage rules apply!
Storing and Reheating Your Masterpiece
Got leftover cake? Lucky you! To keep this chocolate mocha dream fresh, pop it into an airtight container or wrap it up snugly. The fridge is best for cakes with buttercream and ganache – it’ll stay delicious for about 3 to 4 days. Before you dig in, let that slice hang out on the counter for about 20-30 minutes. This lets the frosting and cake come back to the perfect temperature, so it’s not too hard and is wonderfully moist!
Estimated Nutritional Information
Just a heads-up, these nutrition numbers are estimates! They can totally change depending on the brands you use and any little tweaks you make. This Chocolate Mocha Cake (per slice, based on 12 servings) comes in at about 613 calories, with 38g fat, 6g protein, and 64g carbs, including 46g sugar. Enjoy every delicious bite!
Share Your Cake Creations!
I absolutely LOVE seeing your baking adventures! Did you try this chocolate mocha cake? What did you think? Drop your comments, share your baking triumphs (or even epic fails – we’ve all been there!), and tag me in your photos on social media. You can find more amazing recipes like this one over on my recipes page. I can’t wait to see what masterpieces you create!
Chocolate Mocha Cake with Ganache Drip
Ingredients
Equipment
Method
- Preheat your oven to 350F. Grease three 6-inch round baking pans, dust them with cocoa powder, and line the bottoms with parchment paper.
- In the bowl of your stand mixer fitted with a paddle attachment, combine all dry ingredients for the cake and stir to combine.
- In a medium bowl, whisk together all wet ingredients for the cake. Slowly add the hot coffee to avoid cooking the eggs.
- Add the wet ingredients to the dry ingredients in the stand mixer. Mix on medium speed for 2-3 minutes. The batter will be thin.
- Pour the batter evenly into the prepared pans. Use a kitchen scale to ensure the batter is evenly distributed.
- Bake for 30-35 minutes, or until a cake tester comes out mostly clean.
- For the mocha buttercream, place the egg whites and sugar in the bowl of your stand mixer and whisk until combined. Ensure there are no traces of egg yolk and the bowl and whisk are grease-free.
- Place the mixer bowl over a pot with 1-2 inches of simmering water. Stir constantly with a whisk until the mixture is hot to the touch and no longer grainy, or reaches 160F on a candy thermometer (about 3 minutes).
- Place the bowl back on your stand mixer. Whisk on medium-high speed until the meringue is stiff and cooled (the bowl should no longer feel warm to the touch, approximately 5-10 minutes).
- Switch to the paddle attachment if desired. Slowly add the cubed butter and mix until the buttercream is smooth.
- Add the vanilla extract, melted dark chocolate, and espresso powder mixture. Whip until smooth. The buttercream may appear curdled at some point; continue mixing until completely smooth.
- For the ganache drip, finely chop the dark chocolate and place it in a bowl. Heat the heavy cream just until it barely simmers, then pour it over the chopped chocolate. Cover with plastic wrap and let stand for 2 minutes.
- Stir the ganache gently with a spatula until combined and smooth. Allow it to cool and thicken slightly before using.
- To assemble, place one cake layer on a cake stand or serving plate. Top with approximately 2/3 cup of frosting and spread evenly. Repeat with the remaining layers.
- Apply a thin coat of frosting all over the cake and chill for 20 minutes.
- Frost and smooth the sides of the cake, then chill for another 20 minutes.
- Using a small spoon, place dollops of ganache around the top edges of the cooled cake, allowing some to drip down the sides. Fill in the top of the cake with more ganache and spread evenly with an offset spatula.
Nutrition
Notes
Tried this recipe?
Let us know how it was!
Dual-Restriction Recipe Engineer & Cross-Contamination Specialist
Everything changed when my teenage son got hit with celiac disease and Type 1 diabetes diagnoses within six months of each other. Suddenly, pizza and pasta were off the table, and most “diabetic-friendly” foods contained gluten. I went from regular mom cooking to navigating what I call “compound restriction cooking”—and I had a kid’s appetite and taste buds to satisfy.
Lucky for us, my background in pharmaceutical quality control gave me the systematic mindset this level of precision requires. My kitchen now operates under pharmaceutical-grade protocols adapted for home use: dedicated prep surfaces, separate storage systems, and testing procedures that verify both carb counts and gluten absence before any recipe gets published.
I’ve developed over 220 recipes that clear multiple dietary hurdles simultaneously—finding gluten-free thickeners that don’t spike blood sugar, creating bread alternatives that meet both keto ratios and celiac safety, and developing desserts that actually taste good to a teenager despite impossible restrictions.
Through my “Safe Kitchen Certification” program, I teach other parents that managing multiple dietary restrictions isn’t about multiplying limitations—it’s about systematic thinking that reveals unexpected possibilities. When you engineer solutions instead of making compromises, restriction becomes innovation rather than deprivation.