
Oh, the sheer joy of baking a cake! It’s such a wonderful way to show love, celebrate milestones, or just make an ordinary day feel a little bit special. But I totally get it – sometimes, the thought of baking a cake from scratch can feel a bit… intimidating, right? That’s exactly why I put together The Ultimate Cake Ideas Recipes Guide for Beginners, just for you!
I still remember the first cake I attempted after juggling my son’s dietary restrictions. I was determined to make a gluten-free birthday cake that not only adhered to his new health needs but also delighted his teenage taste buds. After a few baking disasters, I finally landed on a simple recipe that tasted incredible—rich, moist, with just the right sweetness. The joy on his face when he took that first bite was absolutely priceless. It reminded me that cake isn’t just about the ingredients; it’s about love, creativity, and an unwavering spirit to make memories, even under challenging circumstances. As a Dual-Restriction Recipe Engineer & Cross-Contamination Specialist, I’m here to show you that delicious, inclusive baking is totally achievable. Let’s dive in and create some magic together!
Why This Peach Upside Down Cake is Perfect for The Ultimate Cake Ideas Recipes Guide for Beginners
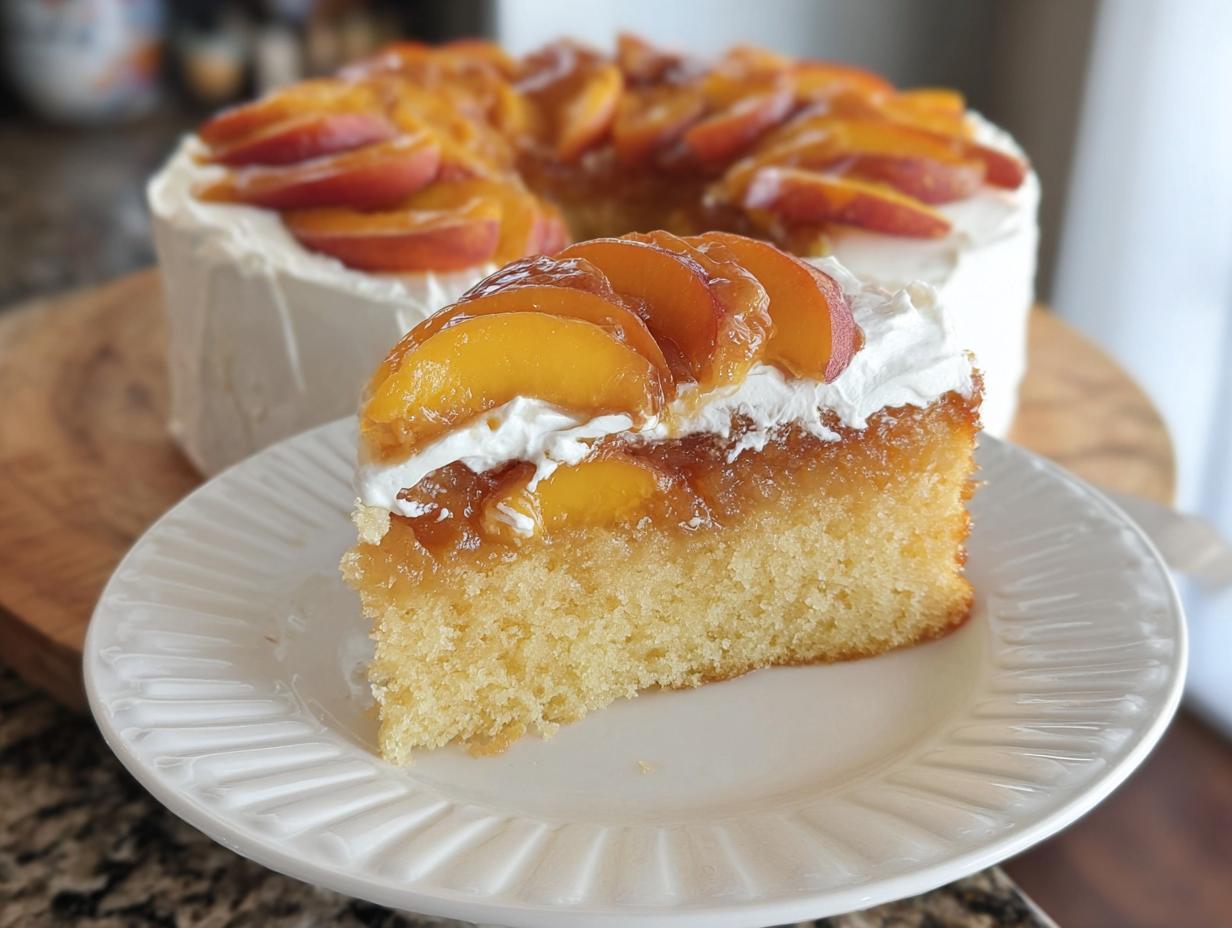
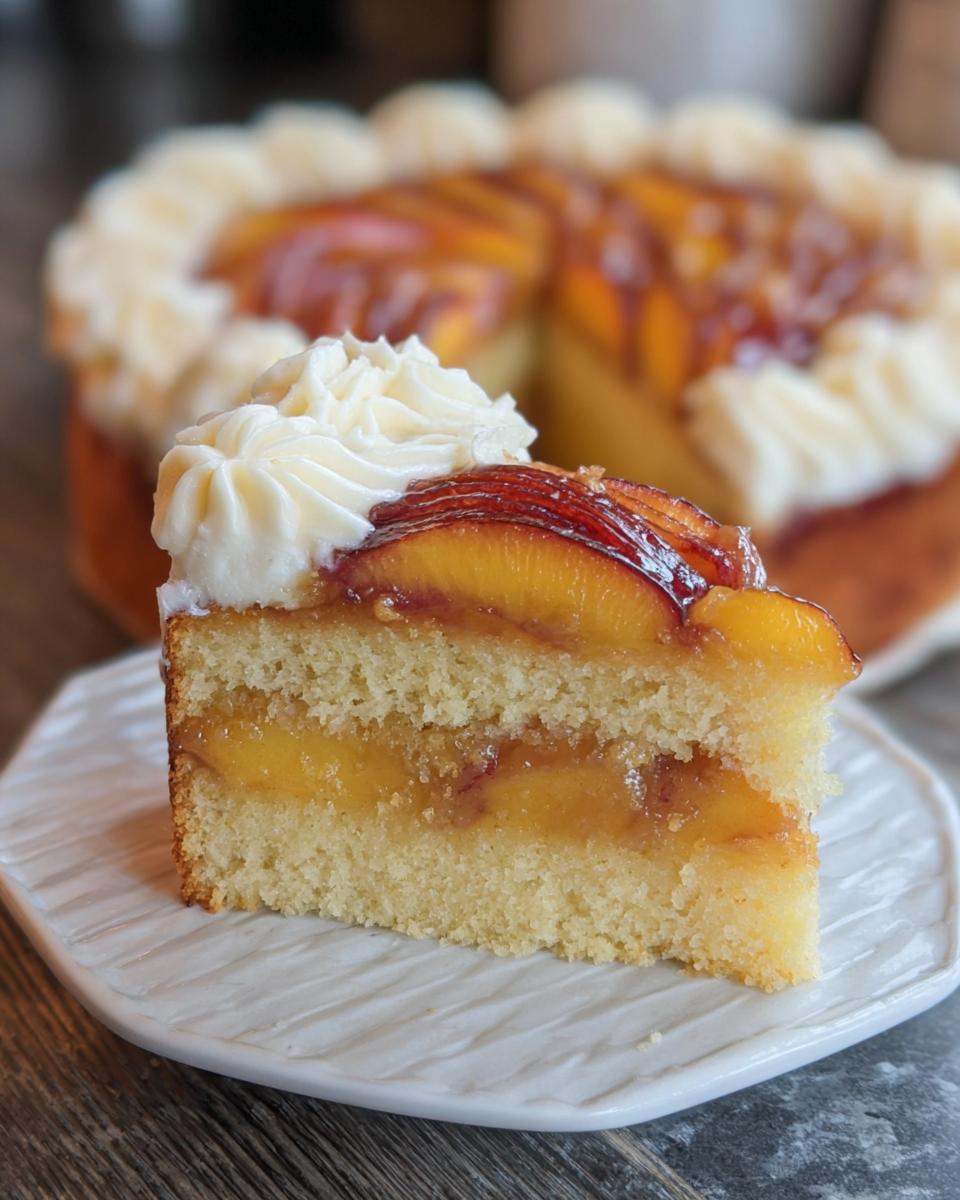
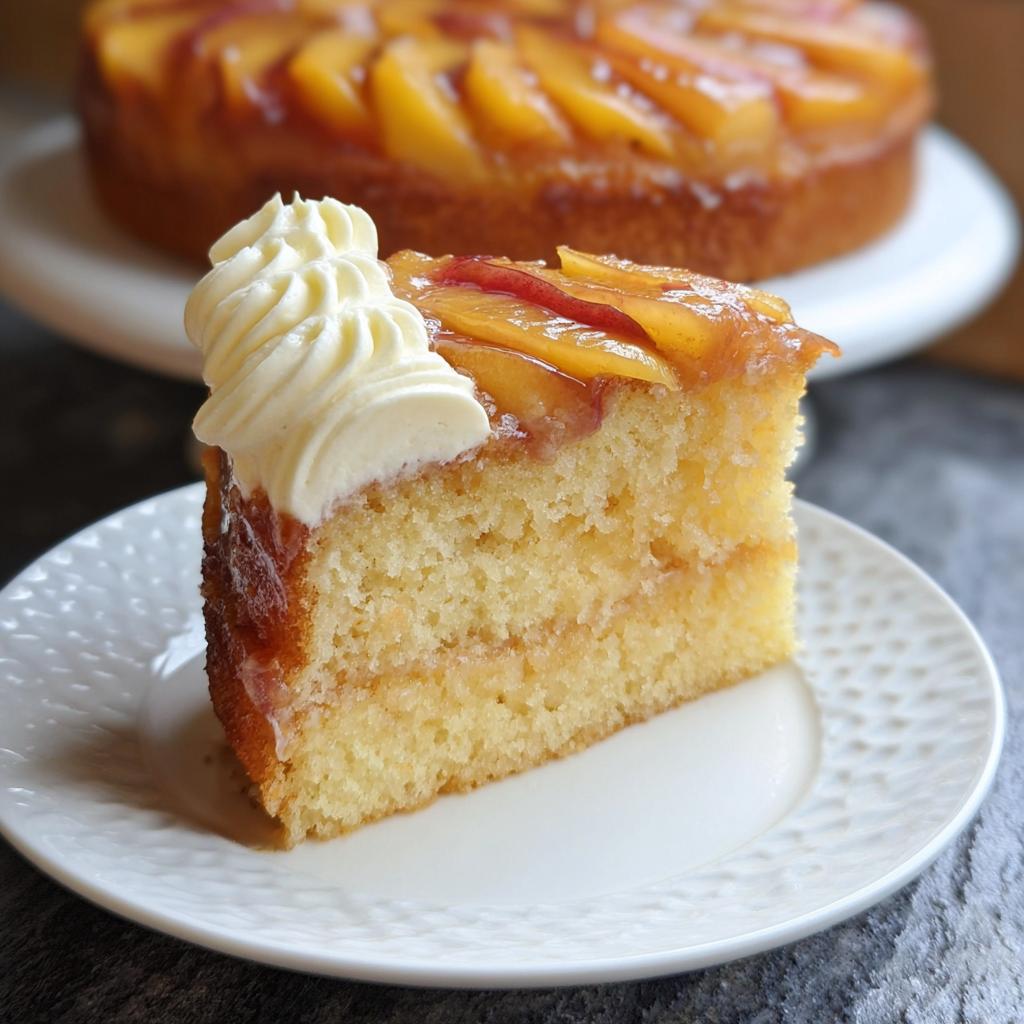
So, why is this peach upside down cake the absolute star of The Ultimate Cake Ideas Recipes Guide for Beginners? Honestly, it’s kind of a showstopper with very little fuss. The whole upside-down thing means you get this gorgeous, caramelized peach topping without any crazy decorating skills needed – trust me, the cake does most of the work for you! It’s incredibly forgiving, which is huge when you’re just starting out. Plus, who doesn’t love biting into warm, tender cake with sweet, gooey peaches? It’s a fantastic way to dip your toes into cake-making and see just how rewarding it can be. If you’re looking for ways to fancy up a simple box mix or just want a foolproof cake that wows, this “box mix glow up” is for you. Check out other amazing peach upside down cake ideas here!
Gather Your Ingredients: Essential Components for The Ultimate Cake Ideas Recipes Guide for Beginners
Alright, let’s get our ducks in a row! Having all your ingredients prepped and ready is key to making this cake a breeze, especially when you’re just starting out. This is where The Ultimate Cake Ideas Recipes Guide for Beginners really shines – we keep things super straightforward.
For the Peach Brown Sugar Layer:
- 1/4 cup unsalted butter, melted
- 2/3 cup brown sugar
- 3 large peaches, sliced (peel ’em if you want, or leave them on – totally up to you!)
For the Peach Yellow Cake:
- 3 large eggs, brought to room temperature (this really helps!)
- 2/3 cup sour cream, also at room temperature
- 1/3 cup vegetable oil
- 2/3 cup buttermilk, at room temperature
- 1 teaspoon vanilla extract
- 1 teaspoon cinnamon
- 1/2 teaspoon peach flavoring (this is optional, but adds a nice punch!)
- 1 (15.25oz box) yellow cake mix (any brand works great!)
For the Classic Vanilla Buttercream:
- 1 1/2 cups unsalted butter, softened (super important for smooth buttercream!)
- A pinch of salt
- 1 Tablespoon vanilla extract
- 1/4 cup heavy cream
- 7-8 cups powdered sugar (have a little extra handy just in case)
Step-by-Step Baking: Your Guide to The Ultimate Cake Ideas Recipes for Beginners
Okay, deep breaths, bakers! This is where the magic happens, and honestly, this part of The Ultimate Cake Ideas Recipes for Beginners is super straightforward. First things first, get your oven preheated to 325 degrees F (that’s 160 degrees C). While it’s warming up, let’s get those cake pans ready. I like to grease mine really well with shortening and then give them a good dusting of flour. This little trick is a lifesaver, especially for beginners, and it stops anything from sticking.
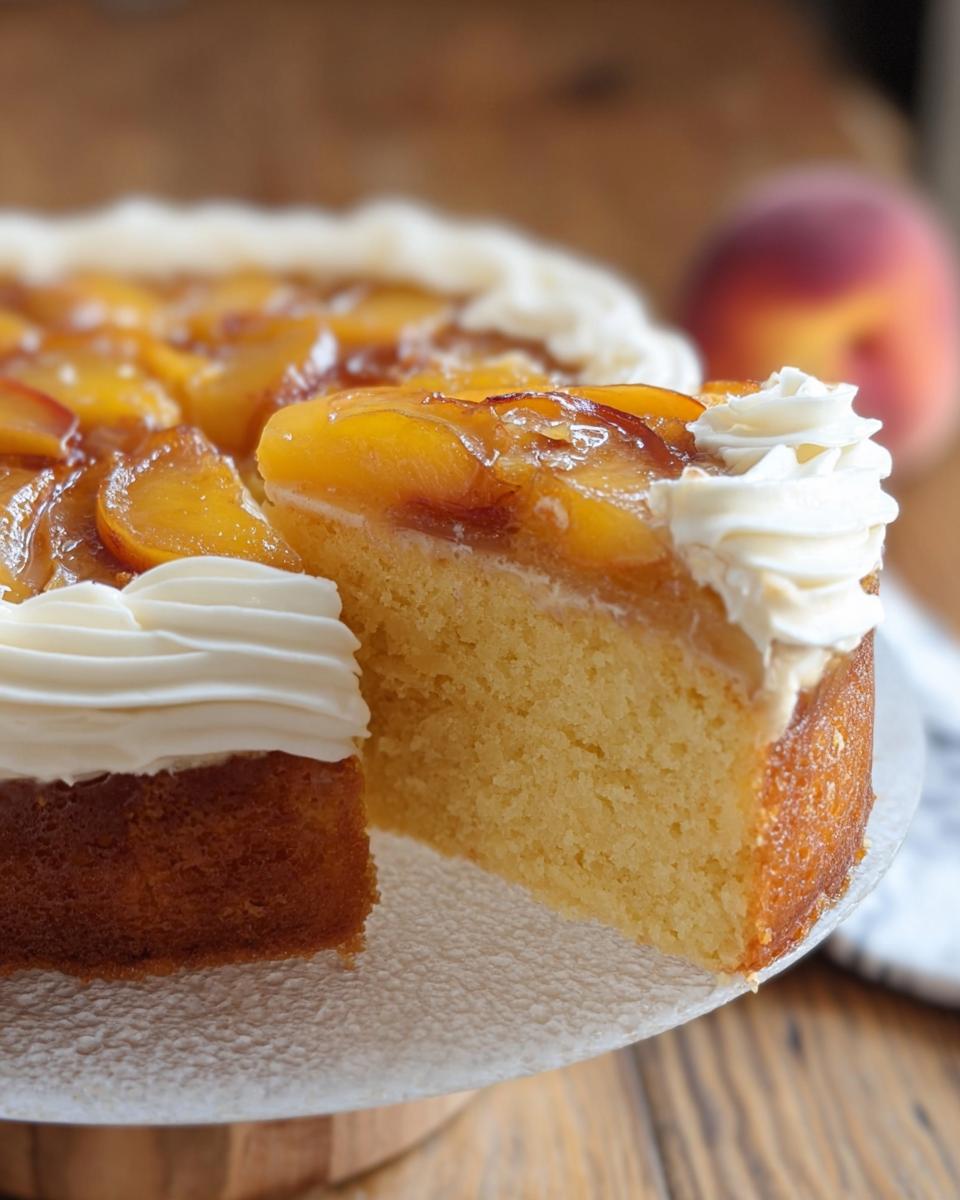
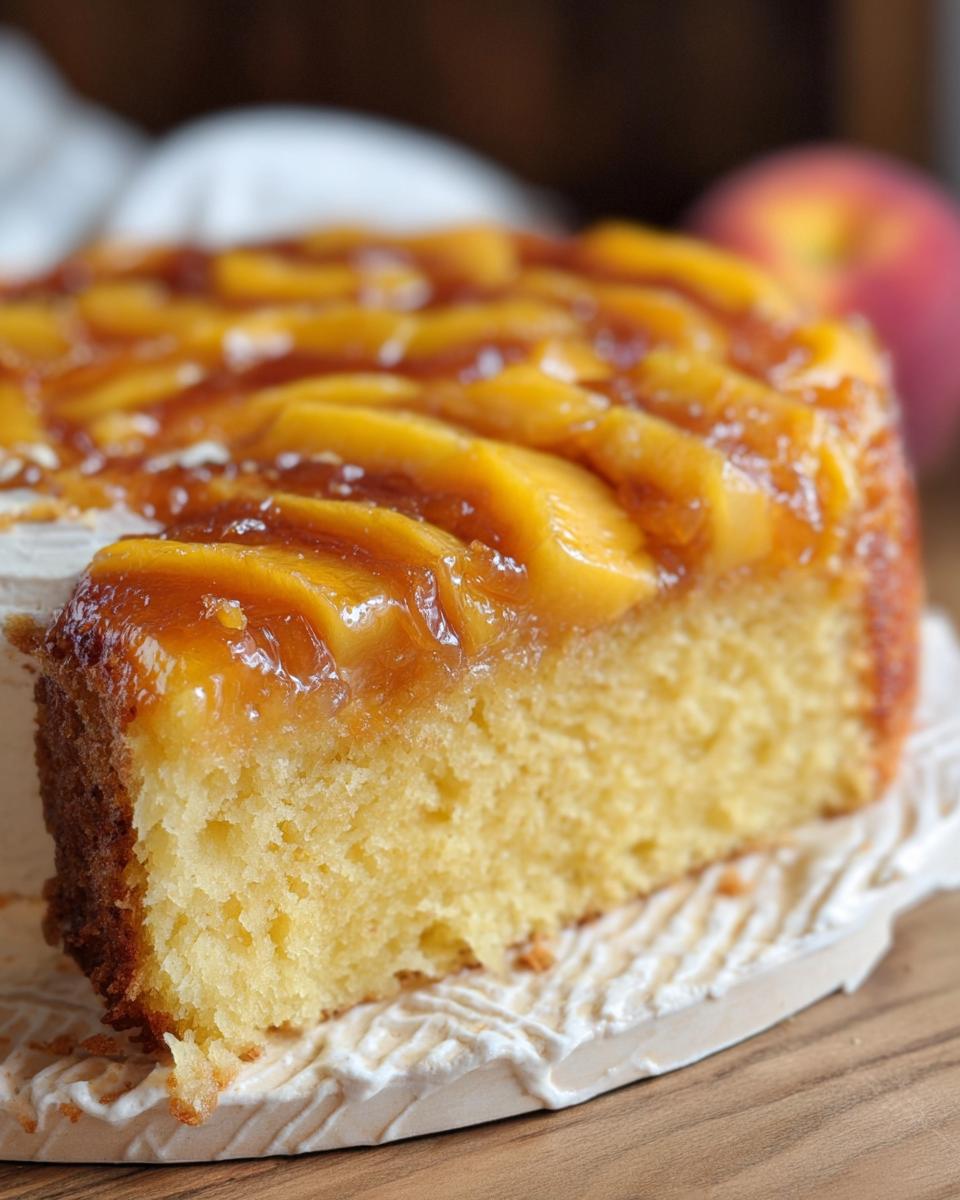
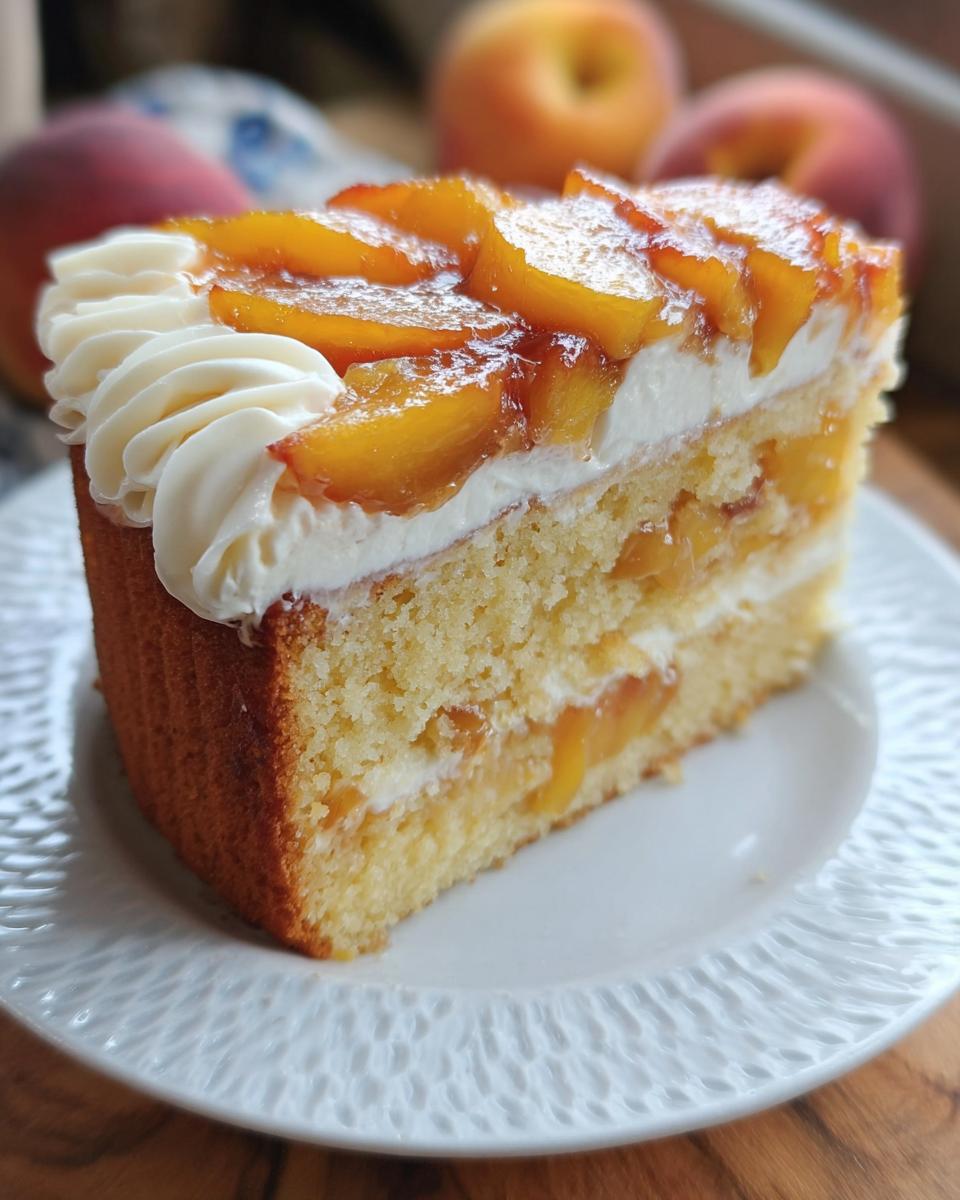
Now, for the fun part: dividing that melted butter between your two prepared 8-inch cake pans. Spread it around so the bottom is covered nicely. Then, sprinkle that lovely brown sugar right over the butter. This is going to create that gorgeous, caramelized layer when we flip the cakes. Arrange your peach slices on top of the brown sugar layer – make it look pretty, like you’re arranging jewels! Set these aside for a moment.
In a big bowl, go ahead and whisk together all the cake ingredients *except* the cake mix. Just get them nicely combined. Then, sift in your yellow cake mix and gently stir everything together until it’s *just* combined. We don’t want to overmix here! Divide that batter evenly between your two peach-topped pans.
Pop them into your preheated oven and bake for about 30 to 32 minutes. You’ll know they’re ready when a toothpick poked right into the center comes out clean. Once they’re out, let them cool in the pans for just a few minutes before carefully flipping them onto a wire rack. Let them cool completely. Here’s my little secret weapon for super easy assembly: wrap the cooled cake layers snugly in plastic wrap and pop them in the freezer for at least 30 minutes. Trust me, chilled cake layers are so much easier to frost without making a mess!
For more easy baking tips, check out these bakery-style banana muffins!
Crafting the Perfect Vanilla Buttercream
Now for the fluffy, dreamy part – the vanilla buttercream! Honestly, making buttercream is almost as fun as eating it, and this one is a classic for a reason. We’re going to whip up some magic in your stand mixer (or with a hand mixer if that’s what you’ve got!). Start with 1 1/2 cups of softened unsalted butter. We want it soft enough to mash easily with a fork, but not melty! Whip that butter until it looks light and fluffy, like a little cloud. Then, toss in a pinch of salt to balance the sweetness, a tablespoon of vanilla extract for that gorgeous flavor, and about 1/4 cup of heavy cream. Give that a good mix!
Next, we gradually add in about 7 to 8 cups of powdered sugar. Start with the mixer on low speed so you don’t get a sugar snowstorm in your kitchen! If it looks too thick, just add another tablespoon or two of heavy cream until you get that perfect, spreadable consistency. Then, crank up the speed and beat it for a good two minutes. This is where it gets super light and airy! If you need more tips on getting sauces and dressings just right, check out my creamy alfredo sauce recipe for some pointers on texture.
Assembling Your Masterpiece: Tips for The Ultimate Cake Ideas Recipes Guide for Beginners
Okay, my baking buddies, it’s time to put it all together and make this cake shine! This part of The Ultimate Cake Ideas Recipes Guide for Beginners is all about making your beautiful cake look as good as it tastes. We’ve got those lovely, chilled cake layers from the freezer, and our dreamy vanilla buttercream is ready to go. First, plop a little bit of that buttercream onto your cardboard cake round – it’s like glue to keep your first layer from sliding around. Place your first cake layer right on top, peach-side up, of course!
Now, spread a generous amount of buttercream over that layer. Don’t be shy! Then, we’re going to do a thin layer of frosting all around the sides of the cake. This is called a crumb coat, and it’s super important because it traps all those little loose crumbs so they don’t mess up our final frosting. Once that’s done, add another lovely layer of buttercream all around the sides. This is where the fun decorating part comes in! If you have a cake turntable (and you really should get one, it’s a game-changer!), pop your cake on it. Grab your scalloped cake comb and just gently press it against the side of the cake as you turn the turntable. It creates these gorgeous little waves that look so professional, but honestly, it’s so easy. You’ve got this!
For more fun cake ideas, make sure to check out this vanilla confetti New Year’s cake!
Expert Tips for Beginner Bakers
Alright, aspiring bakers, let’s talk about leveling up your cake game! As your go-to gal for making baking less scary and way more delicious, I’ve picked up a few tricks that have been total game-changers for me, and I just *know* they’ll help you too. First off, don’t skip bringing your ingredients to room temperature – especially eggs, sour cream, and buttermilk for this cake. It seriously helps everything blend together so much smoother, creating that perfect cake texture we’re after.
Also, when you’re mixing the dry ingredients with the wet, remember: gentle does it! Overmixing can make your cake tough. Just stir until you don’t see big streaks of flour anymore. Oh, and ovens can be funny little things! If you notice your cakes are browning too quickly on top before they’re cooked through, just loosely tent a piece of foil over them for the last 10 or 15 minutes. You’ve got this! For more foolproof baking secrets, check out my guide on how to make amazing foolproof banana bread!
Frequently Asked Questions for The Ultimate Cake Ideas Recipes Guide for Beginners
Hey there, fellow bakers! It’s totally normal to have questions when you’re trying out new recipes, especially when you’re building your baking confidence. That’s exactly why this section of The Ultimate Cake Ideas Recipes Guide for Beginners is here for you! Let’s tackle some common curiosities about our yummy peach upside down cake.
Can I use fresh peaches instead of canned for this recipe?
Oh, absolutely! Using fresh peaches is fantastic, and sometimes even better when they’re in season. Just be sure to slice them thinly and evenly, just like we did with fresh ones. If your fresh peaches aren’t super ripe and sweet, you might want to add just a tiny bit more brown sugar to that bottom layer to get that lovely caramelization.
How do I know if my cake is done baking?
This is such a good question! The trusty toothpick test is your best friend here. Just gently insert a toothpick (or a thin skewer or even a clean butter knife) right into the center of the cake. If it comes out clean, with no wet batter clinging to it, then your cake is ready to go! You might see a few moist crumbs, and that’s perfectly fine – it means your cake will be wonderfully moist. If there’s still gooey batter, give it a few more minutes in the oven.
Can I make this cake gluten-free?
Yes, you totally can! Since we’re using a cake mix as our base, making it gluten-free is surprisingly simple. Just grab a gluten-free yellow cake mix instead of a regular one. For the buttercream, it’s naturally gluten-free! You might need to adjust the liquid slightly in the cake batter depending on the gluten-free mix you use, so follow the instructions on the box if they differ from what’s listed here. For more ideas on adapting recipes, check out my list of easy low-carb and gluten-free recipes!
Storage and Reheating
Got leftover peach upside down cake? Lucky you! To keep it tasting its best, wrap any leftovers tightly in plastic wrap or store them in an airtight container at room temperature for up to two days. If it’s really warm in your kitchen, the fridge is a good option, but let it come back to room temperature for about 30 minutes before serving so the frosting and cake are soft again.
To reheat a slice, you can pop it in the microwave for just 10-15 seconds. It’ll warm up that gooey peach layer and make it taste like it just came out of the oven. Easy peasy!
Estimated Nutritional Information
Just a friendly heads-up, the nutritional info can really change based on the exact ingredients you use, especially the cake mix brand and how generous you are with that delicious buttercream! But as a ballpark, you’re looking at roughly 450-550 calories, around 25-35g of fat, 4-6g of protein, and usually 50-60g of carbohydrates per slice. Remember, these are just estimates!
Peach Upside Down Cake with Vanilla Buttercream
Ingredients
Equipment
Method
- Preheat your oven to 325 degrees F (160 degrees C). Prepare two 8-inch cake pans by greasing them with shortening and dusting with flour to prevent sticking.
- Divide the melted butter between the two cake pans, brushing it evenly across the bottom. Distribute the brown sugar over the butter layer in each pan. Arrange the peach slices in an even layer on top of the brown sugar. Set the prepared pans aside.
- In a large bowl, whisk together all the cake ingredients except the cake mix. Sift in the cake mix and gently stir until just combined. Divide the cake batter evenly between the two prepared cake pans.
- Bake for 30-32 minutes, or until a toothpick inserted into the center comes out clean. Remove the cakes from the oven and carefully invert them onto a wire rack to cool completely. Once cooled, wrap the cake layers securely in plastic wrap and freeze for at least 30 minutes to make assembly easier.
- For the buttercream: In a stand mixer fitted with the paddle attachment, whip the softened butter until it is light and fluffy. Add the salt, vanilla extract, and heavy cream, and whip again. Scrape down the sides of the bowl. With the mixer on low speed, gradually add the powdered sugar. If the mixture is too thick, add 2-3 tablespoons more heavy cream to reach the desired consistency. Increase the mixer speed to high and beat for 2 minutes until the buttercream is light and fluffy.
- To assemble: Place a small amount of buttercream on a cardboard cake round to secure the first cake layer. Position the first cake layer, fruit side up, onto the cardboard round. Spread a layer of buttercream over the cake. Apply a thin layer of buttercream to the sides of the cake for a crumb coat, leaving the top exposed. Add another layer of buttercream around the sides of the cake. Using a cake turntable and a scalloped cake comb, carefully create a textured finish on the sides of the cake.
- Slice and enjoy your homemade peach upside down cake!
Notes
Tried this recipe?
Let us know how it was!
Mindfulness & Emotional Wellness Specialist
I never thought I’d leave my career as a corporate litigation attorney, but a panic attack in a courthouse bathroom changed everything. After struggling with emotional eating for over a decade—starting in college and getting worse through the stress of law school—I realized that no diet could fix what was really going on inside me.
My breakthrough came through mindfulness meditation training. Working with Jon Kabat-Zinn’s protocols, I discovered that my relationship with food reflected deeper patterns of anxiety and perfectionism that I’d been avoiding for years. That’s when I understood that sustainable eating changes require internal transformation, not just external rules.
Now I treat meal preparation as meditation practice. My “Mindful Kitchen” workshops help people transform ordinary cooking into opportunities for self-awareness and emotional healing. I’ve developed over 180 recipes designed for slow, mindful preparation—complex enough to keep you present, simple enough not to overwhelm your nervous system.
I believe food becomes medicine when we approach it with presence rather than reactivity. The kitchen can be our monastery if we choose to enter it with reverence.