
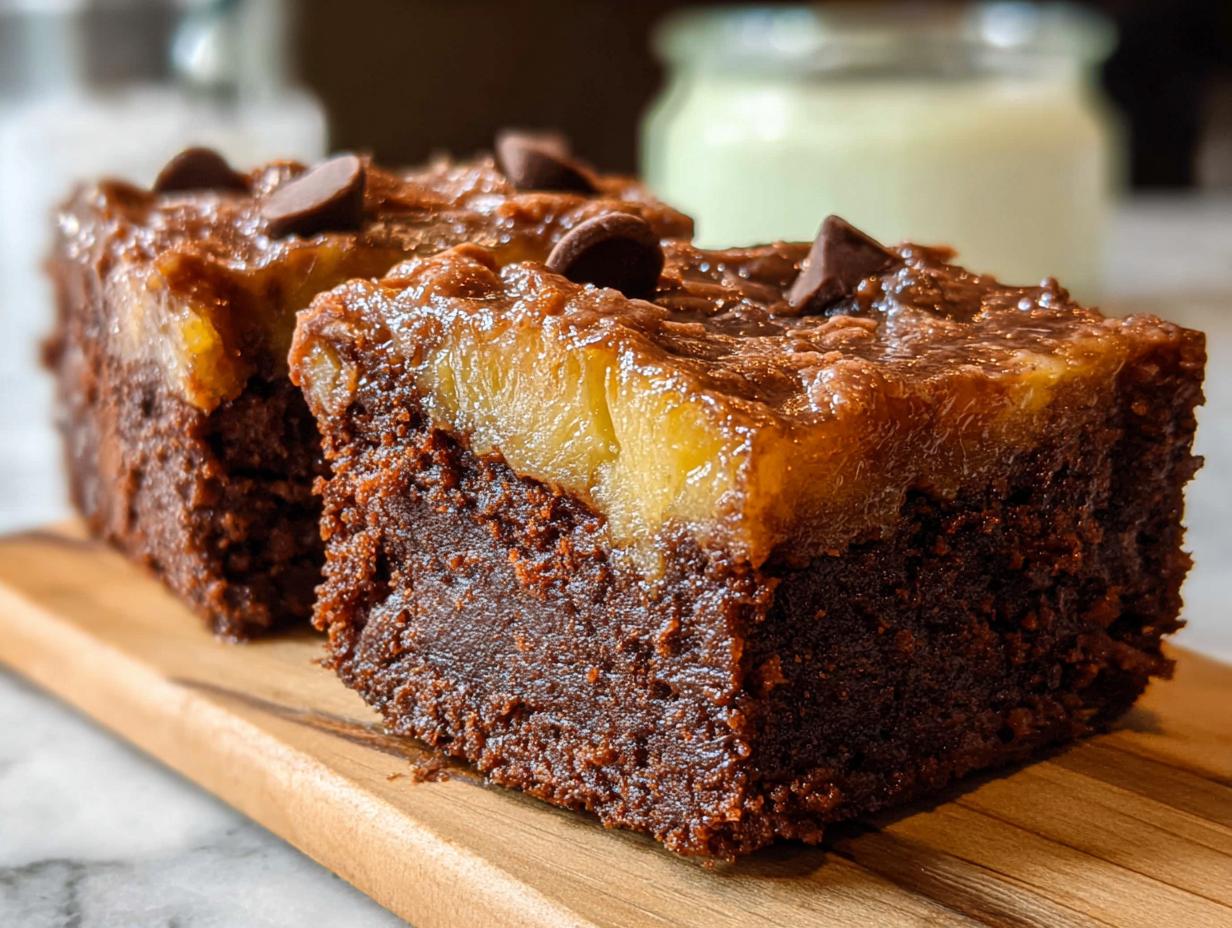
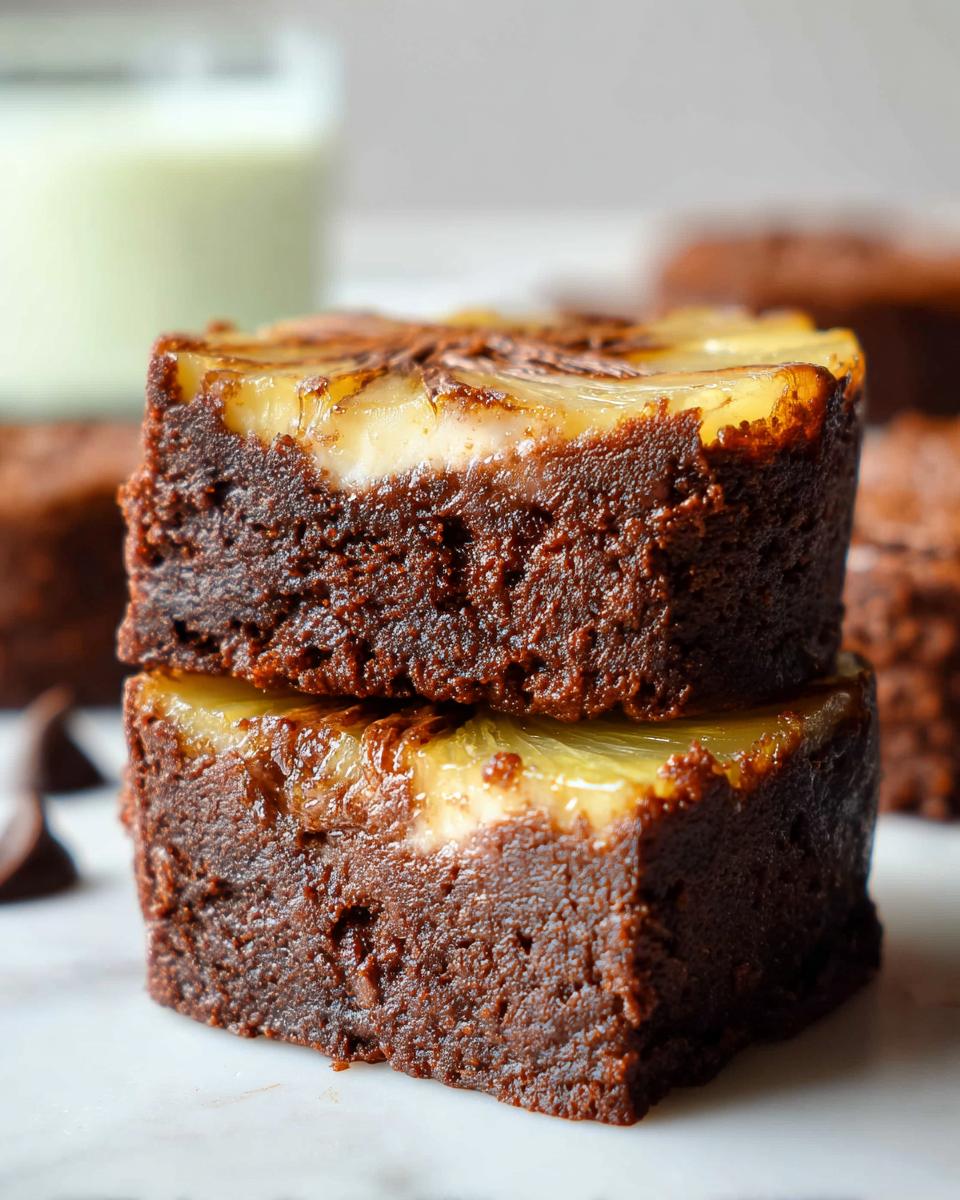
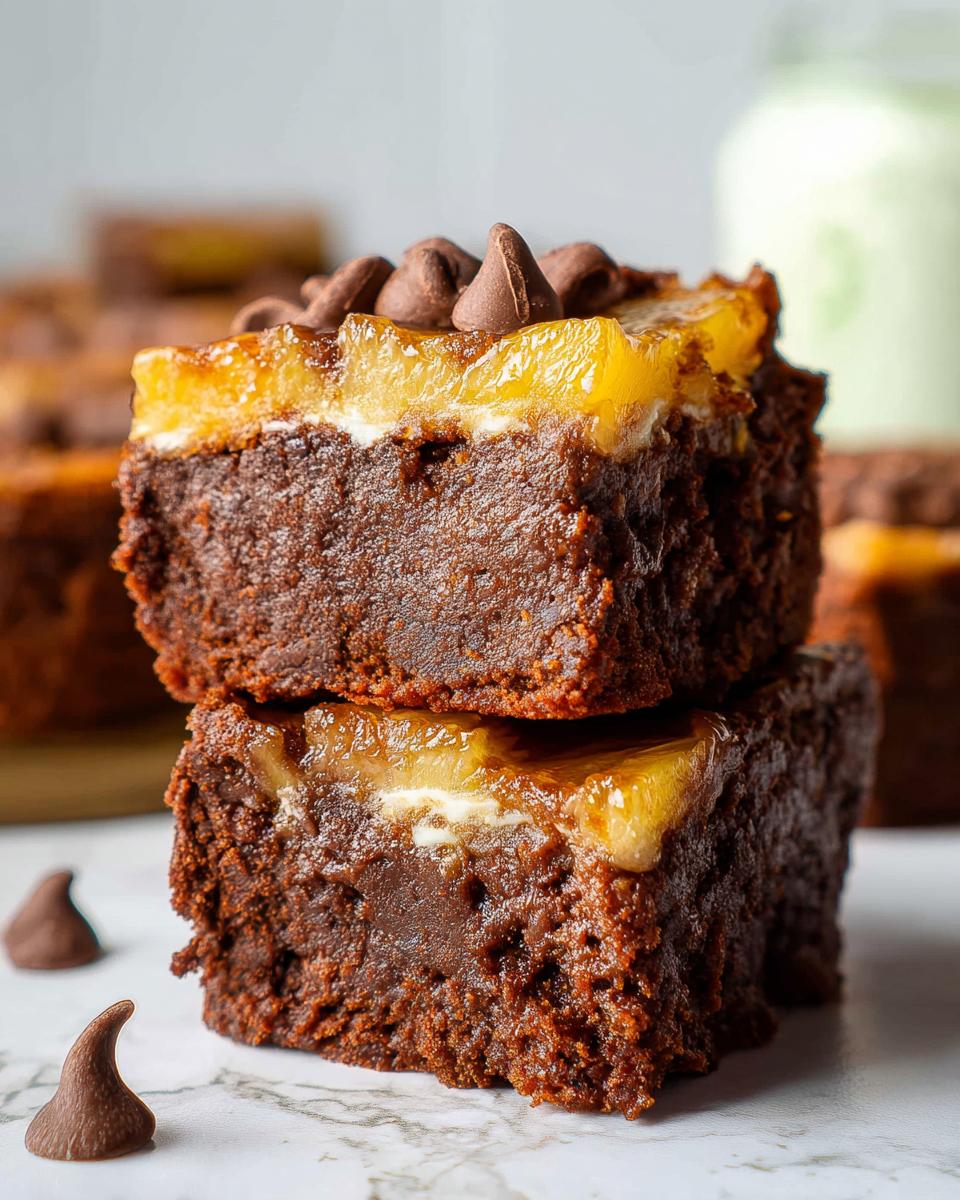
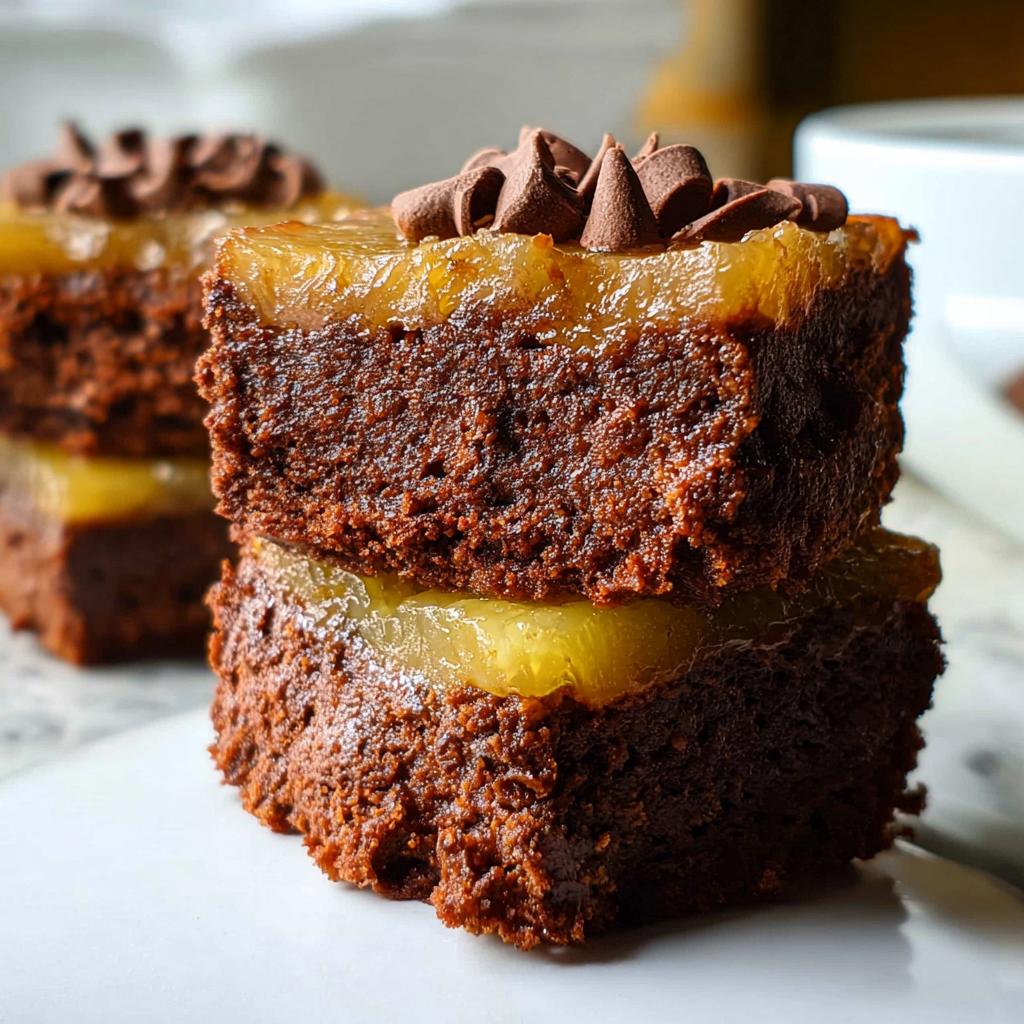
Oh, you are going to LOVE these Mini Pineapple Upside-Down Cheesecakes! Seriously, they’re like a little burst of sunshine on a plate. You know how sometimes you want that classic comfort dessert, but you want it to be a *little* bit fancy, and maybe not a whole giant cake? That’s where these little gems come in. They’ve got all that amazing nostalgic pineapple upside-down flavor, but in this perfect, rich cheesecake bite. I remember making these for a summer barbecue once – it was such a beautiful day, and I just wanted a sweet treat that felt special and familiar. It reminded me so much of my grandma’s famous pineapple upside-down cake. These mini cheesecakes ended up being a huge hit! It’s funny how food can do that, right? Bring people together and bring back all those sweet memories. They’re a perfect blend of old and new, and honestly, just plain delicious.
Why You’ll Love These Mini Pineapple Upside-Down Cheesecakes
Trust me, these little treats are an absolute winner. Here’s why you’ll be hooked:
- Super Easy to Whip Up: Honestly, they come together quicker than you might think, which is perfect for those last-minute dessert needs.
- That Classic Flavor Combo: Sweet, tangy pineapple meets creamy, dreamy cheesecake – it’s a match made in dessert heaven!
- Party Perfect: Forget cutting a big cake! These are individually portioned, making them a breeze to serve and always a crowd-pleaser at any get-together.
- A Touch of Nostalgia: They’ll bring back all those warm, fuzzy memories of classic desserts but with a fun, modern twist.
- Pure Joy in Every Bite: Seriously, the satisfaction of a perfect, bite-sized cheesecake is unbeatable. You get all the flavor without the fuss!
Gather Your Ingredients for Mini Pineapple Upside-Down Cheesecakes
Alright, let’s get our ingredients all lined up! You’ll need to grab a few things to make these delightful Mini Pineapple Upside-Down Cheesecakes. I’ve found that having everything ready to go before you start makes the whole process so much smoother. This recipe uses a fantastic base that’s almost like a rich brownie, loaded with creamy Greek yogurt for that cheesecake vibe. Plus, we’ve got the caramel-y pineapple topping that is just *chef’s kiss*! You’ll want everything measured out and ready to mix. Don’t forget to check out this tip for some amazing healthy Greek yogurt brownies if you want to explore variations later!
Here’s what you’ll need to gather:
- For the Brownie Base:
- 1/4 cup oat flour (or almond flour if that’s what you have!)
- 1/4 cup unsweetened cocoa powder
- 1/4 teaspoon sea salt
- 4 oz semisweet chocolate, chopped
- 2 Tablespoons salted butter (or coconut oil, melted)
- 1/2 cup granulated sugar
- 3/4 cup Vanilla Greek yogurt
- 2 large eggs
- 1 teaspoon vanilla extract
- 1/2 cup chocolate chips (ooh, extra chocolate!)
- For the Ganache (that luscious topping!):
- 1/2 cup semisweet chocolate (about 4 ounces)
- 1/2 cup heavy cream (or coconut cream for a different twist!)
- 1/2 teaspoon vanilla extract
Crafting Your Mini Pineapple Upside-Down Cheesecakes: Step-by-Step
Alright, let’s get baking! This is where the magic happens. Don’t worry, it’s not complicated at all. We’re going to walk through it all together, step-by-step, so you get those perfectly gooey, rich cheesecakes every single time. It’s kind of like building a little dessert paradise, layering all the goodness together. First things first, let’s get that oven prepped!
- Get the Oven Ready: Preheat your oven to 350 degrees Fahrenheit (177 degrees Celsius). Grab your 9×9 inch baking pan and give it a good greasing. We want to make sure nothing sticks later!
- Dry Ingredients Unite: In a little bowl, whisk together your oat flour, unsweetened cocoa powder, and sea salt. Just a quick mix to make sure they’re all friends. Set this aside for a sec.
- Melt That Chocolate: Pop your chopped semisweet chocolate and butter (or coconut oil if you’re using that!) into a microwave-safe bowl. Zap it in the microwave in 30-second bursts, stirring in between, until it’s all smooth and melty. So easy!
- Wet Ingredients Get Whisked: Now, grab that melted chocolate mixture. Whisk in the granulated sugar, that lovely Vanilla Greek yogurt, vanilla extract, and the eggs. Keep whisking until everything is super smooth and looks like a delicious chocolate dream.
- Combine Everything Gently: Pour the dry ingredients you set aside earlier into the wet ingredients. Mix them together until they’re *just* combined. Seriously, don’t overdo it here! Overmixing can make them tough, and we want them tender and fudgy. A few little streaks of flour are okay! If you’re looking for more brownie inspiration, check out these banana bread brownies or chocolate mousse brownies too!
- Chocolate Chip Boost: Stir in those chocolate chips. Because, why not? More chocolate is always a good idea, right?
- Into the Pan: Pour all that glorious batter into your prepared pan. Spread it out evenly.
- Bake Time! Now, slide it into your preheated oven. Bake for about 20 to 25 minutes. You want the top to look just barely set, and you might see the edges starting to pull away a tiny bit from the sides of the pan. If you like yours a little gooier (my favorite!), aim for closer to 20 minutes.
- Cool Down: Once they’re baked just right, take the pan out and place it on a wire rack. Let them cool completely in the pan. Patience, my friend!
- Ganache Time: While those brownies are cooling, let’s make that yummy ganache. Pour your heavy cream (or coconut cream!) into a small saucepan. Heat it on medium-high heat until it just starts to bubble around the edges. Don’t let it boil over!
- Melt and Mix: Turn off the heat. Add the chopped semisweet chocolate and the vanilla extract to the hot cream. Whisk it all together until it’s completely melted and wonderfully dark and smooth. So glossy!
- Let it Thicken: Let that ganache sit for a bit. It’ll start to thicken up as it cools down.
- Top it Off! Once the ganache has cooled a little (it should still be pourable but not super hot), pour it evenly all over your cooled brownies. Make sure to get it into all the corners!
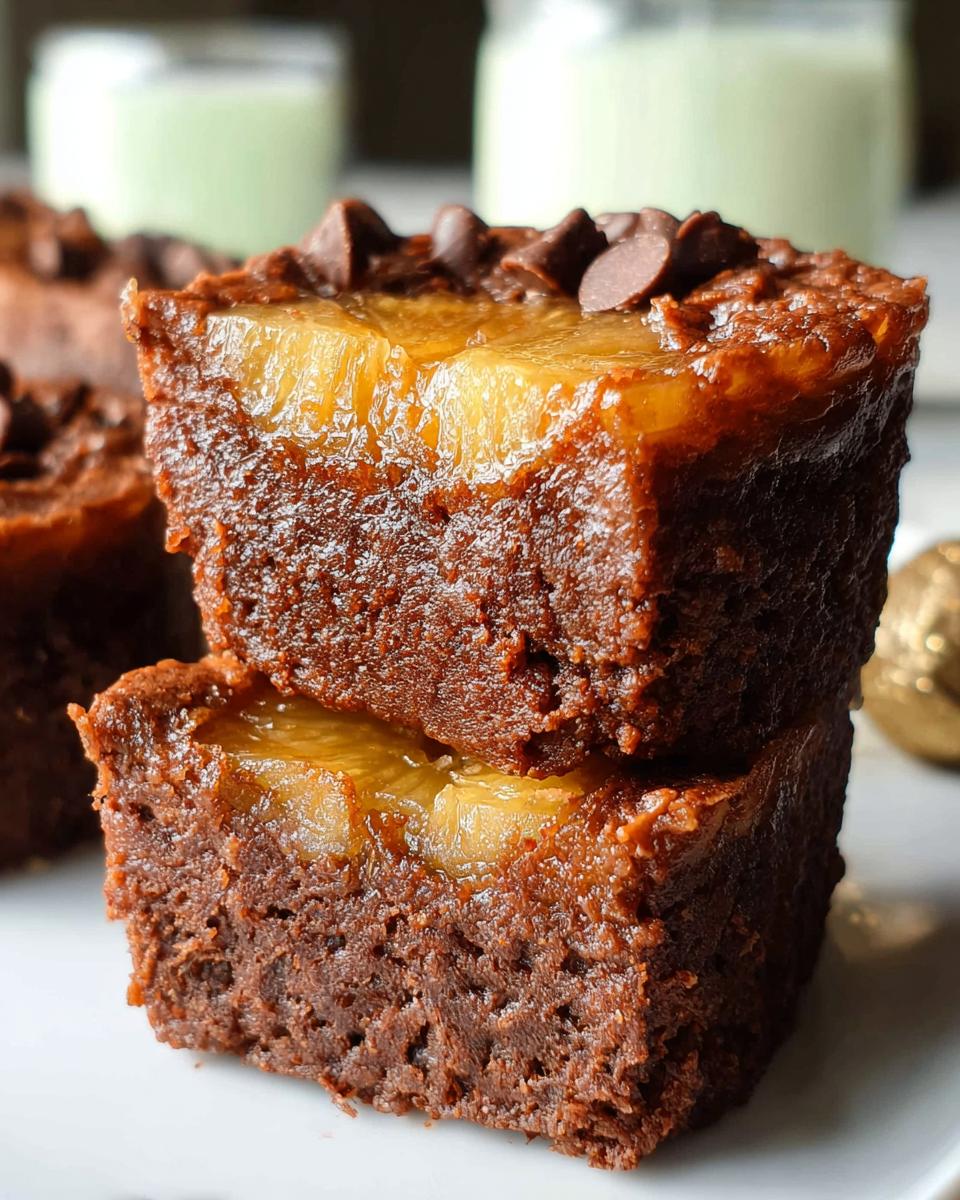
- Set and Slice: Let the ganache firm up at room temperature. If you’re super impatient (I totally get it!), you can pop the pan in the fridge for a bit to speed things up. Once the ganache is firm, cut your brownies into squares. You can serve them at room temperature or cold – both are amazing!
See? Not too bad, right? You’ve just made something spectacular!
Tips for Perfectly Baked Mini Pineapple Upside-Down Cheesecakes
Okay, so you’ve got the recipe, but let’s chat about how to make sure these Mini Pineapple Upside-Down Cheesecakes turn out absolutely *perfect* every single time. It’s all about the little details, you know? Like making sure your ingredients are ready to go and treating the batter with a little love. Trust me, a few simple tricks can make all the difference between a good bake and a *wow* bake!
First off, make sure your eggs and Greek yogurt are at room temperature. It sounds tiny, but it really helps everything blend together smoothly, creating that super creamy texture we’re aiming for. Cold stuff just doesn’t incorporate as well, and we want to avoid any lumps!
And remember what I said about not overmixing? Seriously, it’s crucial! Once you add the dry ingredients, just mix until you don’t see big streaks of flour anymore. Overmixing can make these rich little cheesecakes tough instead of wonderfully tender. You want them fudgy and decadent, not chewy!
When it comes to baking, keep an eye on them. The edges might look ready before the center is completely done, so look for that subtle change – the edges just starting to pull away from the pan. For the ultimate gooeyness, don’t overbake them! A toothpick inserted should come out with moist crumbs, not totally clean, and definitely not wet batter.
Finally, that cooling process is super important. Letting them cool in the pan on a wire rack helps them set up beautifully. If you want to peek at other amazing cheesecake ideas, how about these no-bake Oreo cheesecake bites for your next baking adventure?
Ingredient Notes and Substitutions for Your Mini Pineapple Upside-Down Cheesecakes
Let’s talk about some of the ingredients in our Mini Pineapple Upside-Down Cheesecakes! Sometimes, you might not have exactly what the recipe calls for, or you might just want to try something a little different. Totally fine! For the oat flour, if you don’t have it, almond flour works like a charm. Both give that lovely texture without being too heavy. And the Greek yogurt? Using vanilla flavor is great because it already adds in that subtle sweetness and vanilla note, but plain unsweetened Greek yogurt works too – just maybe add a tiny bit more sugar or a splash more vanilla extract.
A little note on the chocolate: I love using semisweet because it balances the sweetness of the pineapple and yogurt really well. But hey, if you’re feeling bold and have milk chocolate or even dark chocolate chips, go for it! It’ll just change the richness a bit. And for the cream in the ganache, coconut cream is an awesome dairy-free alternative that gives a slightly different, but equally delicious, flavor profile. Explore away! If you’re looking for more creamy dessert ideas, you might enjoy this lemon cream chia pudding!
Serving and Storing Your Mini Pineapple Upside-Down Cheesecakes
Alright, the best part! You’ve made these adorable Mini Pineapple Upside-Down Cheesecakes, and now it’s time to enjoy them! Honestly, they’re amazing just as they are, straight from the pan. But if you want to get a little fancy, try serving them slightly chilled. A tiny dollop of whipped cream or even a little extra drizzle of ganache never hurt anyone, right? They’re also fantastic with a cup of coffee or tea.
Now, about storing them – and trust me, you’ll want to save some if you can! Keep any leftovers in an airtight container in the fridge. They’ll stay yummy for about 5-7 days. The funny thing is, they often taste even better the second day after chilling because all those flavors just meld together beautifully. If you need to freeze them, just wrap them up well or pop them in a freezer-safe container for up to two months. Thaw them out on the counter, and they’re like magic!
For more sweet inspiration, check out these chocolate strawberry yogurt clusters!
Frequently Asked Questions about Mini Pineapple Upside-Down Cheesecakes
Can I make these Mini Pineapple Upside-Down Cheesecakes without eggs?
While this recipe is developed with eggs for that perfect cheesecake texture, you could try a flax egg (1 tablespoon flaxseed meal + 3 tablespoons water, let sit for 5 minutes) as a substitute. Keep in mind it might change the texture slightly, making them a bit denser. It’s always a fun experiment, though!
What if I don’t have a 9×9 inch pan? Can I use a different size?
Absolutely! If you use a larger pan, like a 9×13 inch, your cheesecakes will be thinner and bake faster. If you use a smaller pan, they’ll be thicker and need a bit more baking time. Always keep an eye on them and use the toothpick test to check for doneness!
How do I get that perfect gooey brownie texture?
The key to gooey brownies for these Mini Pineapple Upside-Down Cheesecakes is not overbaking! Bake them for the shorter end of the time range (around 20 minutes) and let them finish cooking on the wire rack. They’ll continue to set up beautifully as they cool.
Can I use fresh pineapple instead of canned?
You sure can! If you use fresh pineapple, make sure it’s ripe and sweet. You’ll want to drain it really well after chopping it up to avoid adding too much extra moisture to the batter. Canned pineapple rings, especially crushed, tend to have a consistent sweetness and texture that works like a charm, but fresh is always a delicious option!
Are there other topping ideas besides pineapple?
Oh, definitely! While pineapple is the star here, you could totally swap it out. Think about canned peaches, cherries, or even a mix of berries. Just make sure they’re well-drained if you’re using anything fresh. Imagine little apple cinnamon cheesecakes! Yum! If you’re looking for more bite-sized treats, how about these easy baked churro bites?
Nutritional Information (Estimated)
Alright, let’s talk numbers for these delightful Mini Pineapple Upside-Down Cheesecakes! Keep in mind these are just estimates, and your actual numbers might wiggle around a bit depending on the exact brands and ingredients you use, especially if you get creative with substitutions. But this gives you a good idea of what you’re working with per serving.
Per Serving (approximate):
- Calories: 173.5
- Carbohydrates: 22.2g
- Protein: 2.7g
- Fat: 9.3g
- Cholesterol: 27.5mg
- Sodium: 61mg
- Potassium: 50.8mg
- Fiber: 1g
- Sugar: 19.3g
- Calcium: 22mg
- Iron: 0.5mg
Mini Pineapple Upside-Down Cheesecakes
Ingredients
Equipment
Method
- Preheat your oven to 350 degrees Fahrenheit (177 degrees Celsius). Grease a 9×9 inch baking pan and set it aside.
- In a small bowl, mix the oat flour, cocoa powder, and sea salt. Set this aside.
- Melt the chocolate and butter (or coconut oil) together in the microwave. Stir until completely melted and smooth.
- Whisk in the sugar, Greek yogurt, vanilla extract, and eggs until the mixture is smooth.
- Add the dry ingredients to the wet ingredients and whisk until just combined. Do not overmix.
- Stir in the chocolate chips.
- Pour the batter into your prepared pan. Bake for 20 to 25 minutes, or until the top is just barely set and the edges are slightly pulling away from the sides of the pan. For gooier brownies, bake for 20 minutes.
- Once baked, place the pan on a wire rack to cool.
- While the brownies are baking, prepare the ganache. Add the heavy cream to a small saucepan and warm it over medium-high heat until it just begins to bubble. Do not let it boil.
- Turn off the heat and whisk in the chopped chocolate and vanilla extract until the mixture is dark and smooth.
- Remove the saucepan from the heat and let the ganache cool slightly. It will thicken as it cools.
- Once the ganache has cooled slightly, pour it evenly over your cooling brownies.
- Allow the ganache to firm up at room temperature, or place the pan in the refrigerator to speed up the process.
- Remove from the refrigerator if chilled. Cut the brownies into squares and serve at room temperature or cold.