
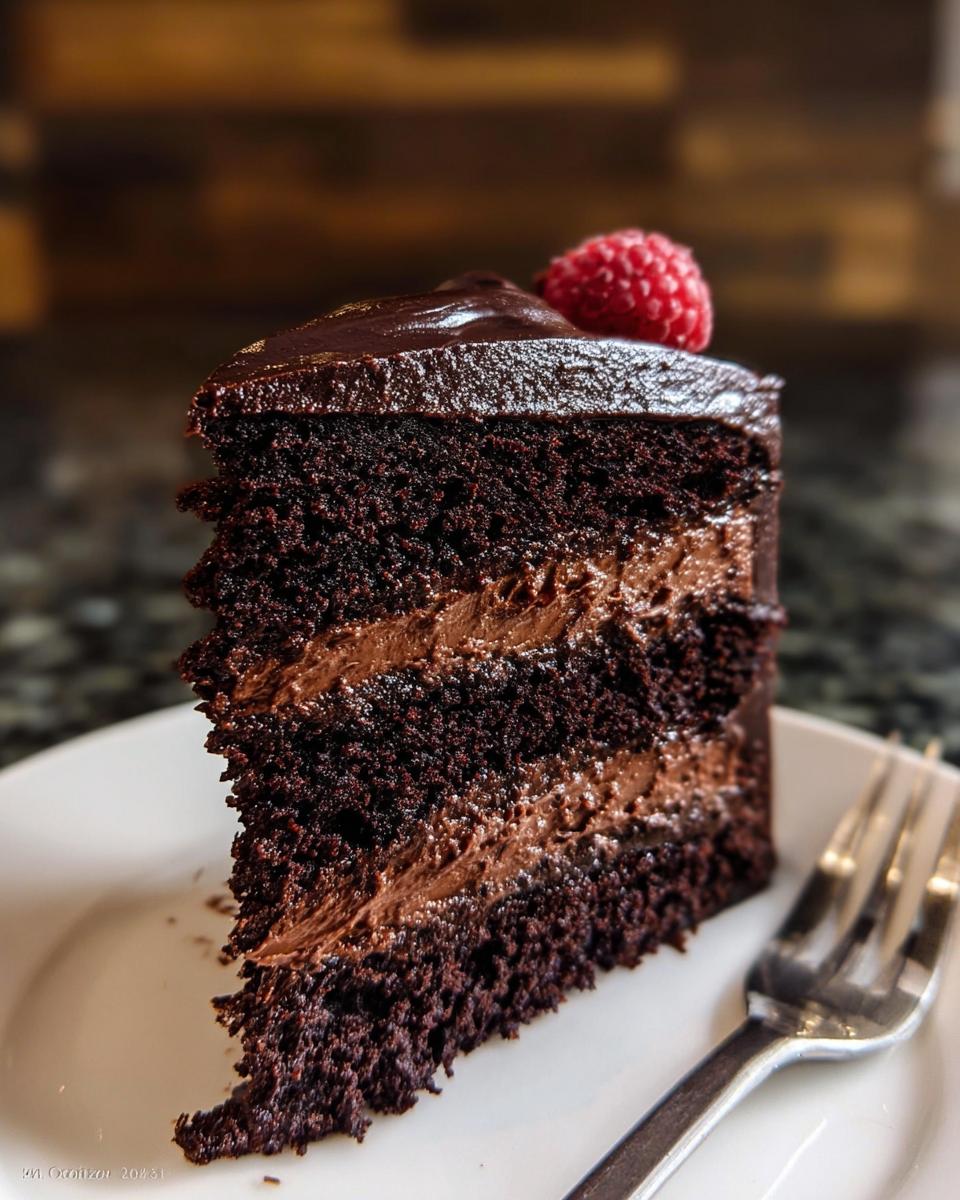
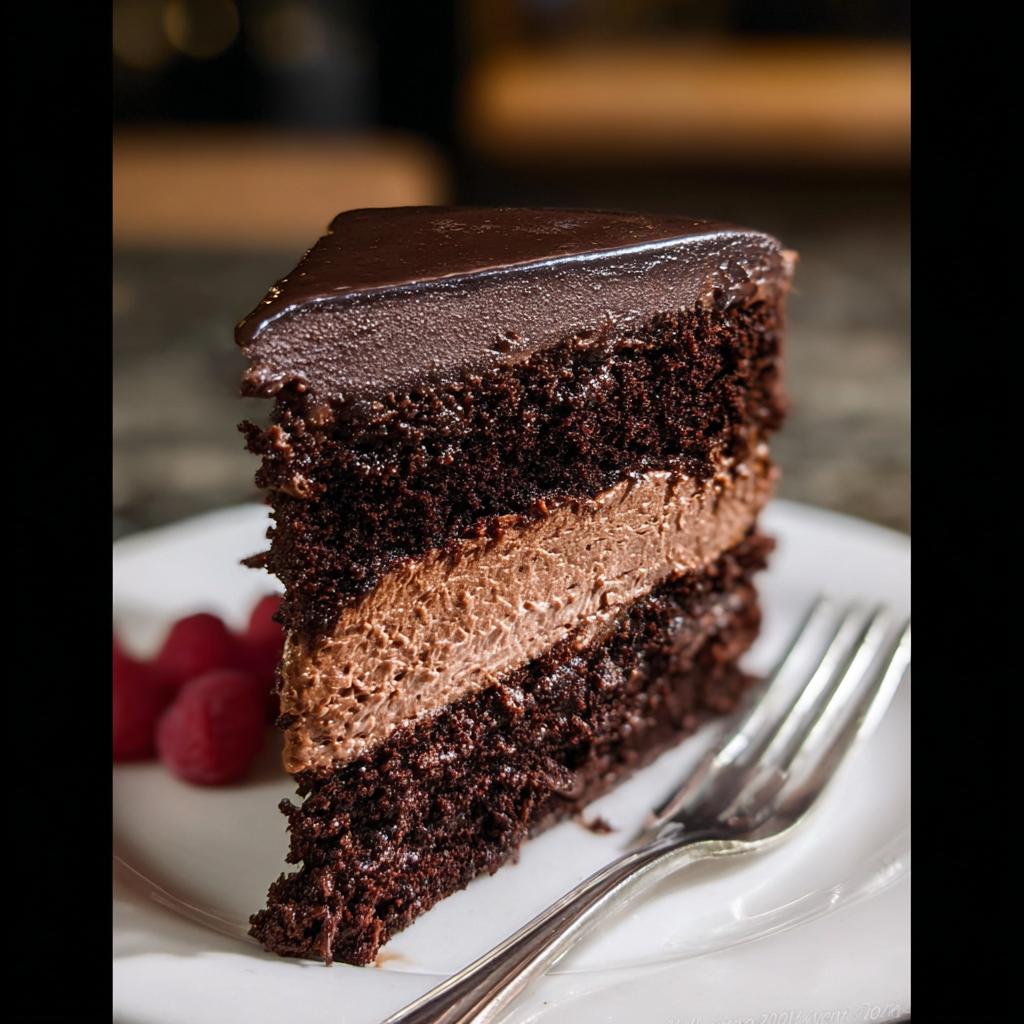
Oh, that moment when you crave something truly decadent, something that whispers luxury with every bite? That’s exactly when my heart sings for a perfectly crafted Dark Chocolate Mousse Cake. I still remember the first time I bravely tackled making one after my son’s celiac and Type 1 diabetes diagnoses. I was so determined to create a dessert that wasn’t just *safe* but genuinely *amazing*. And let me tell you, that first bite – the smooth, rich mousse meeting that tender chocolate cake – it was pure magic, tears and all! It reminded me that deliciousness and dietary needs can absolutely go hand-in-hand. As a Dual-Restriction Recipe Engineer & Cross-Contamination Specialist, it’s my passion to help you find those joys too, proving that you can have your gourmet cake and eat it too, no matter what!
Why You’ll Love This Dark Chocolate Mousse Cake
Get ready to fall head over heels for this incredible cake! It’s more than just a dessert; it’s an experience.
- Unbelievably Rich Flavor: We’re talking deep, dark chocolate goodness that will wow any chocoholic.
- Dreamy Texture: Imagine tender chocolate cake layers cradling the silkiest, smoothest chocolate mousse. It’s pure bliss!
- Showstopper Appeal: Seriously, this cake looks as good as it tastes. It’s perfect for impressing guests or just treating yourself.
- Dietary-Friendly Hero: Whether you’re managing gluten-free or sugar-free needs, this recipe is your new best friend for guilt-free indulgence.
- Perfect for Any Celebration: Birthdays, anniversaries, or just a Tuesday needing a little sparkle – this cake fits the bill.
Ingredients for Your Dark Chocolate Mousse Cake
Alright, let’s get down to the good stuff! Having the right ingredients is key to making this Dark Chocolate Mousse Cake absolutely sing. Think of them as your little flavor helpers. Don’t worry if you need to swap things out later for gluten-free or sugar-free versions – we’ll chat about that in the notes!
For the Cake:
- 1 ¾ cups all-purpose flour, spooned & leveled
- 1 ¾ cups granulated sugar
- ¾ cup unsweetened natural cocoa powder (the good stuff!)
- 2 teaspoons espresso powder (optional, but trust me, it deepens the chocolate flavor!)
- 2 teaspoons baking soda
- 1 teaspoon baking powder
- 1 teaspoon salt
- ¾ cup full-fat sour cream, at room temperature
- ½ cup vegetable oil
- 2 large eggs, at room temperature
- ½ cup buttermilk, at room temperature
- 2 teaspoons pure vanilla extract
- ½ cup hot water or black coffee
- 1 cup semi-sweet mini chocolate chips, tossed in 1 Tbsp flour (this stops them from sinking! Optional, of course)
For the Chocolate Mousse:
- ½ cup hot water
- ¼ cup unsweetened natural or Dutch-process cocoa powder
- 8 ounces quality semi-sweet chocolate, finely chopped
- 2 cups heavy cream, nice and cold
- 2 Tablespoons confectioners’ sugar
- ½ teaspoon pure vanilla extract
For the Chocolate Ganache:
- 8 ounces quality semi-sweet chocolate, finely chopped
- 1 cup heavy cream
Optional Garnish:
- Fresh berries and/or chocolate shavings
Equipment Needed for the Perfect Dark Chocolate Mousse Cake
To make this dreamy Dark Chocolate Mousse Cake, you’ll want to have a few things ready. Don’t worry, it’s mostly everyday kitchen stuff!
- Oven
- Cake pans (four 8 or 9-inch ones are great!)
- Parchment paper
- Cooling rack
- Mixing bowls (a few are handy)
- Whisk
- Handheld mixer or stand mixer
- Double boiler or a saucepan for melting chocolate
- Spatula and an icing spatula
- Serrated knife (for leveling if needed!)
- Bench scraper (super helpful for smooth sides!)
- Serving plate or cake stand
- Cake turntable (optional, but it makes frosting a breeze!)
How to Make a Decadent Dark Chocolate Mousse Cake
Okay, get ready for the fun part – bringing this gorgeous Dark Chocolate Mousse Cake to life! It’s like building a chocolate dream layer by layer. Don’t worry if it seems like a lot; we’ll take it step by step, and trust me, the result is SO worth it. This is where the magic happens, and you get to be the chief magician!
Preparing the Chocolate Cake Layers
First things first, let’s get that oven preheated to 350°F (177°C). Now, grab your four cake pans and give them a good greasing. Pop in some parchment paper circles and grease those too; this step is crucial for a perfect release, so no stuck cakes on my watch! You can find a great guide on preparing cake layers that really helps.
Whisk all your dry ingredients together – flour, sugar, cocoa, that *secret weapon* espresso powder (if you’re using it!), baking soda, baking powder, and salt. In another bowl, give your sour cream, oil, eggs, buttermilk, and vanilla a good whip until they’re looking happy and combined. Now, pour your dry stuff into the wet, add that hot water or coffee, and mix until it’s just combined. If you’re adding those little chocolate chips, gently fold them in. Divide your batter evenly between those pans. Pop them in the oven for about 19–23 minutes. You’ll know they’re ready when a toothpick comes out clean. Let them cool in the pans for a whole hour – patience is key here! – then run a knife around the edge and carefully flip them onto a cooling rack to finish cooling completely. They might sink a little in the middle, and that’s totally normal!
Crafting the Silky Chocolate Mousse
Time for that super smooth mousse! Start by whisking the hot water and cocoa powder together until it’s completely smooth. In a separate bowl, melt your finely chopped chocolate – I like to use a double boiler for this, but the microwave works too if you do it in 20-second bursts, stirring in between. Once it’s all melty, stir in that cocoa mixture until it’s thick and gorgeous. This is similar to how we’d make the mousse for a layer cake.
Now, in a big bowl, whip up your cold heavy cream with the confectioners’ sugar and vanilla until you get lovely medium peaks. You know, the kind that hold their shape but are still a bit soft. Gently, and I mean GENTLY, fold that chocolate mixture into the whipped cream. You don’t want to overmix it; nobody likes a tough mousse! Cover this dreamy mixture and pop it in the fridge for at least 2 hours, or even up to 2 days. This is where it really thickens up.
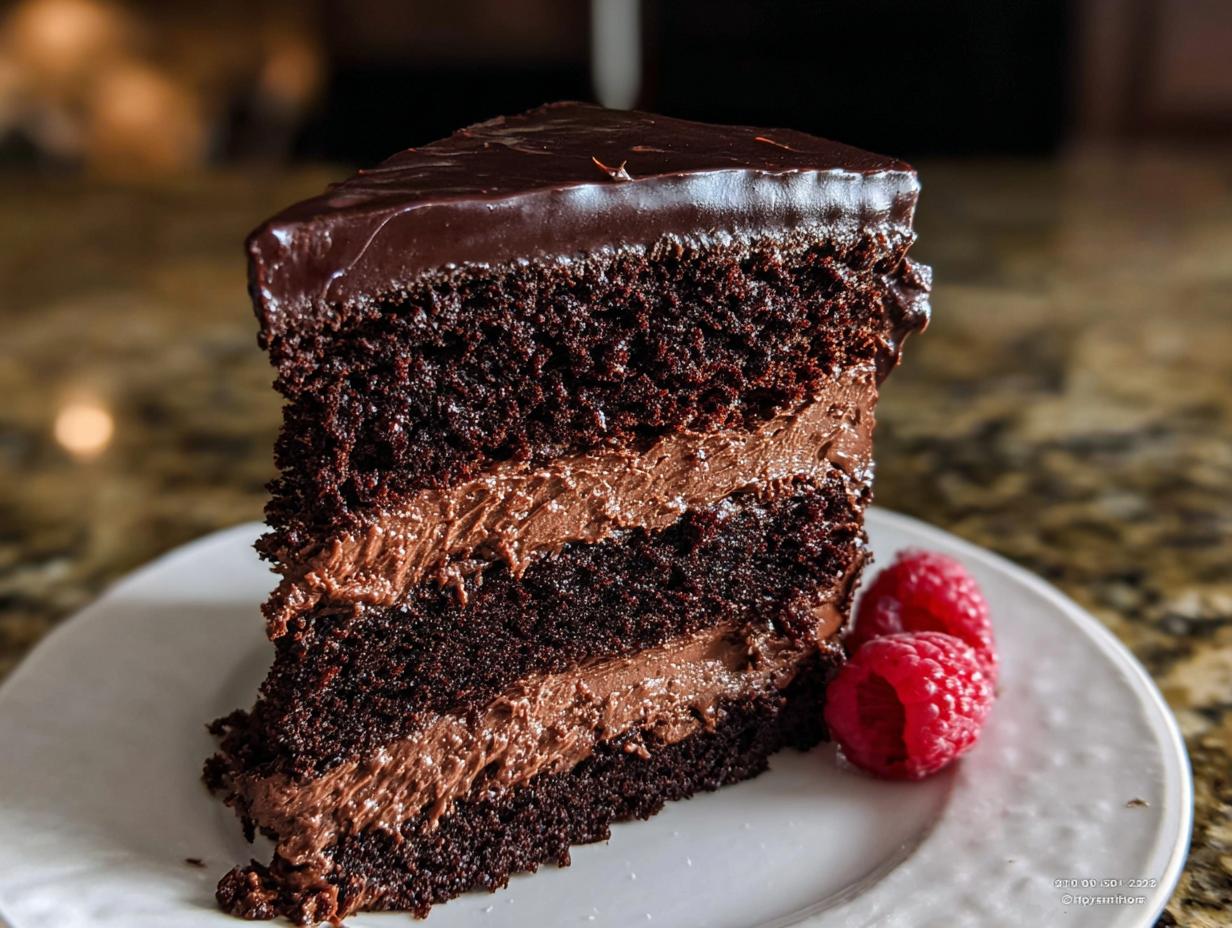
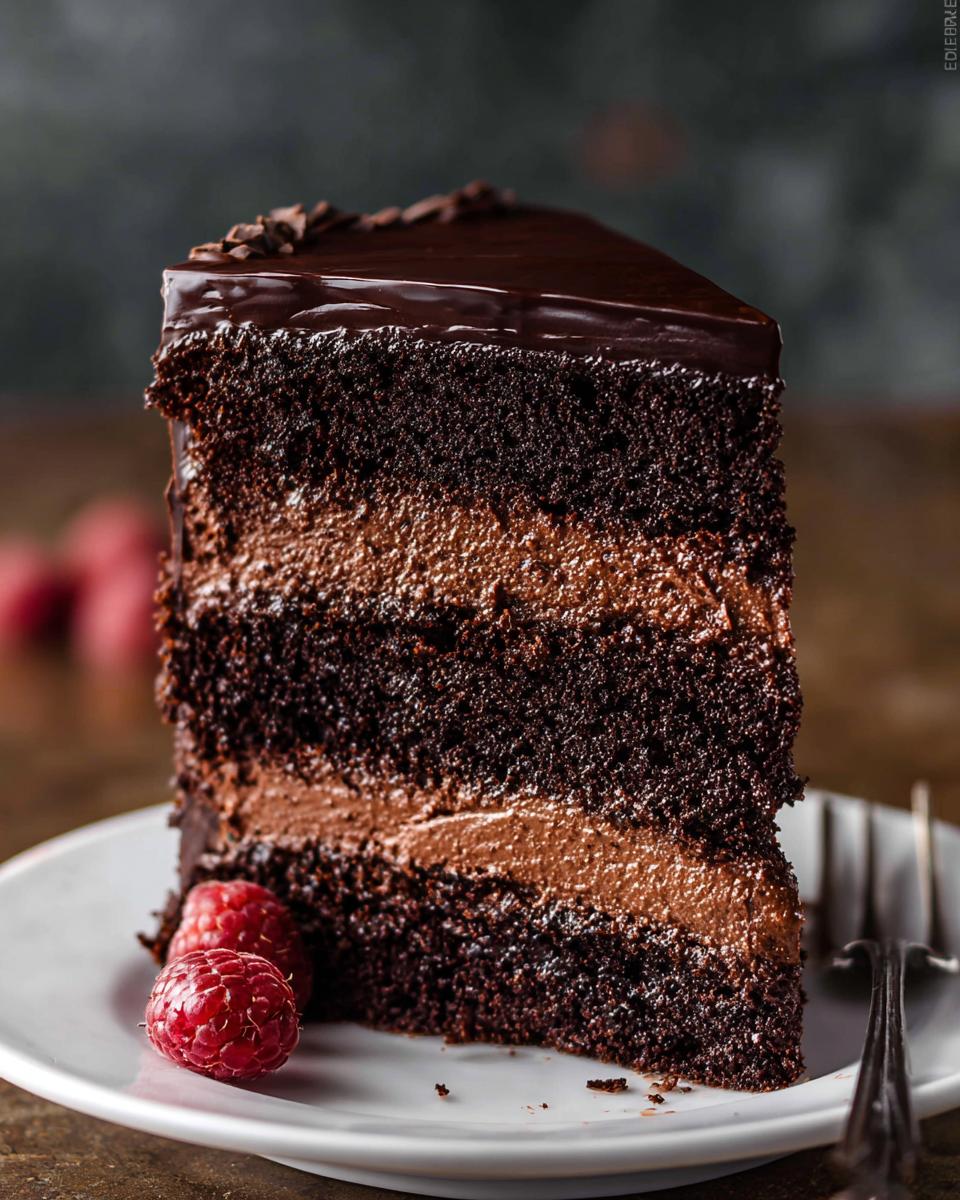
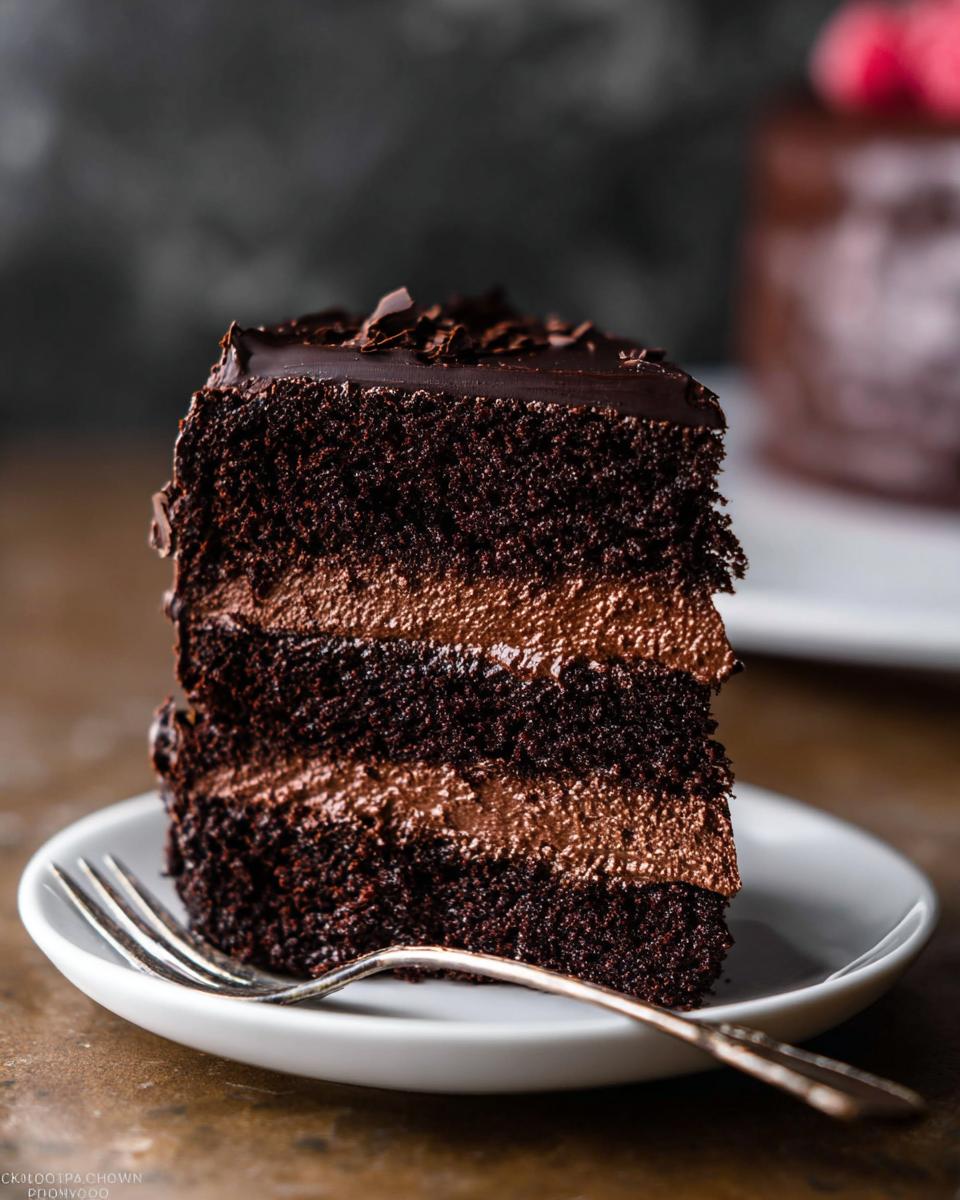
Assembling Your Dark Chocolate Mousse Cake
Okay, let’s build this beauty! If your cake layers have a bit of a dome, carefully use a serrated knife to slice off the tops so they’re perfectly flat. This makes stacking SO much easier. Place your first cake layer onto your serving plate or Dark Chocolate Mousse Cake stand. Spread about 1.5 cups of that chilled chocolate mousse evenly over the top. Then, take your second cake layer and flip it upside down right on top of the mousse, and spread another 1.5 cups of mousse. Repeat with the third layer. Finally, carefully place that last cake layer on top. Now, use the rest of the mousse to give the whole cake a thin, even coating – this is called a crumb coat. Use a bench scraper to get those sides as smooth as possible. Pop the whole thing back in the fridge for at least an hour, or up to 4 hours, so everything sets up nicely before the final flourish.
Creating the Glossy Chocolate Ganache
Now for that shiny, irresistible ganache! Put your chopped chocolate into a heat-proof bowl. Warm up your heavy cream in a small saucepan until it’s just about to simmer – no need for a rolling boil! Pour that hot cream right over the chocolate and let it sit for about 2–3 minutes. This gives the chocolate time to soften. Then, gently stir from the center outwards until everything is melted and beautifully smooth. If it’s not quite there, resist the urge to microwave it! Just keep stirring. Let this ganache sit for at least 30 minutes, or up to an hour, to thicken up a bit. You want it spreadable, not runny.
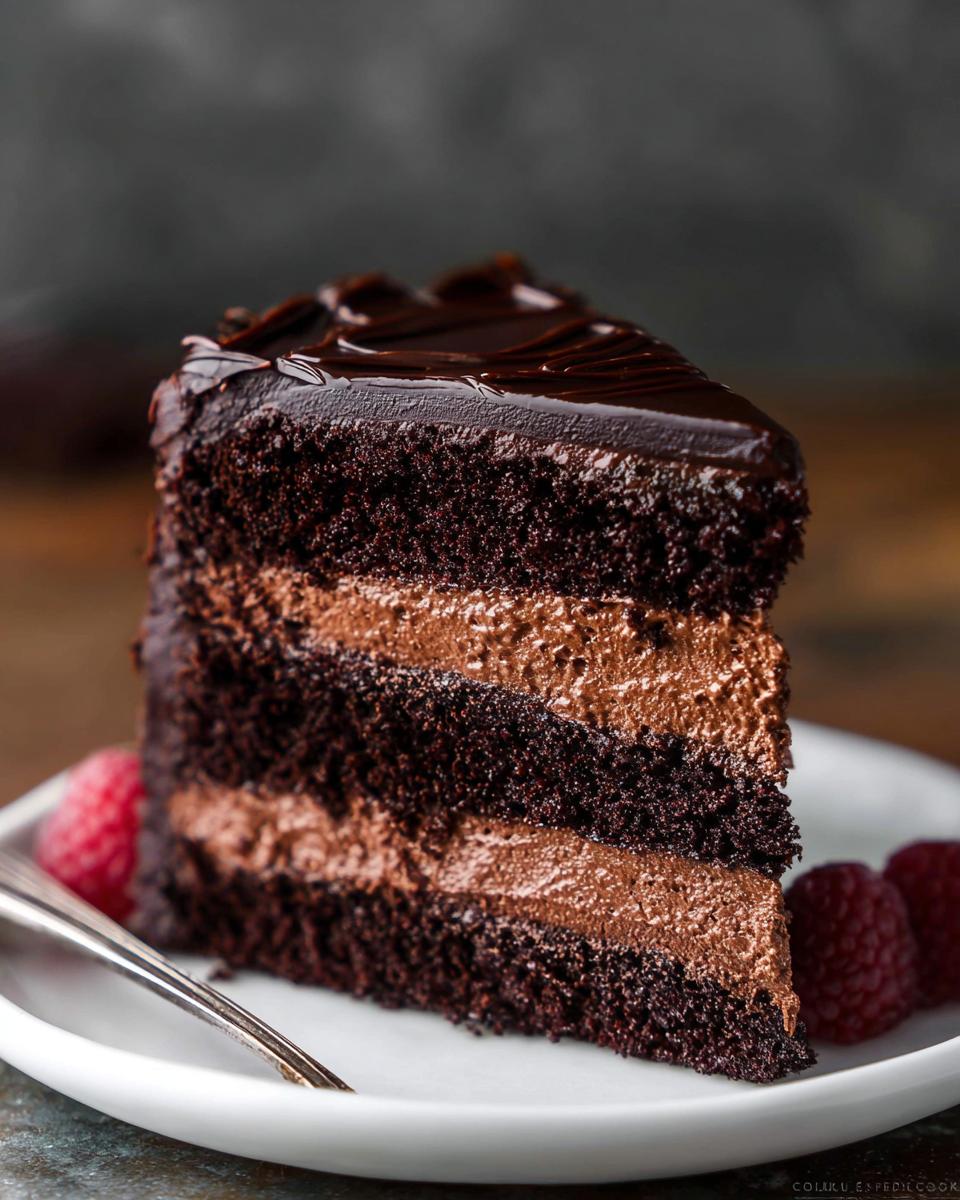
Finishing and Garnishing Your Masterpiece
Time for the grand finale! Pour or spoon that gorgeous, thickened ganache over your nice, chilled cake. Use your icing spatula to get it smooth on top and down the sides. Now’s your chance to get creative! Add some fresh berries or pretty chocolate shavings – whatever makes your heart happy!
Tips for the Ultimate Dark Chocolate Mousse Cake
Alright, let’s talk secrets to making this Dark Chocolate Mousse Cake absolutely perfect! It’s not just about following the steps; it’s about a few little tricks that make all the difference. Trust me, I’ve learned a few things along the way, especially when trying to balance taste with dietary needs! For even more fabulous ideas on making your cakes shine, check out these fancy finishes.
First off, ingredient temperature is HUGE! Make sure your eggs, sour cream, and buttermilk are at room temperature for the cake batter. This helps everything mix together smoothly so you don’t end up with a lumpy mess. Cold ingredients can seize up the butter and cocoa. Also, and this is super important for the mousse, use COLD heavy cream. It whips up so much better when it’s chilled to the max! And that chocolate? Use the good stuff! It really does make a difference in the final flavor. Don’t rush the chilling times either – they’re there for a reason!
Ingredient Notes and Substitutions for Your Dark Chocolate Mousse Cake
Let’s dive a little deeper into some of these ingredients for our Dark Chocolate Mousse Cake. Knowing the “why” behind them really helps boost your baking confidence! For the cake, using room temperature ingredients like eggs and sour cream makes a world of difference – it helps everything blend together smoothly, creating a tender crumb.
Now, if you’re going gluten-free, a good quality 1-to-1 gluten-free baking flour blend is your best friend! Just make sure it contains xanthan gum. For the sugar-free crowd, you can swap out the granulated sugar in the cake for a brown sugar substitute like erythritol or a blend, and use a sugar-free powdered sugar for the mousse. Always taste your mousse before adding it to the cake to ensure the sweetness is just right for you! And for that deep chocolate flavor? Using good quality cocoa powder and semi-sweet chocolate makes all the difference, seriously!
Frequently Asked Questions About Dark Chocolate Mousse Cake
Got questions about whipping up this amazing Dark Chocolate Mousse Cake? I’ve got you covered! Here are a few things people often ask:
Can I make the cake layers ahead of time for my Dark Chocolate Mousse Cake?
Absolutely! Once the cake layers are completely cool, you can wrap them really well in plastic wrap and store them at room temperature for a day or two, or pop them in the fridge for up to 4 days. They actually taste even better the next day!
How do I get perfectly smooth sides on my Dark Chocolate Mousse Cake?
The trick is a good crumb coat and a bench scraper! After you assemble the cake with the mousse and chill it, apply a thin layer of mousse all over to catch any loose crumbs. Chill it again until firm, then add your ganache. Using an offset spatula or a bench scraper to smooth the ganache as you pour it helps create those super clean lines. It takes a little practice, but you’ll get there!
Can I freeze Dark Chocolate Mousse Cake?
You can certainly freeze it, but the mousse texture might change a bit after thawing. It’s best to freeze individual slices tightly wrapped. Thaw them in the refrigerator overnight for the best results. You can find more make-ahead tips for chocolate mousse desserts that might help too!
What’s the best way to store leftover Dark Chocolate Mousse Cake?
Just keep it covered tightly in the refrigerator. The ganache does a good job of protecting it, and it’ll stay delicious for about 5 days. Honestly though, it usually disappears way before then!
Storing and Reheating Your Dark Chocolate Mousse Cake
Keeping your glorious Dark Chocolate Mousse Cake fresh is simple! Just cover it really well, either with plastic wrap or in an airtight container, and pop it in the fridge. It’ll stay absolutely delicious for up to 5 days. I find it’s actually even better the next day, as the flavors get to mingle even more!
Reheating isn’t really necessary since this cake is wonderful chilled or at room temperature. If you do happen to prefer it a bit warmer, just let a slice sit out on the counter for about 20-30 minutes before digging in. Easy peasy!
Nutritional Information
Please keep in mind that this nutritional information for our Dark Chocolate Mousse Cake is an estimate. The exact values can vary depending on the specific brands of ingredients you use and any tiny tweaks you might make. It’s a decadent treat, so enjoy it!
Dark Chocolate Mousse Cake
Ingredients
Equipment
Method
- Preheat your oven to 350°F (177°C). Grease four 8-inch or 9-inch cake pans. Line them with parchment paper rounds, then grease the parchment paper. This helps the cakes release easily.
- Make the cake: In a large bowl, whisk together the flour, sugar, cocoa powder, espresso powder (if using), baking soda, baking powder, and salt. Set this dry mixture aside.
- In another large bowl, use a mixer (handheld or stand) with a whisk attachment to combine the sour cream, oil, and eggs on medium-high speed until mixed. Add the buttermilk and vanilla and mix until combined. Pour the dry ingredients into the wet ingredients. Add the hot water or coffee and whisk or beat on low speed until just combined. Gently fold in the floured mini chocolate chips, if you are using them. Divide the batter evenly among the prepared pans.
- Bake for 19–23 minutes. Baking times can vary, so check your cakes. They are done when a toothpick inserted into the center comes out clean. Let the cakes cool in the pans on a cooling rack for 1 hour. Run a knife around the edges to loosen the sides, then remove the cakes from the pans. Peel off the parchment paper and place the cakes on the rack to finish cooling completely. The cakes might sink slightly in the middle as they cool; this is normal.
- Make the chocolate mousse: In a small bowl, whisk the hot water and cocoa powder until smooth. Melt the chopped chocolate using a double boiler or the microwave. If using the microwave, place the chocolate in a heat-proof bowl and microwave in 20-second intervals, stirring after each, until melted and smooth. Pour the hot water/cocoa mixture into the melted chocolate and stir until thick and smooth. Set aside. In a large bowl, whip the heavy cream, confectioners’ sugar, and vanilla extract with a mixer on medium-high speed until medium peaks form, about 3 minutes. Medium peaks are softer than stiff peaks but hold their shape. Pour the chocolate mixture into the whipped cream and gently fold together with a spatula. Be careful not to overmix. Cover the mousse and refrigerate for at least 2 hours or up to 2 days. This makes about 4.5 cups.
- Assemble the cake before making the ganache: If needed, level the cakes by slicing off the tops with a large serrated knife to create a flat surface. Place one cake layer on your serving plate or cake stand. Spread about 1.5 cups of chocolate mousse evenly over the top. Place the second cake layer upside down on top of the mousse and spread another 1.5 cups of mousse. Add the third cake layer right side up and spread another 1.5 cups of mousse. Top with the final cake layer. Spread the remaining mousse on the top and sides of the cake for a crumb coat. Use a bench scraper to smooth the sides. Refrigerate the cake for at least 1 hour and up to 4 hours.
- Make the chocolate ganache: Place the chopped chocolate in a medium heat-proof bowl. Heat the cream in a small saucepan over medium heat until it just begins to simmer gently. Do not let it boil rapidly. Pour the warm cream over the chocolate and let it sit for 2–3 minutes to soften. Stir slowly with a metal spoon or spatula until the chocolate is melted and the mixture is smooth. If the chocolate doesn’t melt easily, do not microwave it. Refrigerate the ganache for at least 30 minutes or up to 1 hour to thicken.
- Pour or spoon the thickened ganache over the chilled cake. Use an icing spatula to smooth the top and sides. Add optional garnishes like fresh berries or chocolate shavings. Serve the cake immediately or chill, uncovered, for up to 4–6 hours before serving. The cake can be served at room temperature or chilled. Cover any leftover cake tightly and store it in the refrigerator for up to 5 days.