
There is just something magical about counting down the minutes or days until a celebration, right? Whether it’s a birthday, a holiday, or that huge family vacation we’ve been planning forever, marking the time makes the anticipation so much sweeter. When Celiac disease and Type 1 diabetes entered our lives, I thought those fun traditions were over, especially baking. But I was wrong! I adapted my favorite summer memory—making cookies with my son to count down to our big trip—into the most amazing, safe treat: these perfectly delicious, gluten-free, and diabetic-friendly Clock Face Countdown Cookies.
I remember standing in the kitchen with Liam, armed with cookie cutters and a nervous energy, trying to make sure we could still celebrate big moments, just differently. It took lots of trial and error, believe me, but we nailed a base cookie sturdy enough for decorating but perfectly compliant with his needs. That day reminded me that love and creativity always find a way, even when dealing with dietary restrictions. These cookies are proof of that!
Why You Will Love These Clock Face Countdown Cookies
Seriously, these aren’t just *any* cutout cookies. I put my heart into adjusting the texture so they hold up to decoration while being perfectly safe for my family. You are going to want to make these for every milestone!
- Gluten-Free & Safe: Finally, a cutout cookie that everyone can enjoy without worry! These Clock Face Countdown Cookies use tested gluten-free flour blends, letting your kids participate safely.
- Diabetic-Friendly Base: I tweaked the sweetness level substantially so you don’t have to worry about sugar spikes, even if you use approved sweeteners in place of the standard sugar listed.
- Incredible Sturdiness: This dough doesn’t spread, which is music to my ears when dealing with intricate shapes like clock faces. They bake up firm and flat!
- The Fun Factor is HUGE: Kids absolutely light up when they realize these aren’t just cookies; they are functional countdown tools! It turns any event into a party. We even used them just to count down to pizza night once!
- Perfect Canvas for Decorating: The mild flavor profile of this base means it really lets your beautiful royal icing designs shine through. They are just waiting to be turned into masterpieces.
- Easy to Make Ahead: As I mention in the FAQs, the dough chills like a dream, meaning you can get the heavy lifting done the day before your big decorating session.
If you’re wondering more about my journey creating these kinds of recipes that cater to dietary restrictions, you can always check out a little bit about me over on my about page too!
Essential Equipment for Perfect Clock Face Countdown Cookies
To make these Clock Face Countdown Cookies look amazing and taste great, you can’t just grab any old baking tray. Since we need that flat, perfect surface for icing later, the equipment really matters. Thankfully, you probably have most of this stuff just sitting in your pantry, but a few key items help us get that uniform look we need for a proper countdown display!
You’ll definitely need a sturdy stand mixer for properly creaming the butter and sugar—it makes such a difference compared to handheld beaters. A good rolling pin is non-negotiable since we are rolling this dough thin. And, naturally, you need your round cookie cutters, but the magic is in how you cut them!
Pro Tip for Uniform Clock Cookies
Listen to me on this small detail, because it saves you so much heartache when decorating! When you roll out your dough—which should be aiming for a perfect 1/4 inch thick—always press your cookie cutters straight down and then lift straight up. Don’t twist the cutter at all! Twisting seals the edges weirdly and causes them to bake unevenly, resulting in oddly shaped edges where your royal icing won’t sit flat. Be firm, be straight, and watch your Clock Cookies bake perfectly flat every single time.
Gathering Ingredients for Your Clock Face Countdown Cookies Base
Before we even think about turning these beautiful cutouts into works of art, we need a solid foundation. And honestly, the foundation for these Clock Face Countdown Cookies is the best gluten-free, low-sugar base I’ve ever developed. It’s simple, straightforward, and bakes up beautifully every time. This dough is just waiting for you to decorate it!
Since this is the cookie base itself—the part that needs to survive chilling, rolling, and baking—we’re focusing just on the cookie components right now. We’ll handle the icing in the next section! You can always see a list of all kinds of recipes I’ve tested over the years on my main recipe page.
Here is exactly what you need for our 24 sturdy cookies:
For the Cookies- 1/2 cup butter (make sure it’s softened—this is important for creaming!)
- 2/3 cup white sugar (See my note below! This is where we adapt.)
- 1 egg
- 1 egg white
- 1/4 tsp vanilla extract
- 1 2/3 cup all-purpose flour (or your favorite GF blend!)
- 3/4 tsp baking powder
- 1/4 tsp salt
Ingredient Notes and Diabetic-Friendly Substitutions
Okay, let’s talk about that white sugar, because that’s the one part that needs adjusting if you are strictly watching blood sugar levels. The recipe as written uses white sugar, which is fine for some people focusing only on gluten-free, but it isn’t truly diabetic-friendly at that level.
If you need this recipe to be fully compliant for a diabetic diet, you must swap out that 2/3 cup of white sugar for a granulated low-carb sweetener that measures cup-for-cup. I personally love using erythritol or xylitol blends, but you have to test what works best for your family’s needs and monitor how your body reacts. Just know that when measuring, measure the substitute exactly as you would the sugar!
For the flour, if you are using a pre-made gluten-free blend, make sure it already contains xanthan or guar gum. If it doesn’t, I highly recommend adding about 3/4 teaspoon of xanthan gum to the dry ingredients. That extra binder helps hold these Clock Cookies together perfectly after baking, especially since we aren’t using wheat flour!
Step-by-Step Instructions to Make Clock Face Countdown Cookies
Now for the fun part—turning ingredients into dough! Baking tutorials are my favorite because you get to see your work taking shape right before your eyes. These instructions for our Clock Face Countdown Cookies are broken down super clearly so you don’t miss anything, especially that vital chilling time. Trust me, if you skip the chill, these will spread, and you won’t get those sharp clock edges!
Before you mess with the flour, make sure your oven is ready to go. We need it hot! Preheat your oven to 400 degrees Fahrenheit. That high heat helps these gluten-free cookies set up quickly, which is key to stopping spread.
If you are curious about other techniques I use for making complex gluten-free textures manageable, like how I handle a roux, you can check out my post on making perfect gluten-free roux. It’s all about finding the right technique for the right flour!
Mixing and Chilling the Clock Cookie Dough
If you have a stand mixer, dust it off! You want to start by creaming the softened butter and the sugar (or your sweetener substitute). Beat them together until they are nice and fluffy. Then, you add in your single egg, the extra egg white for structure, and that little splash of vanilla extract. Make sure everything is incorporated thoroughly here.
Next, we add the dry stuff. Gently stir in the flour, baking powder, and salt until the dough just comes together. Stop mixing as soon as it looks like a cohesive ball. Overmixing gluten-free dough can sometimes make it tougher, so be gentle!
This next step is non-negotiable for beautiful Countdown Cookies: cover the dough tightly with plastic wrap. You absolutely must chill this dough for at least 1 hour. I always tell people, if you can manage it, leave it in the fridge overnight! That extra chilling time firms up the dough so much that rolling and cutting become an absolute breeze.
Rolling, Cutting, and Baking Your Clock Face Countdown Cookies
Once your dough is cold—and I mean *cold*—it’s time to roll! Lay down a big sheet of parchment paper, and roll that dough out evenly to a consistent thickness of 1/4 inch. I aim for exactly 1/4 inch because anything thinner might burn before the center cooks, and anything thicker won’t look quite right once iced. Remember, consistency is what makes these look professional!
Now, grab those circle cutters and press down firmly and straight to cut out your shapes. Because these are meant to be counted down, make sure you cut out enough rounds for the number of days you need to track!
Place your cut Clock Cookies onto an ungreased baking sheet (or one lined with fresh parchment, I always like fresh parchment!). Pop them into that 400 degrees Fahrenheit oven and bake them for only about 7 to 8 minutes. Watch the edges. You want them to be just lightly golden. Pull them out right when they look set!
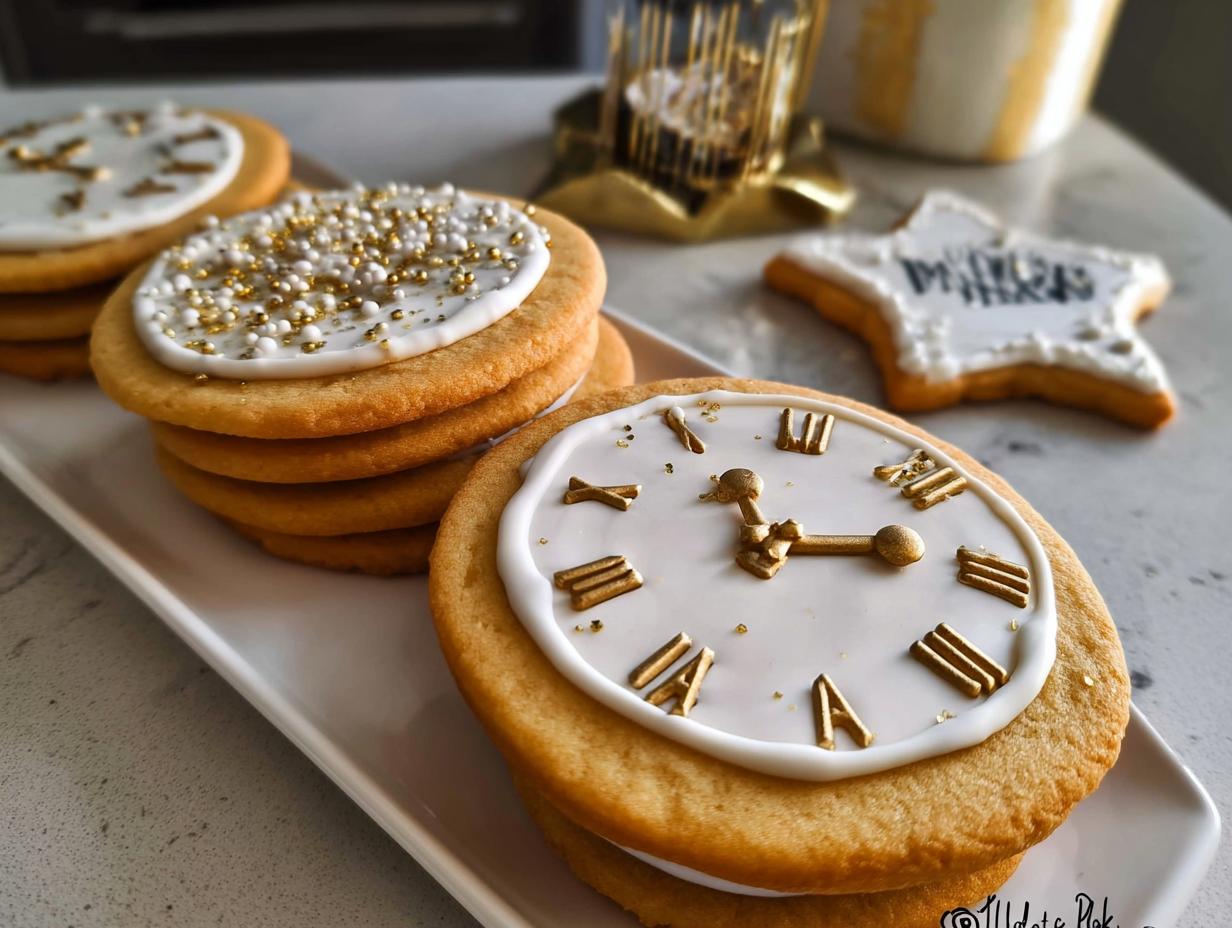
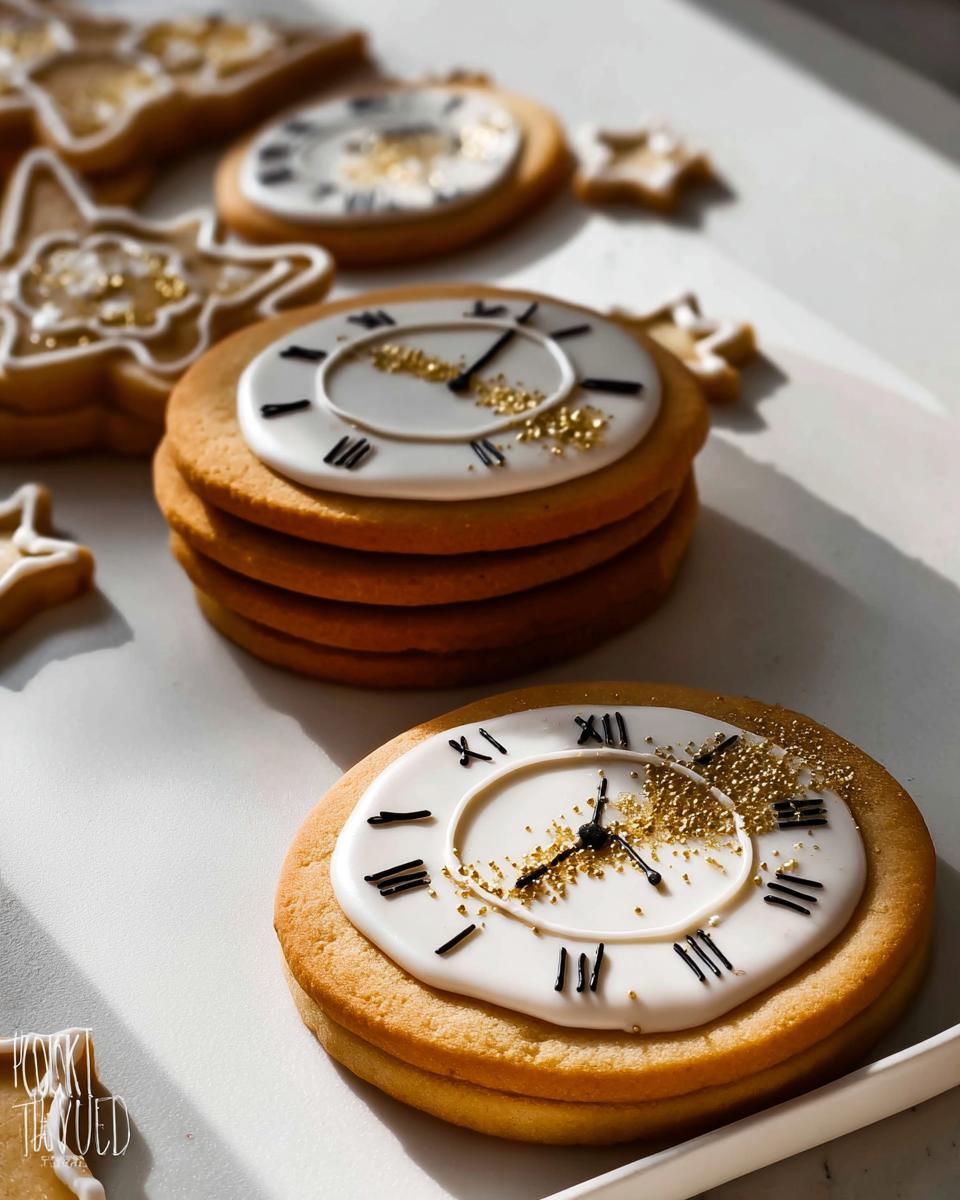
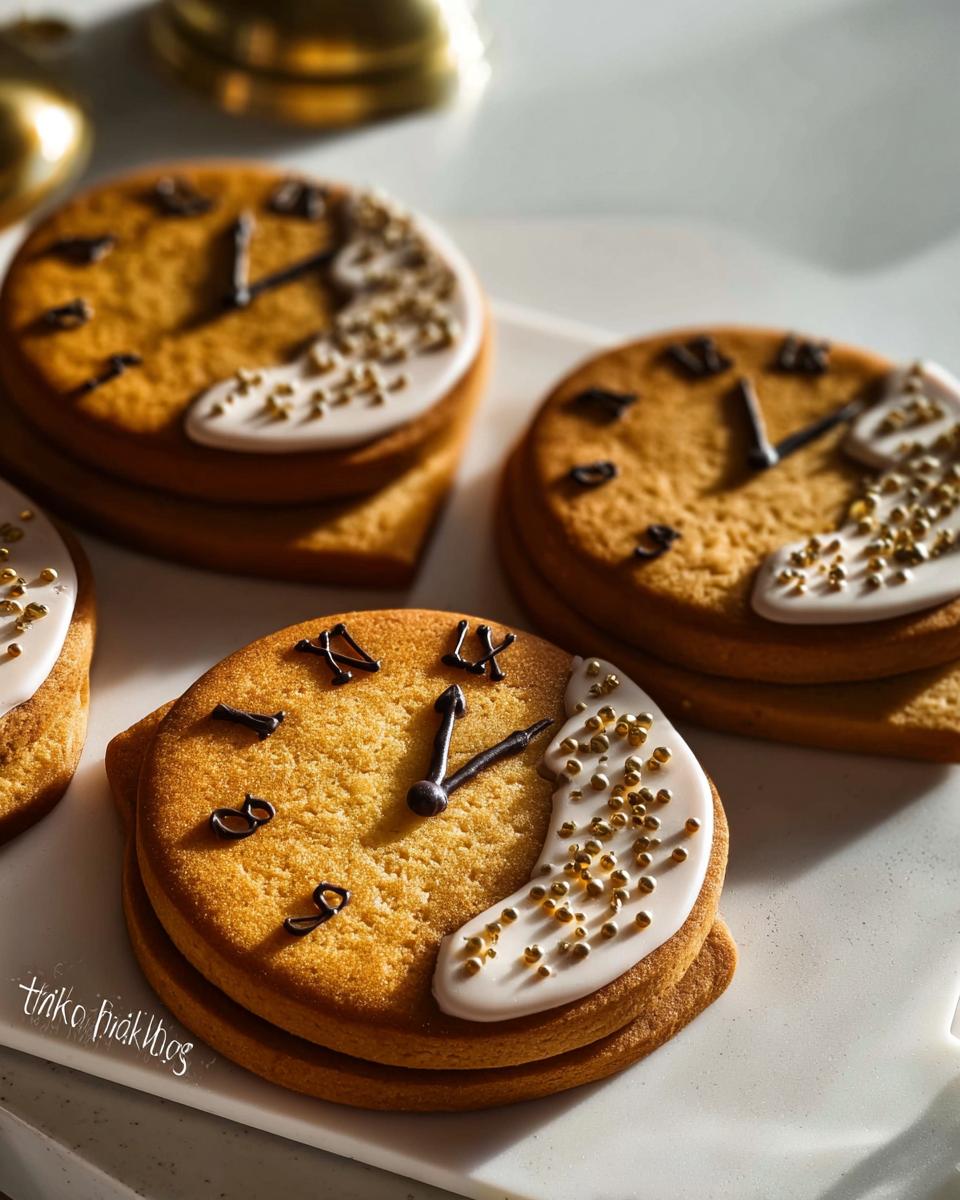
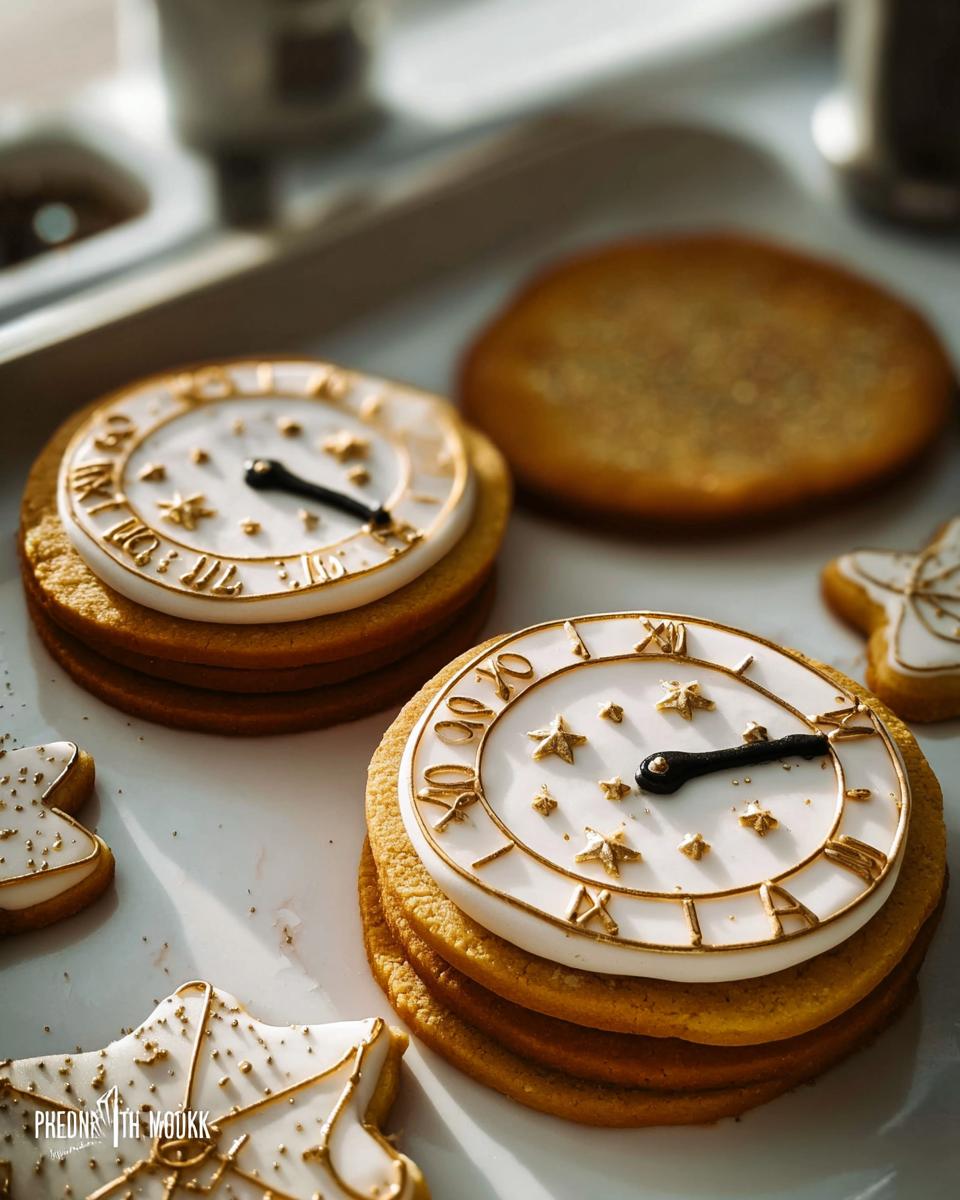
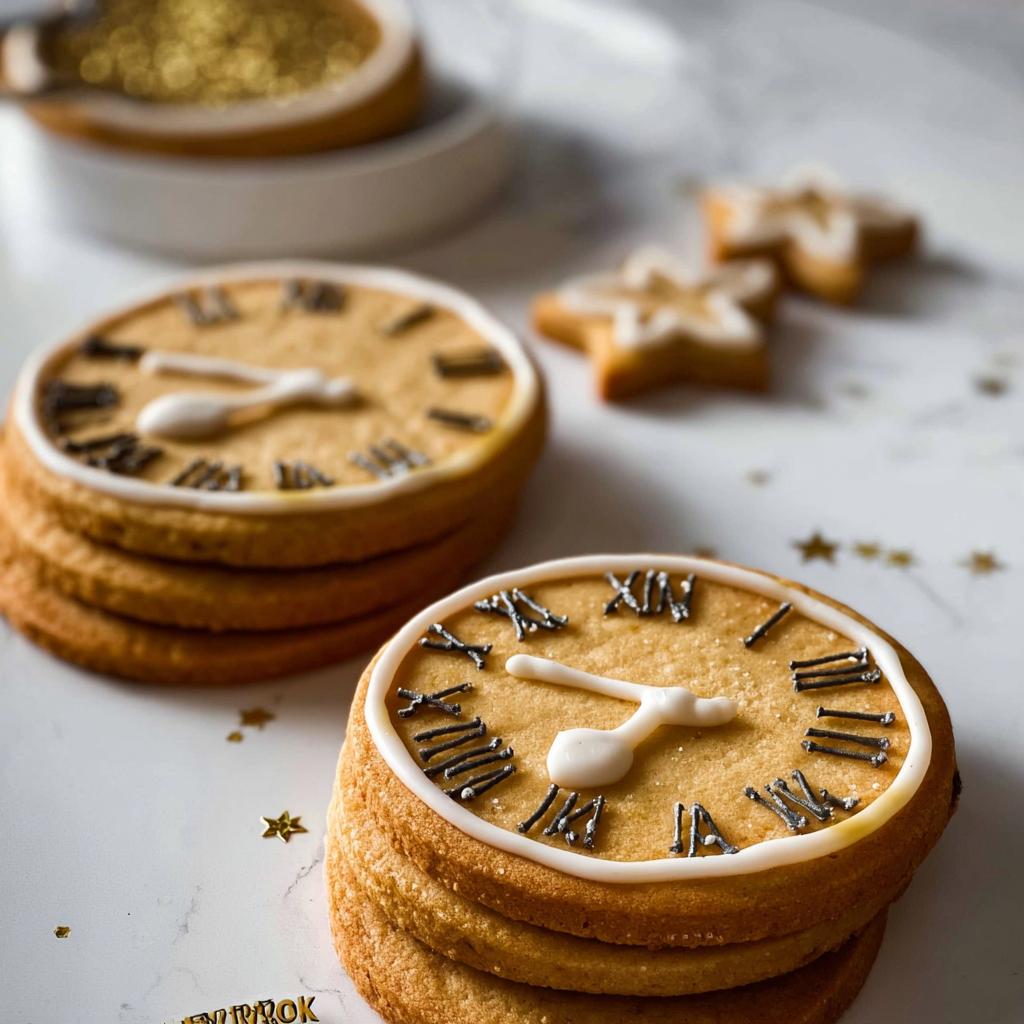
Decorating Your Clock Face Countdown Cookies with Royal Icing
Okay, the cookies are baked, cooled, and lined up like little blank canvases! This is where the real magic happens and where we transform these sturdy bases into fun, functional Clock Face Countdown Cookies. If you’ve ever been intimidated by royal icing, don’t worry! It’s all about getting the right thickness, and once you master two simple consistencies, you can make any design you want.
I love getting creative here. You can go simple—just basic black lines for the numbers and a couple of hands—or you can get wild with colors that match your party theme. Since we are aiming for a clock face, we need that detailed piping, and that relies heavily on the icing texture. If you want a massive gallery of decorating inspiration, I always love checking out other creative bakers, like the wonderful examples found over at this external site for ideas!
This is where you can really let your personality shine through beside the structural requirements of the cookie. For more easy-to-achieve gluten-free treats that make holidays fun, you should take a look at my list of 23 easy recipes; there are tons of fun Piping Ideas there too!
Tips for Perfect Royal Icing Consistency
The secret to making those crisp clock numbers and clean edges is using two different consistencies of Royal Icing. You absolutely need a stiff icing and a medium-flow icing.
For Outlining (Stiff Consistency): This icing needs to be thick enough that when you pipe a line, it stays put and doesn’t run into the cookie. If you try to poke a line you just piped, the indentation should disappear slowly, after about 10 seconds. This is the icing you use to draw the outer circle of the clock face and the numbers themselves.
For Flooding (Medium Consistency): Once the outline is totally dry—and I mean totally dry, give it a few hours—you move to the flood. This icing should be much thinner. When you lift the whisk (or a spoon) out of the bowl, the icing that drips back down should sink back into the bowl, and it should take about 10 seconds for the surface to look smooth again. This is the best consistency for filling in the center of the clock face smoothly. If it’s too thin, it runs right over the edges of your outline! If it’s too thick, you get annoying little peaks inside your clock face. Play around with a tiny splash of water until you hit that 10-second mark for perfect decoration!
Serving Suggestions for Clock Face Countdown Cookies
Once you’ve mastered the Clock Face Countdown Cookies, the next step is turning them into the centerpiece of your celebration! These aren’t just snacks; they are decorative, edible tally marks leading up to the big day. The presentation makes them so much more fun, especially since they cater to everyone with dietary needs!
Think about your specific occasion. If you are counting down to a major birthday—say, a Sweet Sixteen or a 21st—you could make one cookie showing the number of days left until the party, and then have smaller cookies with clocks set to the actual hour the party starts. That’s a great Party Theme element!
For that big family vacation we counted down to, we set up a display board. We used little clothespins to attach the cookies, one per day, counting down from ten days out. The kids loved pulling the cookie for the day off the line in the morning! It made the entire lead-up feel special.
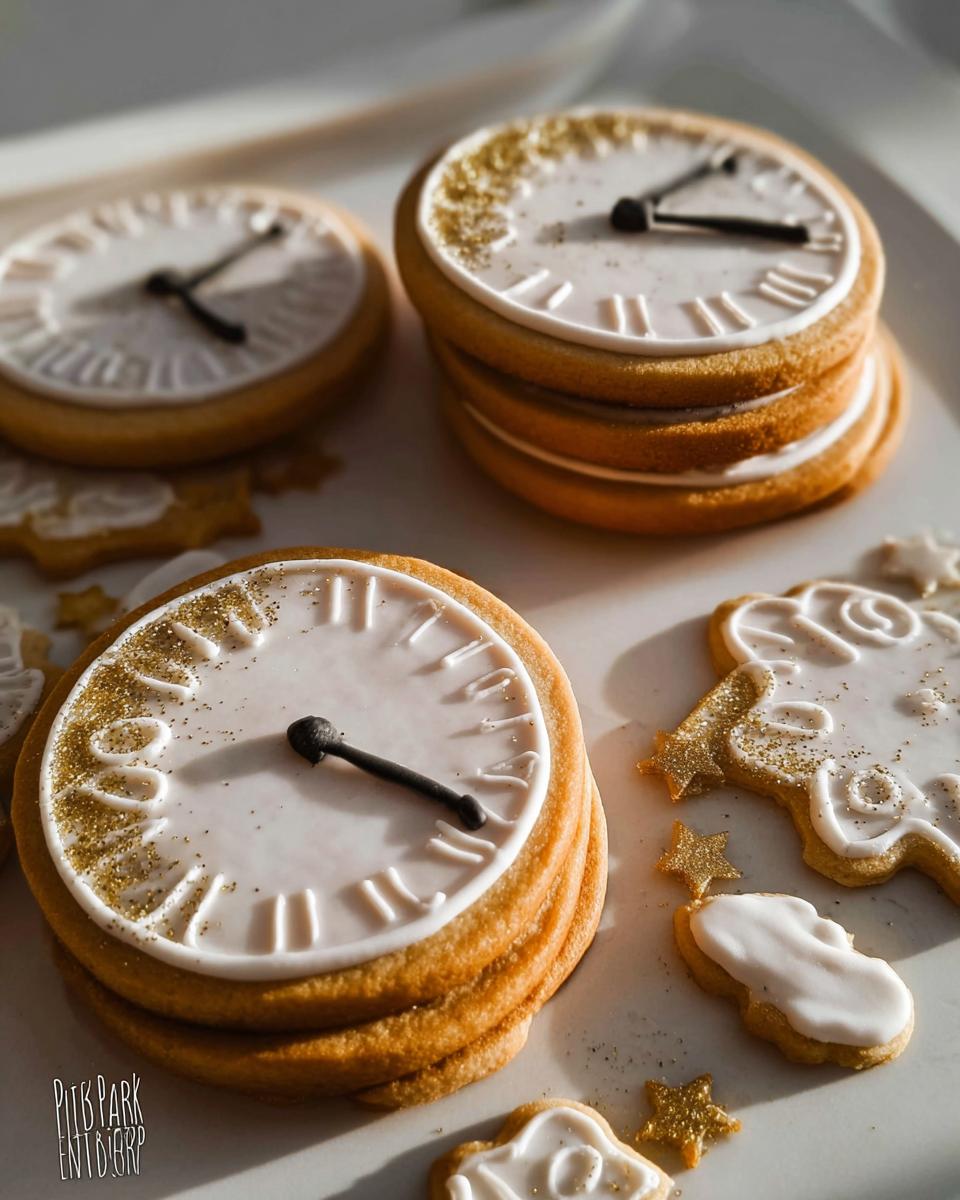
If you are using these for New Year’s, clearly, the clock theme is perfect. You can have cookie clocks set for every hour leading up to midnight. And if you are looking for other easy, crowd-pleasing ideas that keep gluten-free and low-sugar in mind, I always share what recipes are trending over in my Pinterest trends section—there’s always something fun to try!
Don’t forget to use different icing colors to match the overall theme of the event. A bridal shower countdown needs soft pastels, while a graduation party might need school colors piped onto those clocks!
Storing Your Finished Clock Cookies
Once you’ve put all that hard work into outlining and flooding your Clock Cookies, you naturally want them to last! Since these cookies don’t rely on dairy or eggs in the icing (thanks, royal icing!), they are actually pretty durable if stored correctly. But royal icing is notorious for getting sticky if the humidity is high, so storage technique is everything here.
The most important thing to remember when storing any decorated cookie, especially one using royal icing, is airflow—or the lack thereof! Never store decorated cookies in airtight containers right away, especially if the icing is still slightly soft. That traps moisture, and humidity is the enemy of crisp icing!
For short periods, like if you’re making these the day before a party, lay the finished cookies out on a baking sheet lined with parchment paper and just leave them on the counter away from direct sunshine or heat. They usually dry completely hard within 12 hours, but honestly, I always give them a full 24 hours just to be safe.
After they are completely dry and hard to the touch, you can stack them. Just be gentle; these are fragile treats! You need a buffer between each layer. I always put a thin sheet of wax paper or parchment paper between each cookie layer. This stops the royal icing from sticking to the cookie above it. They stack beautifully in a single layer in a sturdy container if you have the space.
If you need to store these longer—say, up to a week—a slightly more protected environment helps. A cookie tin works well, provided you still use the parchment separators. Because these Clock Cookies are gluten-free, they tend to dry out a little faster than traditional cookies, so try not to leave them uncovered for too long before sealing them up!
Frequently Asked Questions About Clock Face Countdown Cookies
I get so many questions about these fun treats because people are always trying to figure out how to make them fit their specific party needs or dietary requirements! I’ve tried to answer the most common things I hear about the dough, storage, and sweetness levels right here. If you have other questions, please don’t hesitate to reach out to me over on my contact page too; I love hearing from fellow bakers!
Can I make these Clock Cookies ahead of time?
Oh, yes, you absolutely can! That chilling time isn’t just a suggestion; it’s crucial for easy rolling, so getting that done early is smart organization. You can make the dough and wrap it tightly in plastic wrap right when you finish mixing it, just like I described in the steps. It will keep beautifully in the refrigerator for three whole days. If you want to go even further ahead—like for a huge event—go ahead and freeze the wrapped dough for up to three months! Just thaw it slowly overnight in the fridge before you plan to roll it out. These Countdown Cookies are perfect for advance prepping!
What is the best way to store undecorated Countdown Cookies?
If you bake the actual cookie base but haven’t gotten to the decorating part yet, that’s super easy to store! Once those freshly baked Clock Cookies are totally cooled—and I mean cool to room temperature, no warmth left—place them in a single layer in an airtight container. You don’t need any wax paper separators for plain cookies. They will stay perfectly fresh and ready for icing for about a week if kept at room temperature. I wouldn’t try longer than that since they are gluten-free and usually rely less on heavy fats that act as preservatives.
Are these cookies truly diabetic-friendly if I use standard sugar?
That is an excellent catch, and thank you for asking! This is where reading the details matters. As written in the ingredients list, the base recipe uses 2/3 cup of standard white sugar for structure and texture development—which is why I called the recipe “diabetic-friendly base” and not “diabetic-safe.” For these Clock Face Countdown Cookies to be truly diabetic-friendly, you *must* substitute that white sugar with an approved low-carb, granulated sweetener, as discussed in my ingredient notes. If you use the standard sugar listed, they will spike blood sugar just like any other sugar cookie. Always swap out the sugar for compliance!
Share Your Clock Face Countdown Cookies Creations
I truly hope making these Clock Face Countdown Cookies brought as much joy to your kitchen as it does to mine every single time I whip up a batch for my boy. Taking the time to mark special moments, large or small, makes the memory so much richer, and doing it safely with compliant recipes makes it even better!
Now that you’ve got your clocks ready—whether they are counting down to a huge anniversary or just Friday afternoon—I absolutely want to see them! Did you use a bright blue icing for a space party countdown? Or maybe you went classic gold and black for a New Year’s Eve party? Don’t be shy!
Please snap a photo and tag me on social media, or better yet, come back here and leave a quick rating. Knowing that this recipe works for you is the best compliment I could ever receive. Also, if you have any brilliant new plating ideas or decoration hacks you discovered while working with these, share them in the comments below! I am always learning new things about baking, especially when we are balancing dietary needs. Check out some of my thoughts on visual presentation and design over here if you want more visual inspiration!
Happy counting, friends!
Clock Face Countdown Cookies
Ingredients
Equipment
Method
- If you have a stand mixer, cream together the butter and sugar. Add the egg and vanilla extract. Stir until well combined.
- Stir in the flour, baking powder, and salt. Mix until the dough comes together.
- Cover the dough with plastic wrap. Chill in the refrigerator for at least 1 hour, or preferably overnight.
- Preheat your oven to 400 degrees Fahrenheit. Roll out the chilled dough to 1/4 inch thickness. Use cookie cutters to create your desired shapes.
- Bake the cookies for 7-8 minutes, or until the edges are lightly golden.
Notes
Tried this recipe?
Let us know how it was!
Dual-Restriction Recipe Engineer & Cross-Contamination Specialist
Everything changed when my teenage son got hit with celiac disease and Type 1 diabetes diagnoses within six months of each other. Suddenly, pizza and pasta were off the table, and most “diabetic-friendly” foods contained gluten. I went from regular mom cooking to navigating what I call “compound restriction cooking”—and I had a kid’s appetite and taste buds to satisfy.
Lucky for us, my background in pharmaceutical quality control gave me the systematic mindset this level of precision requires. My kitchen now operates under pharmaceutical-grade protocols adapted for home use: dedicated prep surfaces, separate storage systems, and testing procedures that verify both carb counts and gluten absence before any recipe gets published.
I’ve developed over 220 recipes that clear multiple dietary hurdles simultaneously—finding gluten-free thickeners that don’t spike blood sugar, creating bread alternatives that meet both keto ratios and celiac safety, and developing desserts that actually taste good to a teenager despite impossible restrictions.
Through my “Safe Kitchen Certification” program, I teach other parents that managing multiple dietary restrictions isn’t about multiplying limitations—it’s about systematic thinking that reveals unexpected possibilities. When you engineer solutions instead of making compromises, restriction becomes innovation rather than deprivation.