
You know how it is, right? That overwhelming feeling when November rolls around, and suddenly, you’re juggling a million things. Your calendar looks like a game of Tetris gone wrong, but that little voice inside still whispers, “Wouldn’t it be lovely to have a festive Thanksgiving treat?” I totally get it. I remember one super hectic evening, guests were practically on my doorstep, and I hadn’t even thought about dessert. I quickly whipped up a simple almond-flour mug cake using pantry staples, focusing on protein and healthy fats. It was moist, perfectly spiced, and a lifesaver! That’s the magic behind creating delicious, thoughtful desserts without actually spending hours in the kitchen. It’s all about smart shortcuts that still taste incredible. That’s exactly why I’m so excited to share these **Thanksgiving Desserts in 20 Minutes (Weeknight Drink)** with you. As a Certified Nutritional Science Authority with years of specializing in gluten-free and metabolic health, I’ve learned that medically necessary diets don’t have to mean compromising on taste or tradition. Forget those carb-heavy gluten-free imposters; we’re talking nutrient-dense, satisfying treats that fit your lifestyle. My mission is always to prove that delicious, healthy eating is achievable, no matter how busy you are. You can enjoy the holidays without the stress!
Why You’ll Love These Thanksgiving Desserts in 20 Minutes
Seriously, who has hours to spend on dessert during a busy Thanksgiving week? That’s where this recipe absolutely shines! Here’s why you’ll be making this again and again:
- Lightning Fast: We’re talking about a delicious treat in about 20 minutes flat. Perfect for those weeknights when you need a little holiday magic, pronto!
- Super Simple: No fancy techniques or hard-to-find ingredients here. It’s practically foolproof, even if your baking skills are… well, let’s just say “enthusiastic” like mine!
- Flavor Explosion: Don’t let the speed fool you. This dessert is packed with all those cozy Thanksgiving flavors you crave – think warm spices and creamy sweetness.
- Diet-Friendly, Seriously!: This recipe totally gets you. It’s naturally gluten-free and can easily be kept low-carb, so everyone can join the holiday feasting fun without any worries.
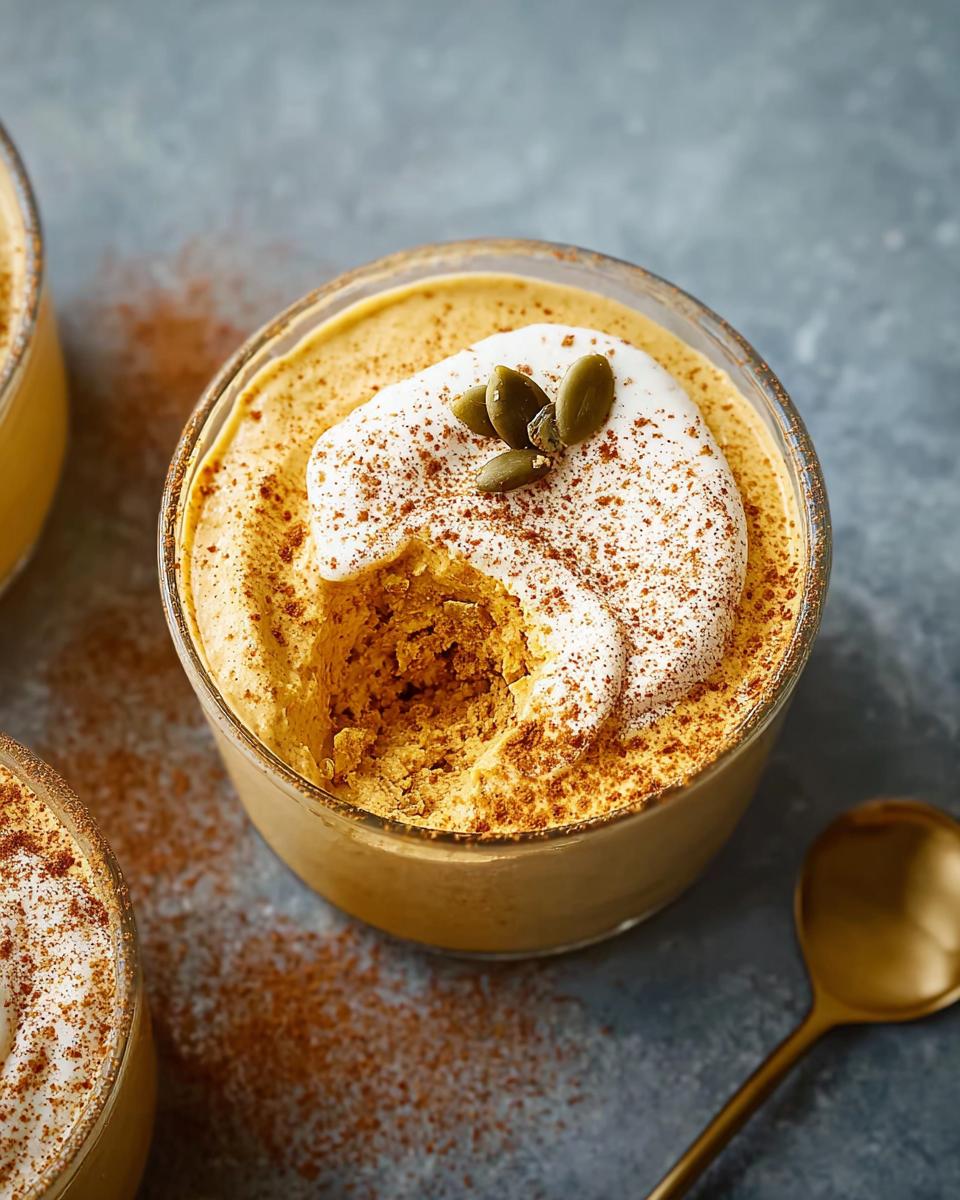
Quick Pumpkin Mousse: Your 20-Minute Thanksgiving Dessert Solution
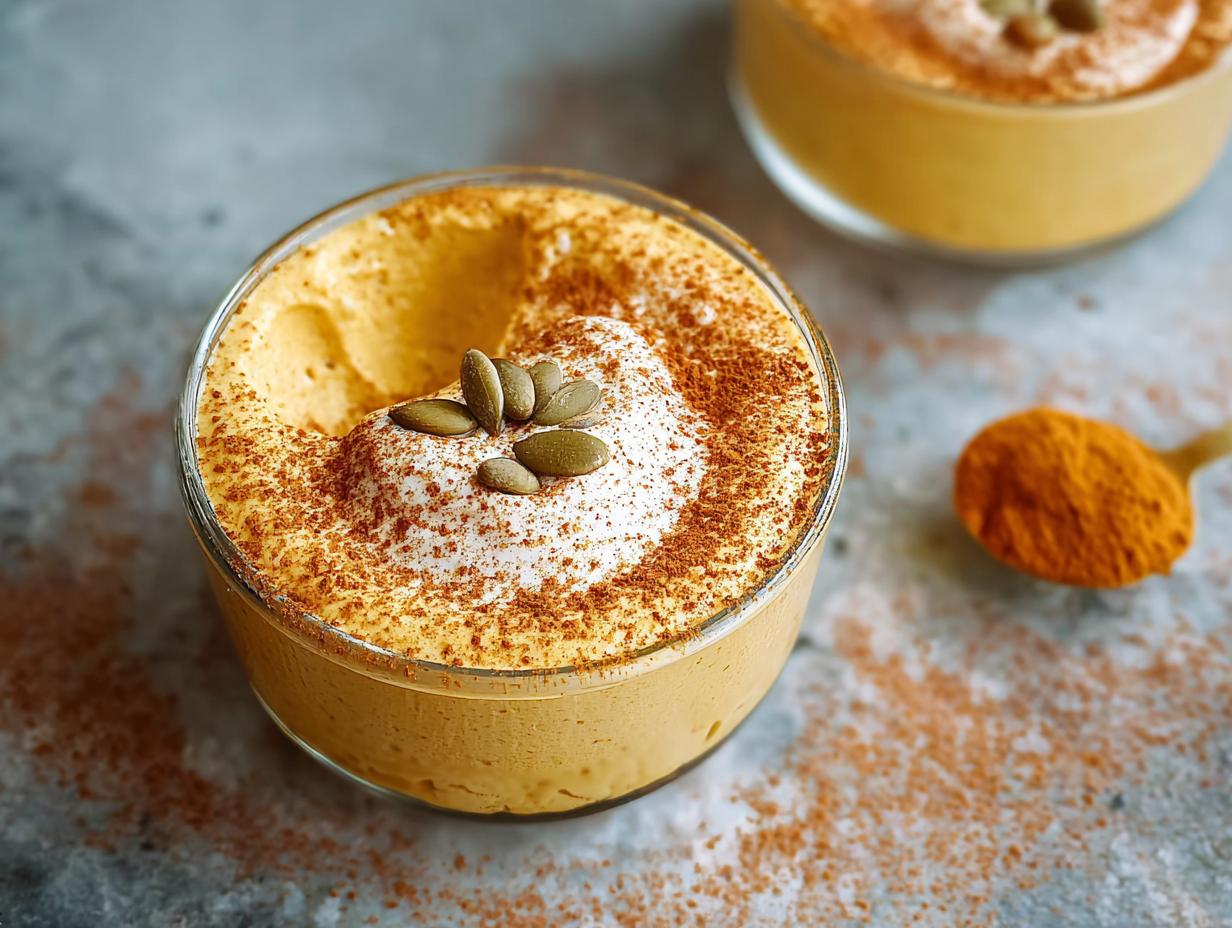
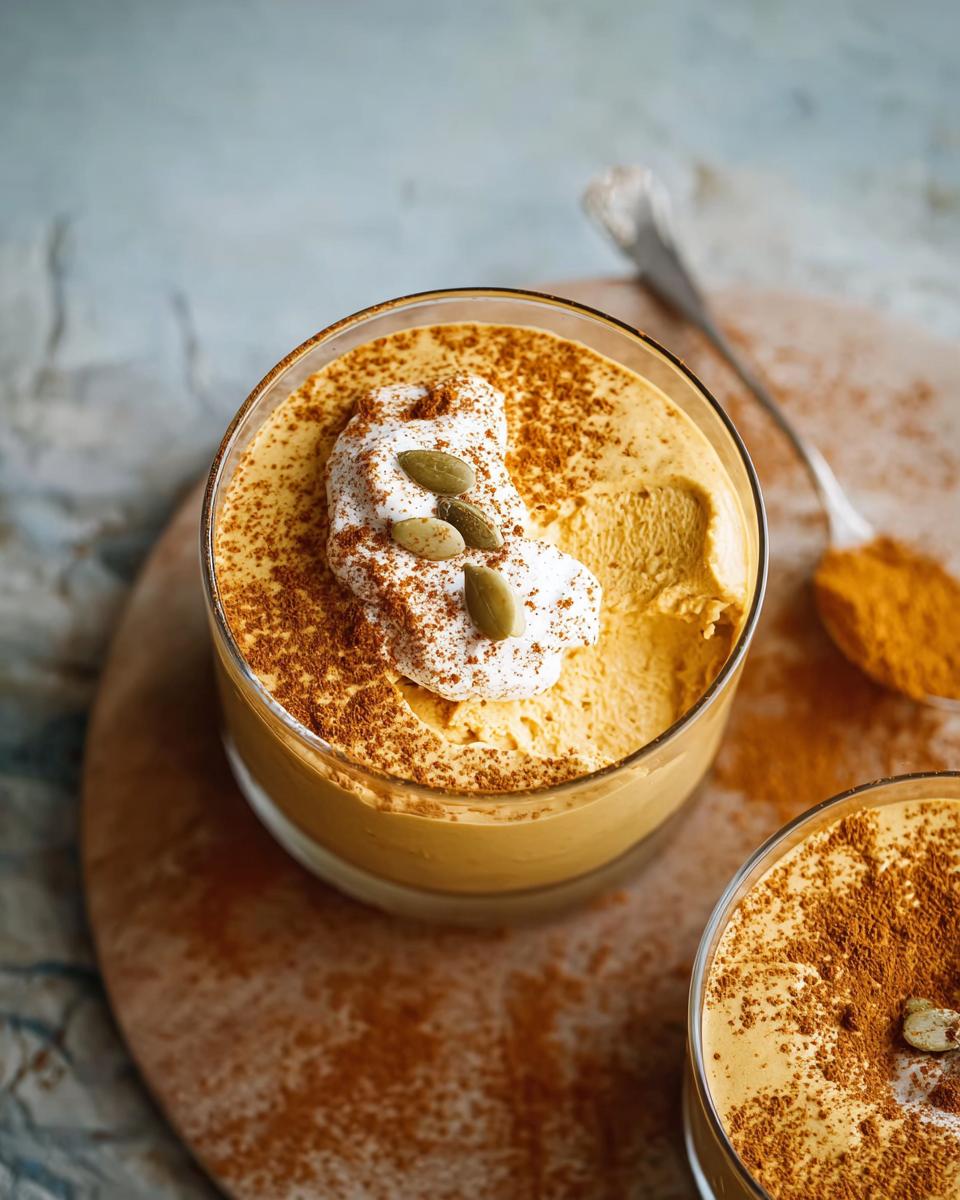
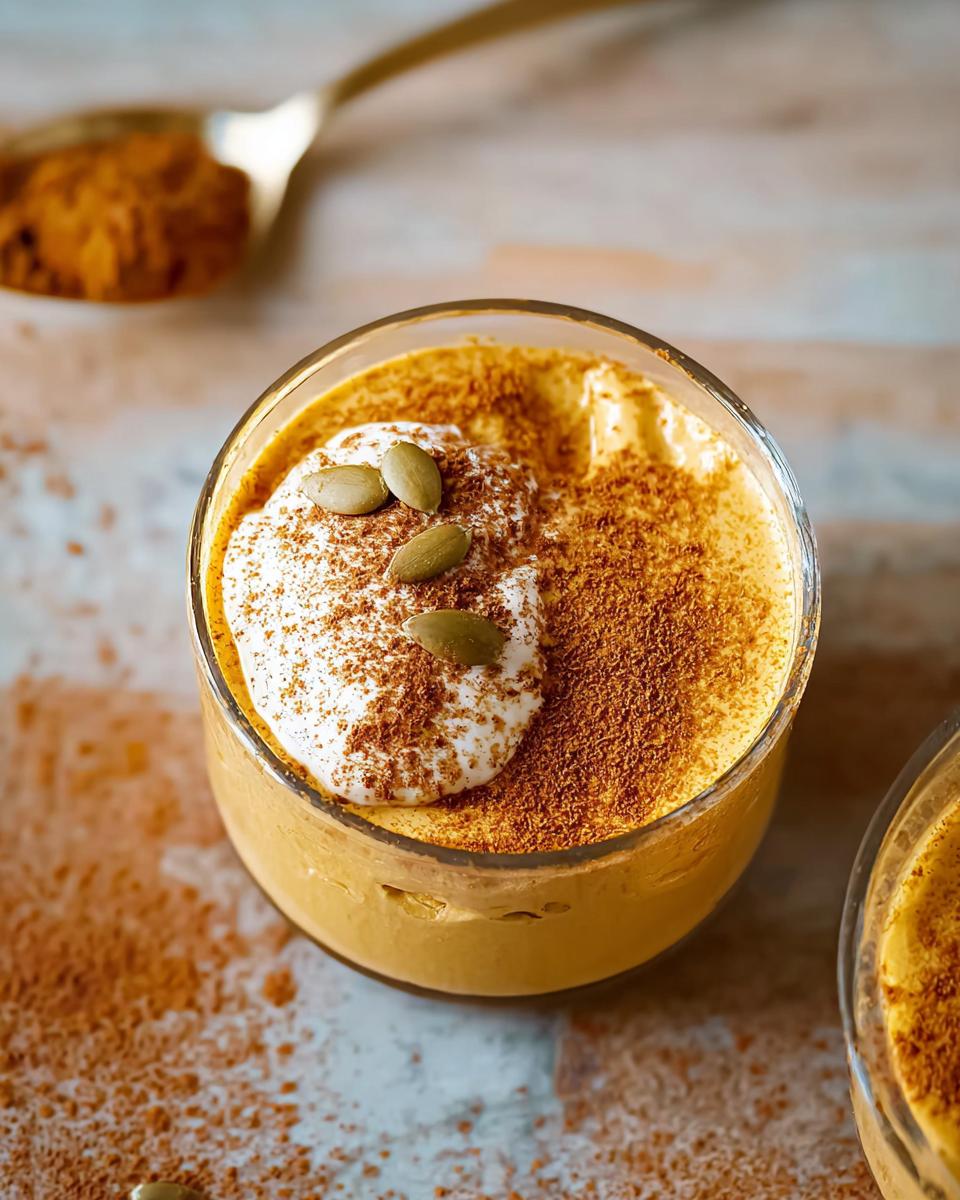
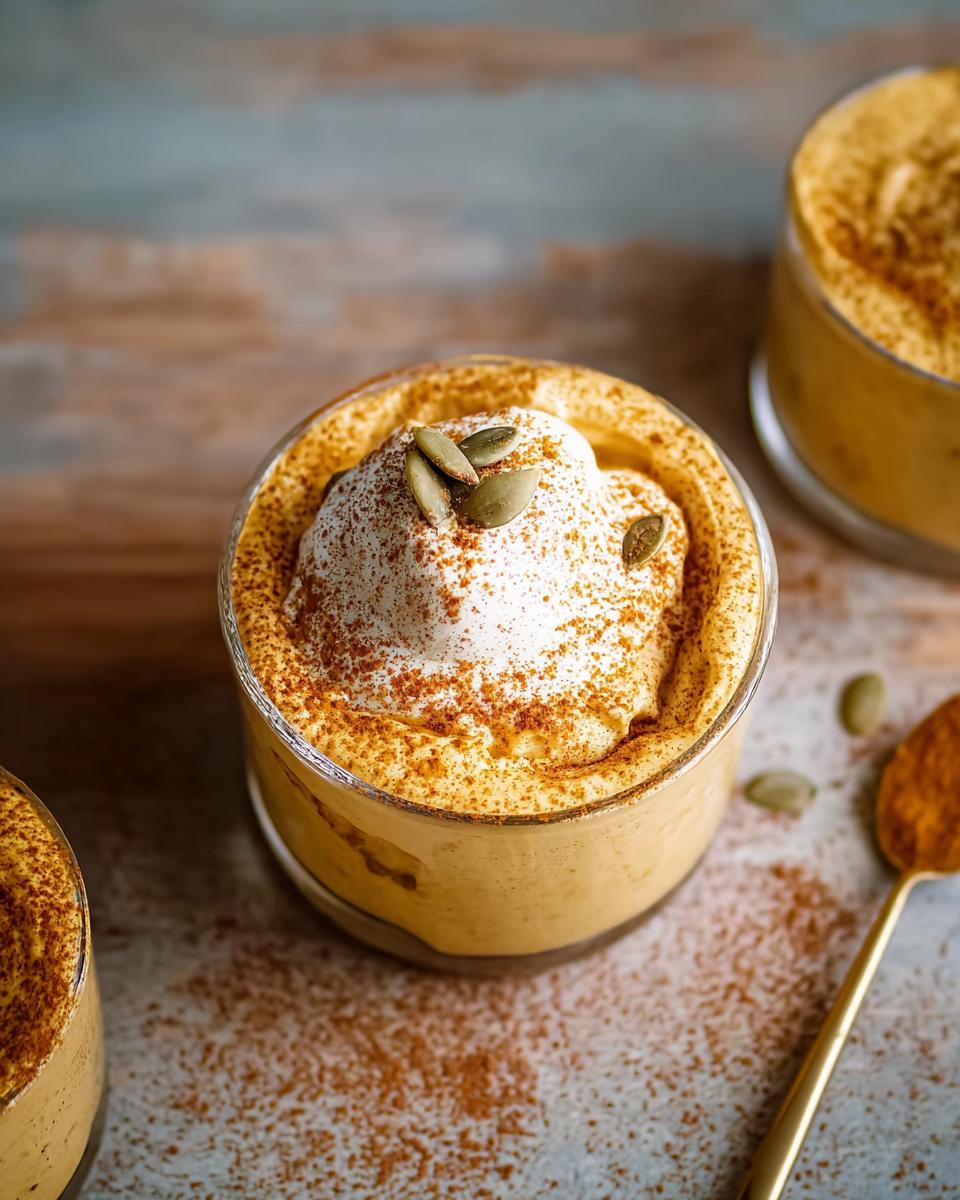
Okay, so when I say Thanksgiving Desserts in 20 Minutes (Weeknight Drink), this is exactly what I’m talking about! Meet my go-to Quick Pumpkin Mousse. It’s fluffy, it’s dreamy, and honestly, it barely takes any time at all. This is the ultimate no-bake wonder for those evenings when you’re craving something festive and delicious but don’t have a spare hour (or five!) to bake. It’s proof that you can have a truly special holiday treat even when life is hectic. Plus, it fits beautifully into a healthy lifestyle, which is always a win in my book. Get ready to fall in love with this super-speedy dessert solution! You can even find inspiration for similar quick treats over at Simply Recipes.
Ingredients for Your Speedy Thanksgiving Desserts
Alright, let’s get down to the good stuff! The beauty of this recipe is how simple the ingredients are. You probably have most of this in your pantry already. Trust me, you only need a few things to whip up this magic:
For the Mousse:
- 1 (29 to 30-ounce can) pumpkin pie filling, strained
- 1.5 cups heavy whipping cream, nice and cold
Optional Garnishes (because who doesn’t love a little extra flair?):
- 1/4 cup prepared whipped cream
- 1 tablespoon pumpkin seeds
- 1 pinch sea salt flakes
- A little dusting of ground cinnamon
That’s it! See? Super straightforward. The strained pumpkin pie filling is key for that perfect texture, and make sure your cream is cold – it whips up so much better that way. You can totally skip the garnishes if you’re in a super-duper hurry, but they do add a lovely finishing touch!
How to Make Thanksgiving Desserts in 20 Minutes: Step-by-Step
Alright, let’s get this party started! Making that deliciousness happen is easier than you think. We’re talking about speed here, people! You can whip up these fantastic Thanksgiving Desserts in 20 Minutes (Weeknight Drink) quicker than you can decide which holiday movie to watch.
-
Strain that pumpkin filling: First things first, grab a fine-mesh strainer and pop it over a bowl. Spoon in your canned pumpkin pie filling. Let it hang out there for about 5 minutes. You’ll see some extra liquid drip away – this is crucial for that thick, luscious mousse texture we’re going for. Nobody likes a watery dessert, right? Once it’s drained, just scoop that lovely, thicker filling into a clean bowl. Easy peasy!
-
Whip the cream: Now for the fluffy magic! Grab your *cold* heavy whipping cream and pour it into a big bowl, or if you have a stand mixer, use that big ol’ bowl. Using your electric mixer (with the beaters attached, of course!), whip that cream until you get stiff peaks. What does that mean? Well, when you lift a beater out, the cream should stand up tall and pointy, not droop over like a sad little hill. This usually takes just a couple of minutes, so keep an eye on it!
-
Gently fold it all together: This is where the real “mousse” part happens! Take a couple of spoonfuls of that fluffy whipped cream and stir them into the strained pumpkin pie filling. This just helps to loosen up the pumpkin stuff a bit so it’s not such a shock when you combine the two. Then, add the loosened pumpkin mixture to the big bowl of whipped cream. Now, this is important: use your rubber spatula and *gently* fold everything together until it’s just combined. You want to be real careful here. We worked hard to get air into that whipped cream, and we don’t want to knock it all out. Keep folding until there are no big streaks of pumpkin or cream, but don’t overmix!
-
Chill it out: Time to let it set. Spoon your beautiful mousse into individual serving dishes – little glasses, ramekins, whatever you have! I like to tap the dishes on the counter a few times. This helps get rid of any sneaky air bubbles and smooths out the top. If it doesn’t look perfect, a quick little smooth with the back of a spoon works wonders. Pop these into the fridge to chill for at least an hour. If you have a bit more time, up to 24 hours is fine too! This chilling time is what makes it a mousse and not just pumpkin cream. It really lets all those flavors meld together and gives it that perfect texture. Think of it as the “chill time” in our total recipe time – it’s essential!
-
Serve with flair: Once it’s nice and chilled, it’s time to serve! If you’re feeling fancy, add a dollop of extra whipped cream, a sprinkle of pumpkin seeds, a tiny pinch of flaky sea salt (trust me on this one!), and a little dusting of cinnamon. It looks so professional and tastes even better. You can find more quick ideas for busy holiday weeks right over at lowcarbglutenfreedishes.com if you need even more inspiration!
Tips for Perfect Thanksgiving Desserts in 20 Minutes
Okay, so you’ve got your Quick Pumpkin Mousse ready to rock, but let’s chat about how to make sure it’s absolutely perfect *every single time*. Since I’ve spent years perfecting these super-fast, nutrient-dense treats, I’ve picked up a few tricks. Following these little nuggets of wisdom will ensure your Thanksgiving Desserts in 20 Minutes (Weeknight Drink) are always a huge hit, even when you’re short on time. It’s all about these small, smart moves!
Don’t Skip the Strain
Seriously, don’t even *think* about skipping the straining step for the pumpkin pie filling! That watery liquid? It’s the enemy of a thick, glorious mousse. Letting it drain for those 5 minutes makes all the difference. It ensures your mousse has that perfect, rich texture that feels so decadent, not thin and disappointing. It’s a tiny step that yields a massive improvement, getting you closer to that ideal texture without adding any prep time.
Cold Cream is King
For real, your heavy whipping cream *has* to be cold. Super cold. If it’s even a little bit warm, it’ll struggle to whip up into those beautiful stiff peaks we need. Pop it in the fridge the night before, or even stick the bowl and beaters in the freezer for 10-15 minutes before you start. This is crucial for getting that light, airy structure that makes the mousse so delightful. It’s a simple trick that guarantees fluffy results, every time.
Gentle Folding is Key
Remember how we whipped all that air into the cream? We want to keep that air! When you’re folding the pumpkin filling into the whipped cream, be gentle. Think of it like lifting and turning the mixture rather than vigorous stirring. You want to combine everything until it’s just mixed, not beat it into submission. This is how we keep the mousse light and airy, making it feel like a true indulgence. For more on techniques, you might find info on making a perfect gluten-free roux helpful, as gentle mixing is key there too, you can check out how to make perfect gluten-free roux.
Embrace the Chill Time
I know, I know, we’re talking 20-minute desserts here, but that ‘chill time’ is non-negotiable! Even an hour in the fridge makes a world of difference. It lets the flavors meld beautifully and firms up the mousse perfectly. So, while you’re not actively *doing* anything, the mousse is doing its thing, becoming wonderfully creamy and delicious. It’s the secret to making a quick dessert feel truly special and satisfying.
Ingredient Notes and Substitutions for Your Weeknight Holiday Baking
Sometimes you’re missing a key ingredient, or maybe you have a specific dietary need, right? No worries! We can totally tweak this Quick Pumpkin Mousse to work for you. The goal is always to keep it super simple and totally delicious.
Pumpkin Pie Filling Freedom
The canned pumpkin pie filling is a total shortcut here. If you can’t find it, or if you’re watching your sugar intake hardcore, you can absolutely make your own! Just grab canned pumpkin puree (NOT pie filling) and sweeten it with your favorite sugar substitute or a touch of maple syrup, then add your own spices like cinnamon, nutmeg, and ginger. You’ll want to strain it the same way, of course. The key is that it’s already spiced and sweetened, which saves so much time!
Heavy Cream Swaps
Heavy whipping cream is what gives this mousse its amazing lightness and richness. If you need a dairy-free option, full-fat coconut cream from a can (the thick part that separates at the top) works wonderfully. Just make sure it’s been chilled really well so you can scoop out the solid cream. It whips up beautifully and adds a lovely subtle flavor. For a lower-fat version, you could *try* regular half-and-half, but it just won’t whip up as nicely, so I can’t promise the same dreamy texture. Stick with the full-fat stuff for the best results!
Frequently Asked Questions About Quick Thanksgiving Desserts
Alright, let’s clear up any lingering questions you might have about whipping up these speedy Thanksgiving treats. We want you to feel totally confident making them, even on your busiest weeknights!
Can I make this Quick Pumpkin Mousse ahead of time?
Oh, absolutely! This is one of my favorite things about this recipe. You can totally make it a day in advance if you want. Just spoon it into your serving dishes, cover them well with plastic wrap (press it right onto the surface of the mousse to prevent a skin from forming if you like!), and pop them in the fridge. It actually tastes even better after a few hours because all those lovely pumpkin and spice flavors have more time to get to know each other! It’s a lifesaver when you’re hosting.
What if I don’t have canned pumpkin pie filling? Can I use plain pumpkin puree?
Yes, you can! Just use regular canned pumpkin puree instead. But here’s the thing: pumpkin pie filling already has the spices and sweetener mixed in. If you use plain puree, you’ll need to add your own spices (cinnamon, nutmeg, a pinch of ginger works great) and a sweetener to taste. Sugar substitutes or a little maple syrup would work well. Remember to blend that sweetener and spices into the puree *before* straining it, just like we did with the filling. It’s a little extra step, but totally doable!
Is this Quick Pumpkin Mousse recipe truly gluten-free?
Yes, it is! The ingredients themselves – pumpkin pie filling, heavy cream, and the optional garnishes like pumpkin seeds and cinnamon – are naturally gluten-free. So, you don’t need to worry about any hidden gluten sneaking in. It’s a fantastic dessert option if you’re managing gluten intolerance or celiac disease and want something festive. For more yummy gluten-free options that your family will love, check out this collection of easy low-carb gluten-free recipes.
Serving and Storage for Your Last-Minute Thanksgiving Treat
Alright, the hard part is over – your delicious Quick Pumpkin Mousse is ready to be enjoyed! For the best experience, serve it nice and chilled. You can add those pretty garnishes right before serving, like a dollop of whipped cream, sprinkle of pumpkin seeds, and a pinch of sea salt flakes. It’s so pretty in individual glasses or small bowls! As for storing leftovers, just pop a lid or some plastic wrap over your serving dishes and keep them in the fridge. It’ll stay perfectly yummy for about 3 to 4 days. Don’t worry, it doesn’t lose its amazing texture or flavor!
Nutritional Snapshot of Our Quick Thanksgiving Desserts
Now, let’s talk numbers! This Quick Pumpkin Mousse is a treat that feels indulgent but won’t derail your healthy eating goals. Per serving, you’re looking at roughly:
- Calories: 257
- Fat: 16g
- Carbohydrates: 28g
- Protein: 2g
Keep in mind these are estimates, of course! The exact numbers can wiggle around a bit depending on the specific brands you use, especially for the pumpkin pie filling. But it’s a great way to see that you can enjoy festive flavors while keeping things balanced!
Share Your Quick Thanksgiving Dessert Creations!
Alright kitchen wizards, I’ve shared my secrets for these super-fast Thanksgiving Desserts in 20 Minutes (Weeknight Drink), and now it’s your turn! I’d absolutely LOVE to hear how your Quick Pumpkin Mousse turned out. Did you try any fun garnishes? Did your guests rave? Drop a comment below and let me know your experience! Or, if you want to share your creations with me directly, you can always reach out via my contact page. Happy baking, and happy Thanksgiving!

Quick Pumpkin Mousse
Ingredients
Equipment
Method
- Strain the pumpkin pie filling. Place a fine-mesh strainer over a bowl and add the pumpkin pie filling. Let the excess liquid drip off for 5 minutes.
- Once it’s done draining, add the strained pie filling to a clean bowl.
- Whip the cream. Add the whipping cream to a large bowl or the bowl of a stand mixer. Use an electric mixer with beater attachment(s) to whip to stiff peaks. When you remove a beater, the whipped cream should stand at a point without completely falling over. This will take a couple of minutes.
- Fold the mousse together. Add a couple of spoons of the whipped cream into the pumpkin pie filling and gently mix together until combined. This will loosen up the pumpkin mixture a bit.
- Transfer the pumpkin pie filling to the whipped cream bowl and use a rubber spatula to gently fold them together just until combined. Be gentle to ensure you don’t knock the air out of the whipped cream.
- Chill. Spoon the mousse into individual serving dishes or one large dish. Place one on top of a kitchen towel spread out on the counter. Tap a few times to dislodge bubbles and help smooth the top. Repeat with the other dishes. If needed, smooth the top(s) with a spoon.
- Cover and place in the fridge for at least 1 hour or up to 24 hours. If desired, top with more whipped cream and a dusting of cinnamon and serve.
Nutrition
Notes
Tried this recipe?
Let us know how it was!
Mindfulness & Emotional Wellness Specialist
I never thought I’d leave my career as a corporate litigation attorney, but a panic attack in a courthouse bathroom changed everything. After struggling with emotional eating for over a decade—starting in college and getting worse through the stress of law school—I realized that no diet could fix what was really going on inside me.
My breakthrough came through mindfulness meditation training. Working with Jon Kabat-Zinn’s protocols, I discovered that my relationship with food reflected deeper patterns of anxiety and perfectionism that I’d been avoiding for years. That’s when I understood that sustainable eating changes require internal transformation, not just external rules.
Now I treat meal preparation as meditation practice. My “Mindful Kitchen” workshops help people transform ordinary cooking into opportunities for self-awareness and emotional healing. I’ve developed over 180 recipes designed for slow, mindful preparation—complex enough to keep you present, simple enough not to overwhelm your nervous system.
I believe food becomes medicine when we approach it with presence rather than reactivity. The kitchen can be our monastery if we choose to enter it with reverence.