
Oh, my friends, have you ever had those moments? The doorbell rings, and suddenly you realize you need an impressive appetizer *right now*? I used to panic, thinking I needed hours to curate something beautiful. But let me tell you, that’s when I discovered the magic of the **Cheese Board in 10 Minutes**! I remember the first time I had to whip one up in a hurry for a last-minute gathering. I grabbed whatever cheese, nuts, and fruits I had on hand and just started arranging them on a simple wooden board, focusing only on the colors and textures.
And wow, were my friends impressed! They honestly thought I’d spent the entire afternoon searching for the perfect artisanal olives. That day, I learned that making amazing food presentation doesn’t have to be complicated; it’s an art form you can execute in mere minutes. As a Visual Culinary Artist & Aesthetic Designer, my whole philosophy centers on proving that beauty doesn’t require endless labor. Trust me when I say, even with only ten minutes to spare, you can turn simple ingredients into a masterpiece spread!
Why You Need This Cheese Board in 10 Minutes Guide
Honestly, who has time to spend hours making a beautiful snack when the guests are already knocking? That’s why this approach to the **Simple Grazing Board** is an absolute lifesaver. We focus purely on **Quick Assembly** so you get maximum ‘wow’ factor for minimal sweat. It’s entertaining without the stress, guaranteed!
- You create a stunning display faster than you can boil pasta.
- It requires zero cooking—just assembly!
- Impresses everyone, making you look like a hosting genius.
- Perfect for those spontaneous weeknight gatherings.
Effortless Entertaining with a Cheese Board in 10 Minutes
When you need a showstopper appetizer fast, this guide delivers exactly that. Sticking to just ten minutes means we ditch complicated arrangements and focus on smart placements. It’s the perfect solution for those last-minute RSVPs, ensuring you always have a ready-to-go spread that screams, “I planned this all week!” You won’t even break a sweat getting this **10-Minute Appetizer** on the table.
Essential Equipment for Your Cheese Board in 10 Minutes
Okay, for this speedy setup, you don’t need fancy risers or twenty serving spoons. Keep it simple, really! You’ll need your main surface, which is just a good old cutting board—wood is gorgeous, but honestly, any large platter or plate works if you’re truly pressed for time. Also, grab those little butter spreaders and a couple of cheese knives.
Expert tip here from me? Go big with your board size! A larger surface allows you to spread things out more, which instantly makes the arrangement look richer and more abundant, even if you’re using fewer bits and bobs. If you’re curious about some beautiful platter ideas, check out this great inspiration. Bigger is better for that fast visual impact we are aiming for!
Curating the Perfect Ingredients for Your Cheese Board in 10 Minutes
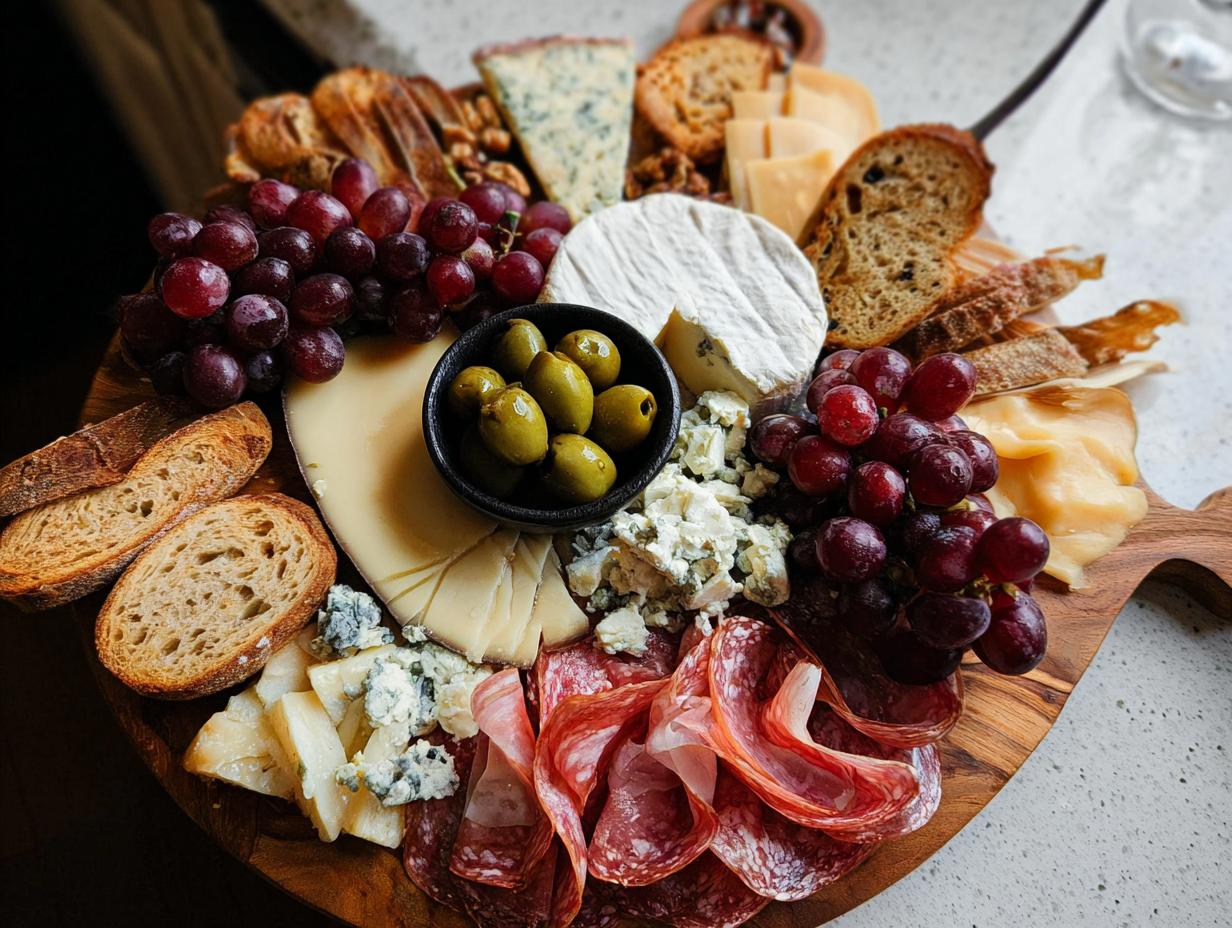
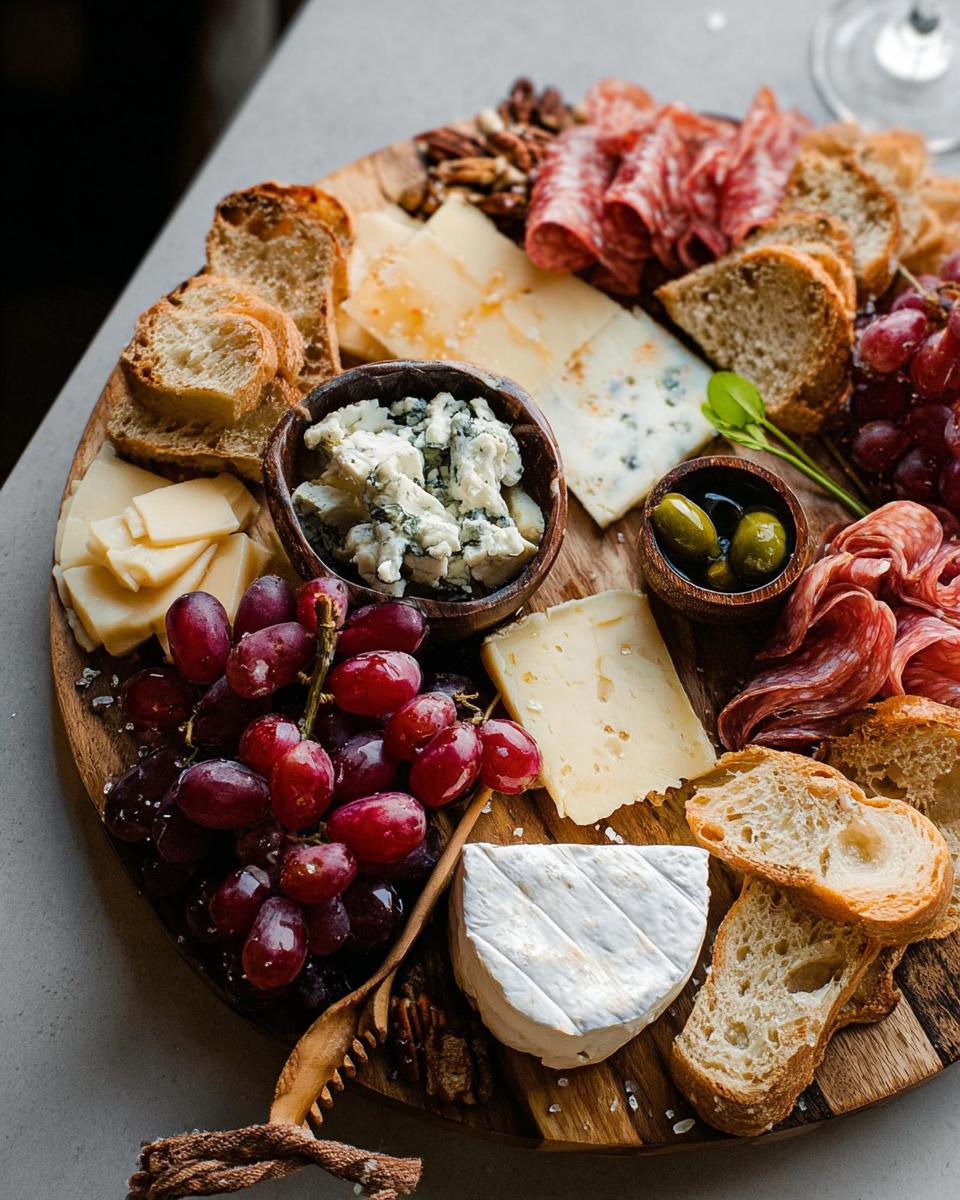
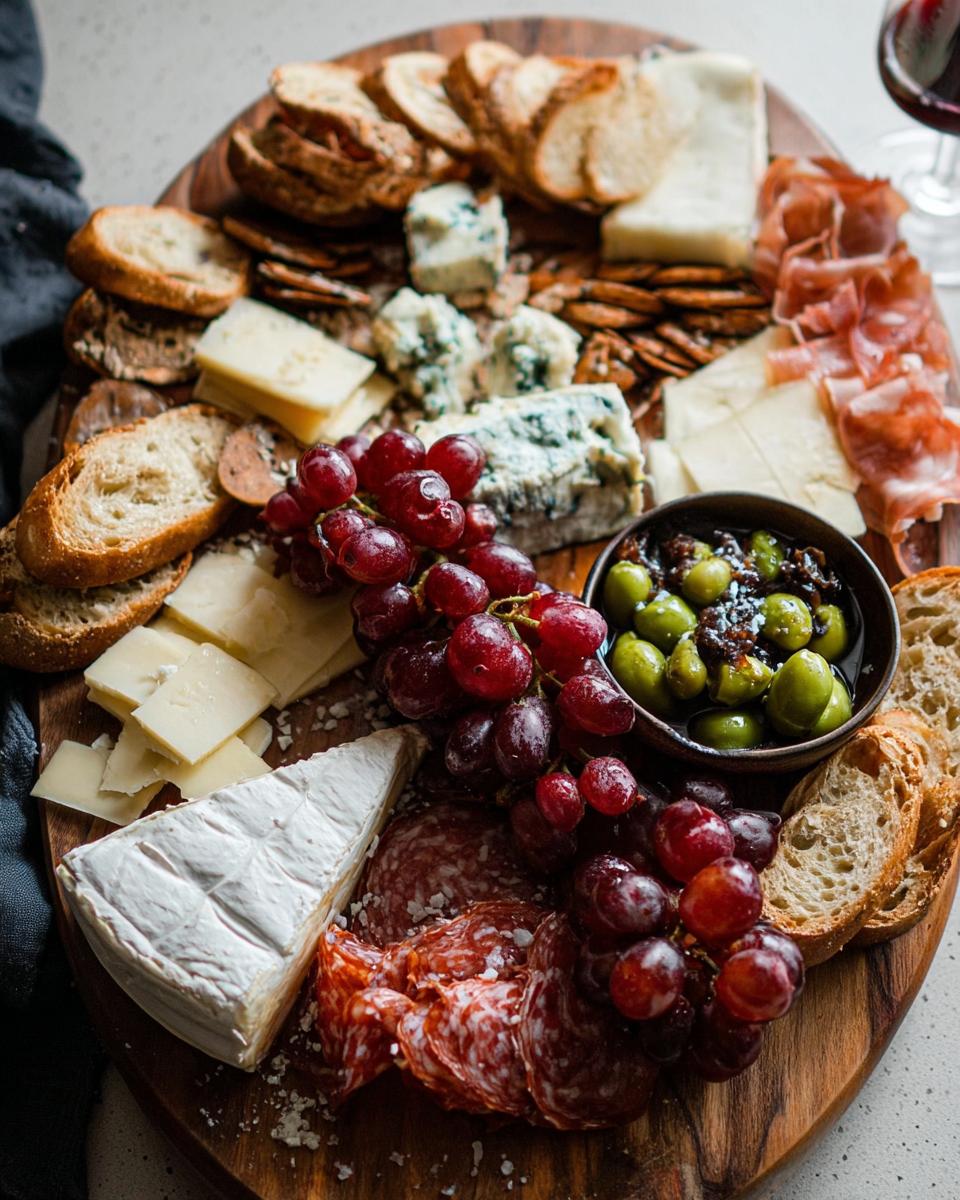
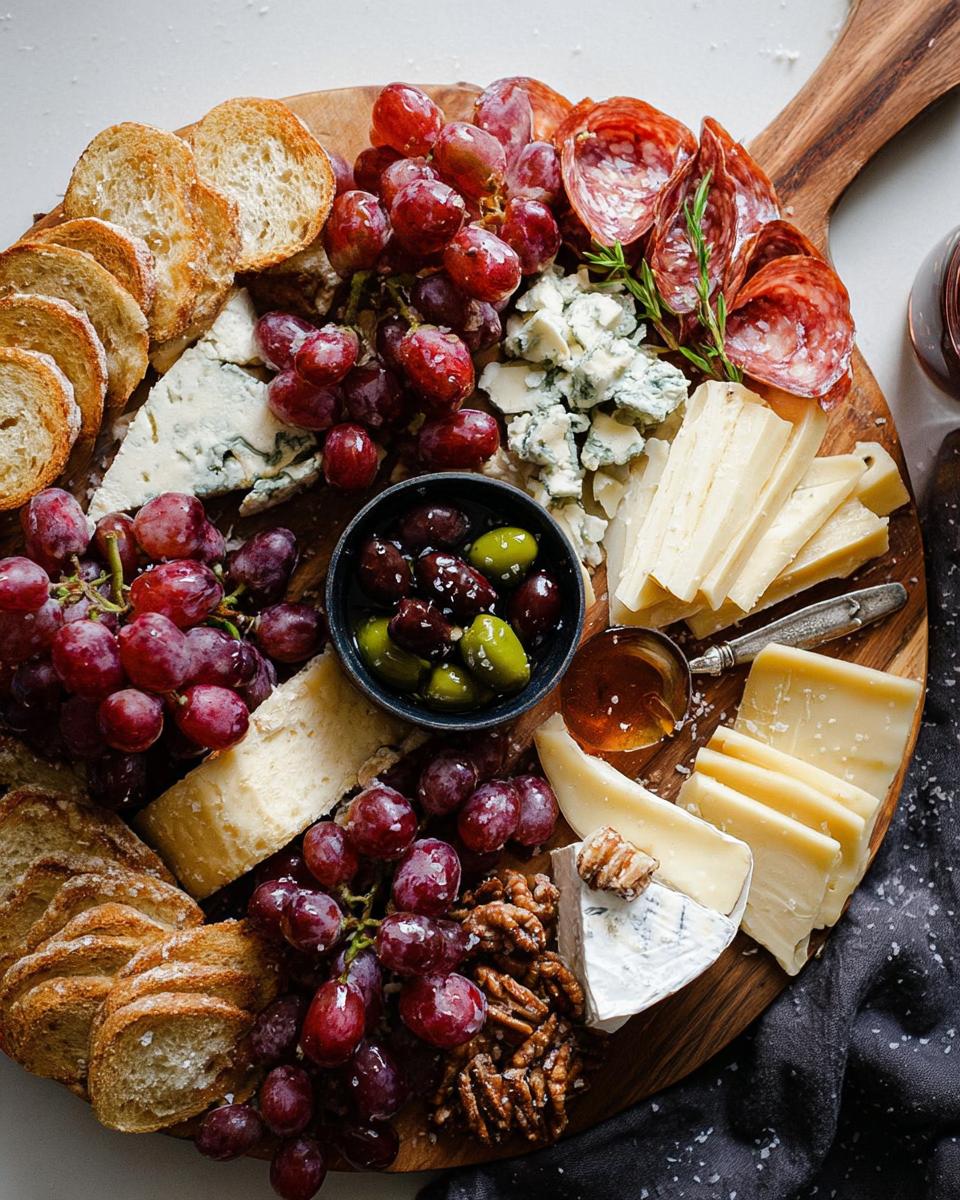
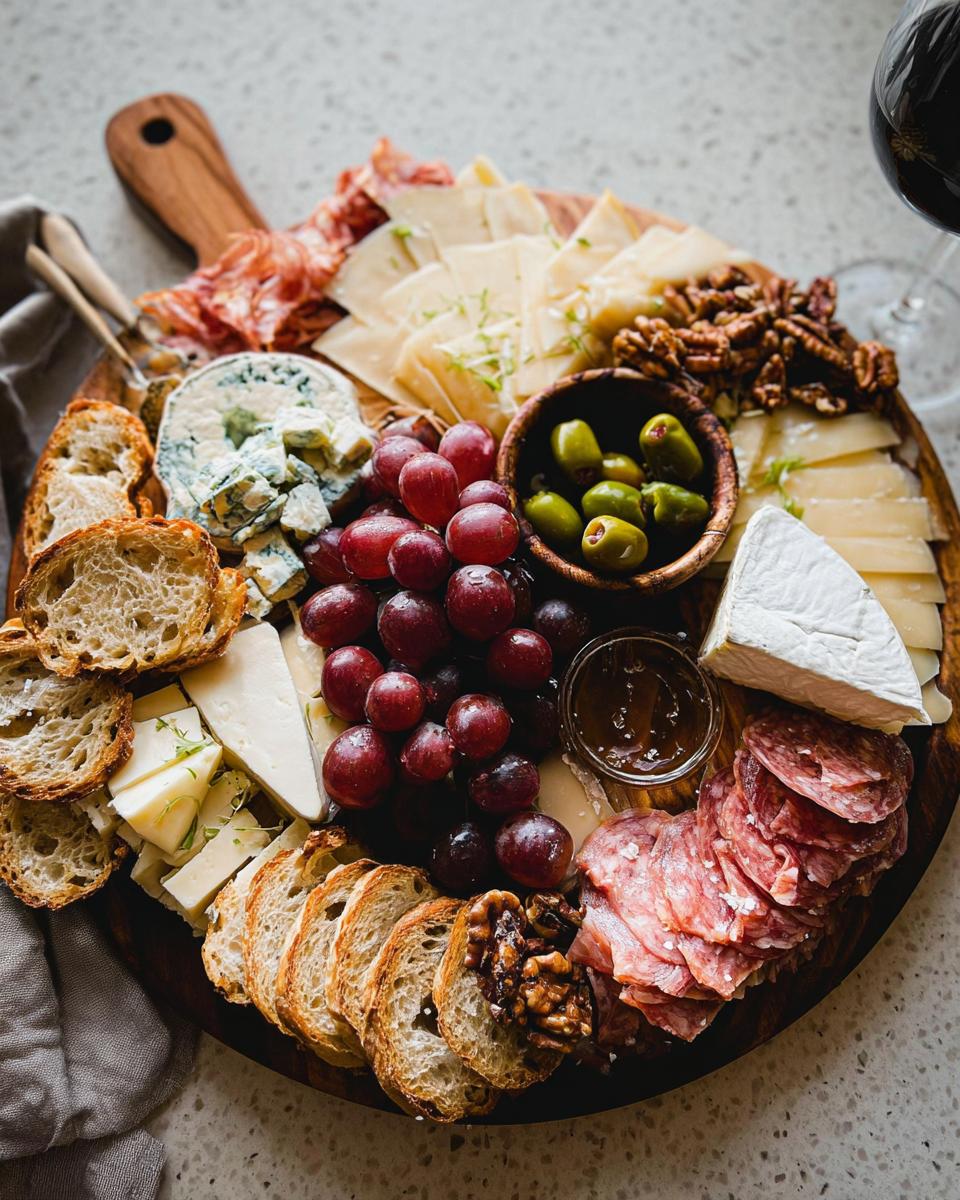
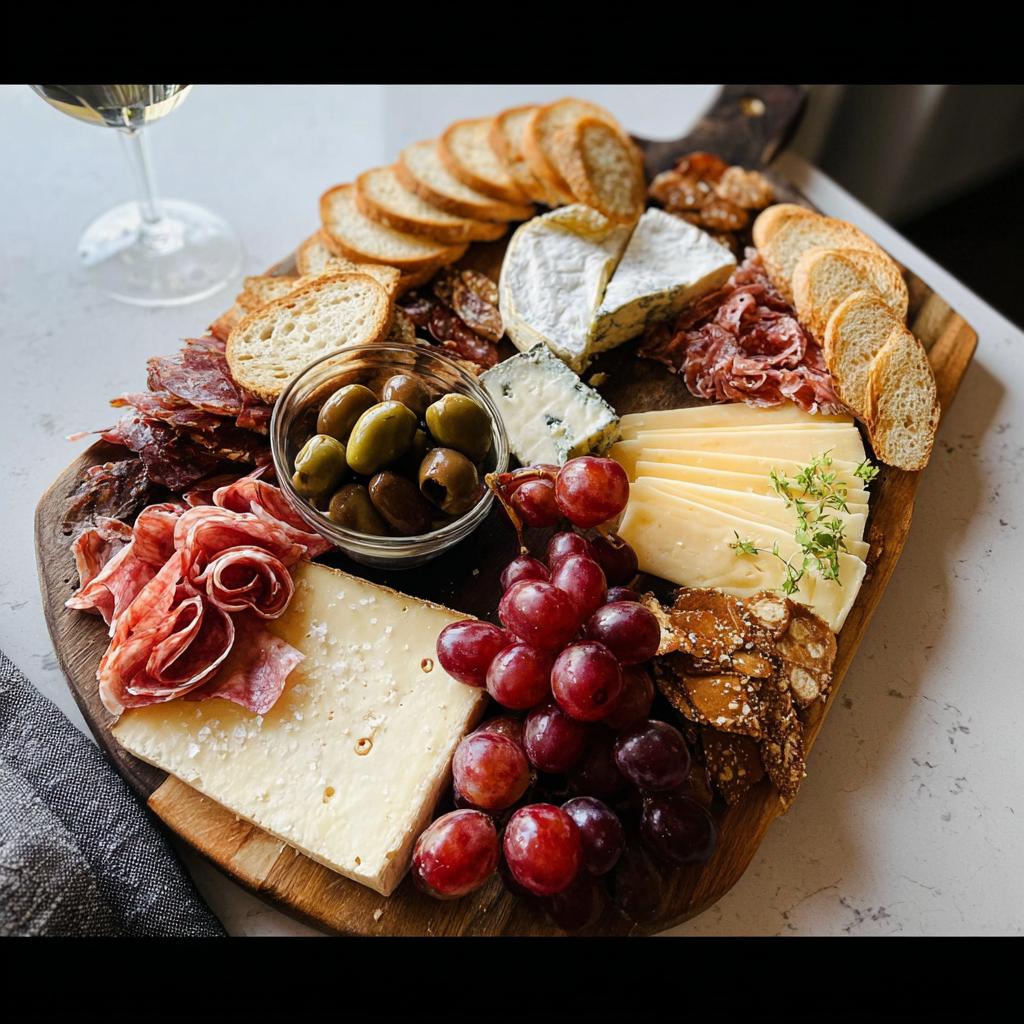
Okay, here’s where we turn a pile of groceries into an artistic statement without any actual cooking! The secret to making this **Cheese Board in 10 Minutes** look intentional and gourmet is focusing on contrasts. We need something hard, something creamy, something salty, and something sweet. Don’t overthink the sourcing too much; just grab what looks good in your fridge right now. If you need some inspiration on how to categorize your amazing finds before you even start slicing, you can check out some of my favorite basic recipe ideas here: my recipe collection has some basics that apply here too!
When you’re assembling fast, having distinct ingredient groups makes the placement so much easier. We are aiming for a mix of textures to keep those nibblers happy—creamy, crunchy, chewy, and sharp. Ready to see what jewels you have hiding inside your fridge?
Selecting Your Cheeses: The Core of the Cheese Board in 10 Minutes
Aim for four to five different cheeses if you can; variety is key! Just make sure to pull them out early so they warm up a bit—that brings out all the amazing flavor. We need a good mix here:
- A pungent one: Some **Blue or Gorgonzola Cheese** lets you add that sharp bite.
- A creamy texture: Don’t skip the **Brie**. Place it whole or cut a wedge out—just be gentle with it!
- Something sharp: I love using **Sharp White Cheddar Cheese**, specifically something aged like the Kerrygold aged cheddar if I have it; it gives great structure.
- A soft, tangy option: Grab some **Goat Cheese**. If you can find that special Bijou aged goat cheese from Vermont Creamery, even better for a foodie flex!
- A hard, salty option: A hunk of **Parmigiano Reggiano** that you can break into craggy little pieces looks so rustic and beautiful.
Adding Crunch: Nuts and Crackers for Quick Assembly
Crackers are your organizational anchors! They take up space and give your guests something substantial to put everything on. Since we are working against the clock, make sure you have your crackers ready to deploy!
- For crunch: A small pile of **Almonds** and some **Walnuts** tucked into empty spaces.
- The starch base: You need your carriers! I always include simple **Water crackers** (like the ones from Carr are perfect because they don’t overpower the cheese) and some pre-made **Toasted baguette slices with salt and pepper**—basically, your crostini, ready to go.
Charcuterie and Sweet/Savory Elements for Your Cheese Board in 10 Minutes
This is where we add color and those salty, savory pops! Think of your meats as artistic folds rather than flat squares. It takes seconds and immediately elevates the whole look.
- Meats: Grab some **Sliced salami**, some **Sliced soppressata**, and if you have time for a dramatic flourish, some thin slices of **Prosciutto**—roll those into little rose shapes!
- The Fillers: Little bowls of **Black & Green olives** are mandatory for that briney hit. A beautiful drizzle of **Honey** is non-negotiable, especially next to the blue cheese!
- Flavor Boosts: A handful of sweet **Red Grapes** adds immediate color contrast. Sprinkle some **Flakey Sea Salt**—Maldon Salt is my favorite—over the cheeses just before serving.
- Garnish: A tiny nest of **Fresh arugula** for garnish, just tucked in around the edges, adds that fresh, green pop we need.
Step-by-Step Instructions for Your Cheese Board in 10 Minutes
Alright, deep breath! This is crunch time, but the good kind of crunch—the one that ends with incredible snacks! Remember, the actual clock starts *after* you’ve done the one non-negotiable prep step. Mastering this **Cheese Board in 10 Minutes** assembly means knowing where everything goes before you even pick up the knife. It’s all about efficient placement, just like setting a beautiful scene!
The Crucial First Step: Preparing the Cheese for the Cheese Board in 10 Minutes
Before you even start the timer, you absolutely must let your cheeses chill out. If you slice into cold, stiff cheese straight from the fridge, you are robbing yourself and your guests of flavor! Flavor molecules don’t wake up until they are slightly warmer.
My rule is 30 minutes to a full hour out of the fridge. This allows the Brie to get soft and spreadable, and the flavor in the Cheddar and Blue to really bloom. This step happens before the 10 minutes start, so consider it mandatory setup time. If you try to skip this, it just won’t taste as amazing, and trust me, you deserve amazing!
Assembly Strategy: Creating Visual Interest in Minutes
Now it’s go time! Grab that large cutting board or platter—remember, bigger is better for that abundant look. We work from big items to small items to maximize speed.
- Anchor the Cheeses: Place your cheeses first. I like to spread them around the board so they aren’t touching. Cut a wedge out of the Brie, crumble the Parmigiano roughly, and place any goat cheese logs strategically.
- Place the Meats: Next, fan out the meats. Instead of laying the salami and soppressata flat, fold them! Just fold the slices in half and stack them slightly—this instantly adds height and texture. Work these around the cheeses.
- Establish the Cracker Rivers: Time for the base carriers. Create ‘rivers’ or flowing lines of your crackers and crostini across the board, guiding the eye from one cheese chunk to the next. Don’t put them all in one giant pile; spacing them out makes the board look fuller.
- Tuck in the Nuts: Quickly dot piles of the almonds and walnuts into the remaining larger gaps between the main groups.
See? We’ve built the structure, all within about seven minutes! This technique keeps the flow logical. If you’re looking for more ideas on structuring your busy weeknights around quick meals, you might find some helpful pacing tips over here on my other site.
Final Touches for an Impressive Cheese Board in 10 Minutes
We’ve got this! The last few minutes are purely for aesthetic sparkle and flavor boosters. This is what separates a pile of snacks from an artistic spread.
- Drizzle that gorgeous **Honey** over the Brie or near the blue cheese—it shines beautifully.
- Scatter your olives and the red grapes loosely around the edges.
- Take that **Flakey Sea Salt** and, using your fingers, just sprinkle a few pinches over the harder cheeses. It looks so professional!
- Tuck small sprigs of fresh **Arugula** around to fill in any *tiny* awkward gaps. A little bit of green goes a long way!
And there you have it! Step back, admire your work, and tell everyone you just whipped up a stunning **Cheese Board in 10 Minutes**. Now, go enjoy! We are done!
Tips for Success When Making a Cheese Board in 10 Minutes
Even when you are moving at lightning speed to build your **Cheese Board in 10 Minutes**, a few aesthetic tricks can make all the difference. As an aesthetic designer, I promise these small adjustments take zero extra time but elevate the visual impact massively. Forget perfection; we are going for organized abundance!
Here are my absolute go-to secrets for making a quick assembly look like it took hours. If you want to see how I keep my kitchen running smoothly in general, check out my tips on foolproof cooking right here!
- Embrace Odd Numbers: Whenever you place a group of ingredients—whether it’s goat cheese rounds, chunks of cheddar, or even olives—try to use groups of three or five. Odd numbers are scientifically more pleasing to the eye than even groupings. It’s a tiny visual trick that makes everything look more curated.
- The Cracker River Flow: Remember I mentioned those ‘rivers’ of crackers? Don’t just stack them neatly in a corner. Angle them slightly so they look like they are flowing from one section to another. This creates movement across the board instead of rigid blocks of food.
- Group Small Items Together: Don’t scatter your almonds and the flaky salt individually all over the board. Instead, group them tightly near a cheese they pair well with. For instance, put the walnuts right next to the Brie. This keeps the look intentional and prevents tiny items from looking like accidental spills.
- Don’t Neglect Negative Space (A Little Bit!): Since you are moving so fast, you might be tempted to cram every inch full. Resist! Leaving just a few small, intentional gaps allows the color of your wooden board to show through. This little bit of breathing room makes the food you *did* place look even better and more deliberately chosen.
Storage and Reheating for Your Cheese Board in 10 Minutes
So, you actually had leftovers from your amazing **Cheese Board in 10 Minutes**? That’s rare, but if it happens, we need to wrap things up quickly so everything stays fresh!
First thing’s first: Reheating is absolutely out of the question for this setup. Cheese boards are meant to be served cool or at room temperature for the best experience—heating them just makes a sticky mess! The real focus here is preservation so you can enjoy the rest tomorrow.
Wrapping Your Cheeses Properly
Soft cheeses like Brie and Goat Cheese are drama queens when it comes to storage. They dry out instantly if left uncovered. Don’t just toss them back into the plastic bag they came in! If you still have the original cheese paper, use that—it lets them breathe a little without drying out. If not, wrap them snugly but gently in plastic wrap, making sure to seal it tight around every edge.
For your hard cheeses, like the Parmigiano Reggiano or Cheddar, wrapping them tightly in plastic wrap is usually fine for a few days in the fridge. If you have leftover wrapping paper from butcher shops or specialty stores, that’s always my preference for hard cheeses!
Handling Meats and Crackers
The charcuterie needs quick attention, too. Salami and soppressata are pretty hardy, but once they’ve been exposed to the air on the platter, they start changing texture fast. Wrap them back up tightly in plastic wrap or foil and get them back into the coldest part of the fridge. Honestly, if the meats have been sitting out for hours at a party, I usually toss them; food safety first, even when you’re trying to save money!
Crackers and nuts? They are easy street. Just scrape any remaining ones into an airtight container or a heavy-duty zip-top bag. Keep them away from humid areas, or they will go soft on you before you get a chance to snack on them later!
Frequently Asked Questions About Quick Cheese Platters
I get so many questions about adapting this whole rapid-fire approach to food presentation. It’s true, we want speed, but we don’t want to sacrifice the fun of **Entertaining Ideas**! Here are some things I hear all the time about putting together a fantastic, yet fast, spread.
How many different cheeses should I use for a Simple Grazing Board?
For a **Simple Grazing Board** that looks abundant but doesn’t require a massive shopping trip, I always suggest aiming for three to five different varieties. The key here isn’t the number, it’s the contrast! You usually want one hard (like Parmesan), one soft/creamy (like Brie), and one with a little “funk” (Hello, Blue cheese!). If you stick to that trio, you cover the flavor bases perfectly, and it looks like you made a serious effort, even if you only grabbed three things!
Can I prep any components of this Cheese Board in 10 Minutes ahead of time?
Absolutely! That’s one of my favorite ways to cheat the timer, and you should totally do it. If you know you’re having people over later, spend five minutes the night before or that morning slicing up your hard cheeses, like that aged Cheddar or Parmigiano. You can even wash and dry your grapes or wash that arugula garnish.
The 10-minute assembly is strictly for the *arranging* part. If your chopping and pre-slicing are already done, those ten minutes become pure, relaxed artistry! It makes the whole process feel leisurely, which is the exact opposite of stressful, last-minute rushing. For more background flavor on my approach to fast food planning, feel free to browse my About Me page!
Understanding the Nutrition of Your Cheese Board in 10 Minutes
Now, look, when we are making a beautiful **Cheese Board in 10 Minutes**, the goal isn’t really counting every calorie; the goal is impressing people quickly! Because we are pulling from such a varied selection—from rich Brie and salty salami to nuts and salty crackers—the actual nutritional breakdown changes constantly based on what you choose and how much you use.
So, I never post exact numbers here, and you shouldn’t stress about them either! It’s a little bit of everything, right? Please consider any nutritional data you might see online as only a rough estimate based on the specific ingredients I listed here. If you swap out Kerrygold for a different cheddar, or swap walnuts for pecans, that number changes!
This guide is all about aesthetic delight and effortless entertaining. If you are planning things out more thoroughly, maybe for a larger social event where you need accurate counts, you might find some ideas over on my contact page that could help you approach meal planning more strategically. But for a quick, fun assembly, let’s just focus on how gorgeous this **Simple Grazing Board** looks!
Share Your Quick Cheese Presentation Masterpiece
That’s it, my friend! You now have all the tools, the secrets, and the confidence to create an absolutely stunning **Cheese Board in 10 Minutes**. Seriously, take a look at what you’ve made. It looks like you spent hours hunting down the finest artisanal goodies, but nope—it was pure, fast artistic arranging on your part!
I would be absolutely tickled pink if you took a snap of your finished **Quick Assembly** the next time you create one. Show me what combinations you came up with! Did you use figs instead of grapes? Did you try folding the salami in a unique way? Post your creation online and tag me so I can see your unique **Fast Cheese Presentation Tips** in action. I can’t wait to see the beautiful, quick spreads you design!
If you found this guide helpful for your last-minute **Entertaining Ideas**, please do me a huge favor and leave a quick star rating right below this post! It helps other busy folks find this trick. And if you have questions or want to share your assembly time—did you beat the 10 minutes?—drop a comment! I try to read every single one. For any major culinary questions or collaborations, you can always reach out directly via my contact page. Happy snacking!
Cheese Board in 10 Minutes
Ingredients
Equipment
Method
- Take cheese out of the fridge and let it come to room temperature for 30 minutes to 1 hour. Cheese should be served at room temperature.
- Assemble all ingredients on a large cutting board or platter.
- Enjoy!
Nutrition
Notes
Tried this recipe?
Let us know how it was!
Visual Culinary Artist & Aesthetic Designer
When the pandemic killed my career as a luxury hotel photographer overnight, I was stuck in my studio apartment with nothing but time and vegetables. That’s when I started treating meal prep like photography projects—and discovered that the same principles that made five-star dishes camera-ready could turn humble zucchini noodles into social media gold.
My fine arts degree from Parsons taught me that people eat with their eyes first. After years behind the lens capturing haute cuisine, I realized that successful dieting often depends more on visual satisfaction than pure nutrition. When your food looks amazing, you actually want to stick with your eating plan.
My recipe development feels more like an art studio than a test kitchen. I use color theory to guide ingredient selections—purple cabbage with golden cauliflower, emerald herbs against ivory cheese. My “Edible Landscapes” series transforms standard low-carb ingredients into miniature scenic compositions that make vegetables feel aspirational rather than obligatory.
I spend evenings exploring art galleries and practicing watercolor painting, always looking for inspiration. My philosophy is simple: make low-carb food visually irresistible, and dietary compliance becomes an aesthetic choice rather than a health sacrifice.